Miasma
10+ Year Contributor
- 434
- 35
- Aug 22, 2012
-
Fort McMurray,
AB, Canada
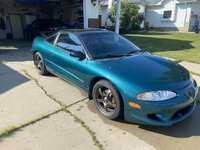
This is the Build Thread for 1998 Eagle Talon TSI AWD. Reply below.
Follow along with the video below to see how to install our site as a web app on your home screen.
Note: This feature may not be available in some browsers.
For 1990-1999 Mitsubishi Eclipse, Eagle Talon, Plymouth Laser, and Galant VR-4 Owners. This is where the DSM platform history is documented and archived. Log in to help us in our mission, and to remove most ads from the browsing experience.

This site may earn a commission from merchant affiliate links, including eBay, Amazon, and others.
 Tuner Torque TV – 1998 Talon Build CA DSM Forum Thread 2GB Talon VIN Spreadsheet VIN Analytics (Form 1) VIN Submission Form
 ).
).


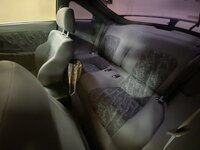
The finish is great. Fitment took a lot of work. The carpets come oversized with extra material like the image below. To install, you have to trim the center console material. I let the carpet rest outside of the box for 24hrs and then used my factory carpet as a template to cut the rough shape needed for it to fit inside the car, then finished the remaining trimming for it to have a proper fit. I also transferred the plastic clips that held the edges of my factory carpet to the sides under the door sills, using 1/8" rivets. This ensured the carpet didn't pull loose under the door sills.Looks good. How do you like the fit and finish of the carpet?


That's a pretty extensive parts list. Nice update.March 2026 Update – Parts Arrival, Interior Refinement & Exhaust Progress
This past month has been a slower one, mostly spent waiting on parts to arrive—but that didn’t stop me from making a bit of progress where I could.
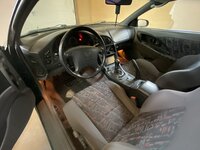
Interior Refinement – LED Conversion
While the car was sitting, I took some time to refine the interior lighting by converting everything over to 6000K LED bulbs. It’s a small change, but it really modernizes the cabin and improves overall visibility at night.
Here’s the full breakdown:
• Glovebox & footwells – 6000K 194 LED bulbs
• Vanity mirrors – 6000K 29mm LED bulbs
• Dome lights – 6000K 31mm festoon LED bulbs
• Hatch/cargo light – 6000K 28mm festoon LED bulb
The difference is immediately noticeable—much cleaner light output compared to the factory incandescent bulbs, and it complements the rest of the interior upgrades nicely.
Parts Orders – Lining Up the Next Phase
Back in late February, I placed a couple of large orders to support the next stage of the build. The goal here is to continue building out the supporting systems so the car is ready for more power and improved reliability.
Fuel System:
• Walbro 450lph E85-compatible fuel pump
• 30A fuel pump rewire relay harness
• Radium Engineering fuel rail
• Radium Engineering direct-mount fuel pulse damper
• Radium Engineering direct-mount mechanical fuel pressure gauge
• Radium Engineering direct-mount fuel pressure regulator
• Performance World 8AN ORB 10-micron inline fuel filter
• Fuel filter bracket
• 8AN male to M14x1.5 bubble flare fitting
• 10 ft of 8AN PTFE line (supply) with fittings
• 10 ft of 6AN PTFE line (return) with fittings
• All remaining AN fittings for a complete setup
Cooling System:
• Mishimoto dual-core radiator
• Performance World 7712B slim puller fans (x2, 1450 CFM each)
• 30A relay harness for radiator fans
• Blue Samco silicone radiator hoses (upper & lower)
• New radiator hose clamps
Exhaust:
• FP Race manifold (ceramic coated & ported)
• OEM Mitsubishi exhaust manifold gasket
• OEM Mitsubishi turbo housing gasket
• Evo 8 exhaust manifold hardware kit
• ExtremePSI heat shield for FP manifold
Gauges:
• AEM X-Series UEGO wideband
• AEM X-Series boost gauge
• AEM X-Series oil pressure gauge
• AEM X-Series oil temperature gauge
• AEM X-Series remote fuel pressure gauge
Drivetrain:
• TRE Stage 1.5 AWD 5-speed transmission (used)
Other:
• Custom valve cover from Rix Racing, powder coated in Prismatic Powders Intense Blue (PPB-4474) with dual 10AN bungs for catch cans
• Dual Radium Engineering catch cans with 10AN lines/fittings
• Boosted Fabrications 2G front strut bar (OEM intake fitment), powder coated to match the valve cover
• Triple gauge AC vent pod from OS Gauge Pods (custom)
• Carbon fiber 2G DSM gas tank / trunk release trim piece
• Carbon fiber Gauge Cluster Speed Ring with Dual Gauge Pods
Dress-Up:
• JMF radiator brackets – bare aluminum
• JMF clutch fluid reservoir cap – bare aluminum
• JMF brake fluid reservoir cap – bare aluminum
• JMF engine oil cap - bare aluminum
• DCP clutch reservoir bracket – bare aluminum
• DCP brake reservoir bracket – bare aluminum
Exhaust Work – FP Race Manifold Install
Once parts started arriving, I was able to get some time in the garage to install the FP Race manifold along with the ExtremePSI heat shield and I was definitely happy to get rid of the factory 2G manifold — especially the excessive RTV that had been used on the gasket previously. Everything cleaned up well, and the new manifold fitment was straightforward.
However, while everything was apart, I came across an issue that explains a lot. After pulling things apart, I found that my TD05H 14B turbine housing is cracked and the crack appears to run through the wastegate flapper area allowing exhaust gases to bypass the turbine wheel. This is a common failure point on these turbos, but it effectively reduces the energy driving the turbo, which explains the laggy spool characteristics I’ve been noticing. Not ideal, but also not the end of the world since a turbo upgrade is already part of the long-term plan.
For the manifold install, I opted to use Evo 8 exhaust manifold hardware instead of the factory 2G hardware. The Evo hardware uses nuts with small serrations/teeth that improve grip and help resist loosening over time after heat cycles. It’s a small upgrade, but one that should improve long-term reliability.
____________________________________________________________________________________________________________________________________________________________________________________________________________________________________________________________________________________________________________________________________________________________________
Up Next
Next on the list is installing the Mishimoto radiator along with the dual slim fans that I'll be wiring through a dedicated 30A relay harness to keep electrical load off the factory circuits and avoid blowing fuses.
With all the major supporting mods now on hand, things should start moving a lot quicker heading into the next update.
Stay tuned for more.
View attachment 787479View attachment 787480View attachment 787483View attachment 787484View attachment 787485View attachment 787486View attachment 787478View attachment 787487View attachment 787482View attachment 787488View attachment 787481View attachment 787489View attachment 787490View attachment 787491View attachment 787492View attachment 787493View attachment 787494View attachment 787495
Thanks, Chris.That's a pretty extensive parts list. Nice update.
Missed this recommendation, but ordered my clutch on Wednesday and just received it on Friday. Express shipping from TMZ in the US to my place in Canada was super quick. Now just waiting on my transmission to arrive before I begin the swap.That's a great clutch, one minor change I'd do is do the full ceramic b-series disk. Mine held 430awhp and like 490awtq with no issues. You could slip it like the OEM clutch, and never have to worry about it "glazing" and having to re-bed the material.


Thank you. It's nearly gone now. Should be able to take the car for a short drive next set of days off.Lookin' good Aaron. Sorry to hear about the snow you're dealing with, seems weather is bad in a lot of places still.

