The Top DSM Community on the Web

For 1990-1999 Mitsubishi Eclipse, Eagle Talon, Plymouth Laser, and Galant VR-4 Owners. Log in to remove most ads.

Please Support STM Tuned
Please Support Rix Racing

Thunderchild: 92 eagle talon street machine build

This site may earn a commission from merchant
affiliate links, including eBay, Amazon, and others.

This site may earn a commission from merchant affiliate links, including eBay, Amazon, and others.

thanks yama

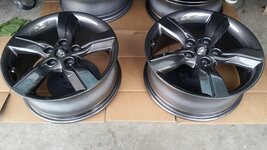
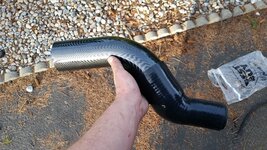
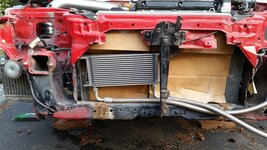
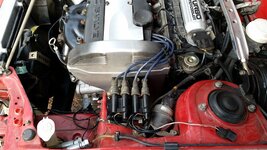
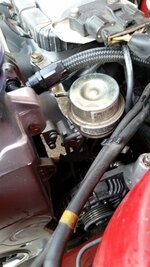
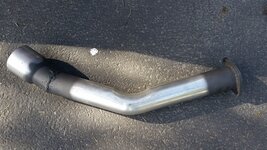
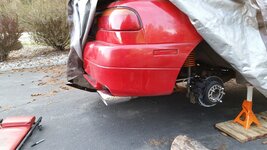
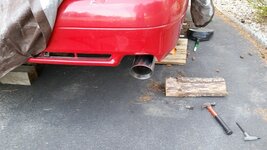
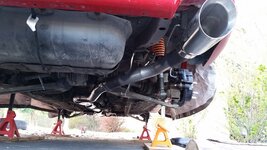
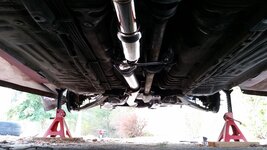
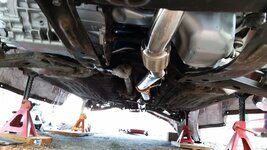
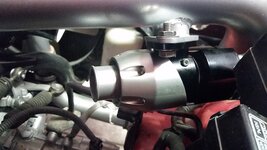
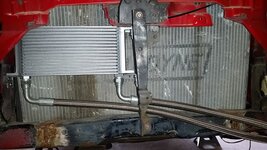
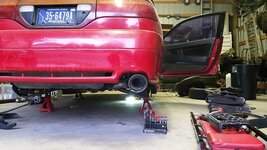
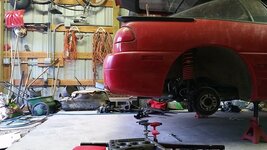
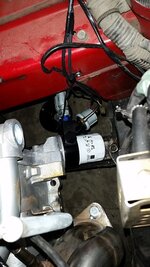
got a bit more done, altered my intake manifold support to work with the cyclone, cleaned up the wiring for the relocation and extended the alternator wiring, installed the turbo/o2/dp, all water and oil lines, intercooler and piping, fuel lab AFPR installed, rerouted my cruise crontrol lines behind the intake manfold, got all my new water/rad/heater lines cut to fit.

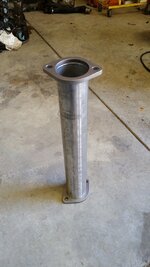
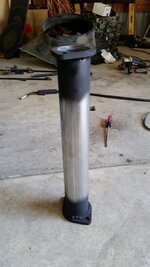
one thing i was kinda bummed about, my ebay j-pipe kit is about 2 inches too short to meet up to my dejon intercooler :( im gonna see if i can weld an extension in there.

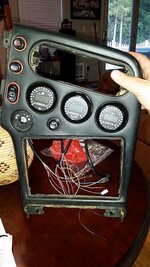
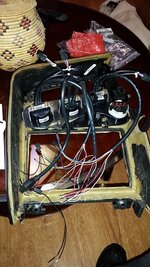
probably some other stuff im forgetting, but oh well, more pics!
 

Attachments

  • ResizedImage_1407811740970[1].jpg
    ResizedImage_1407811740970[1].jpg
    68.2 KB · Views: 127
  • ResizedImage_1407811740112[1].jpg
    ResizedImage_1407811740112[1].jpg
    70.1 KB · Views: 130
  • ResizedImage_1407811740523[1].jpg
    ResizedImage_1407811740523[1].jpg
    71.2 KB · Views: 127
  • ResizedImage_1407811738583[1].jpg
    ResizedImage_1407811738583[1].jpg
    84.9 KB · Views: 182
  • ResizedImage_1407811739641[1].jpg
    ResizedImage_1407811739641[1].jpg
    68.4 KB · Views: 136
  • ResizedImage_1407811739061[1].jpg
    ResizedImage_1407811739061[1].jpg
    72.2 KB · Views: 147
  • ResizedImage_1407811741347[1].jpg
    ResizedImage_1407811741347[1].jpg
    67.5 KB · Views: 132
  • ResizedImage_1407811741774[1].jpg
    ResizedImage_1407811741774[1].jpg
    65.6 KB · Views: 139
  • ResizedImage_1407811737882[1].jpg
    ResizedImage_1407811737882[1].jpg
    68.5 KB · Views: 126
was able to weld an extension in for my lower intercooler pipe, it was ugly so i spent alot of time grinding :idontknow:

finished up the wiring under the hood, ended up running 5 braided grounds (grounded the alternator directly too the chassis w/ one) as well as the main starter ground.

did some cleaning up and reassembling the interior (I.E.- literally throw interior pieces into the car) and past that...got it on wheels and hauled it home!

my class is over tomorrow so i am finishing the car back at my shop, hoping to fire it up within the next couple weeks/maybe a month!

couple pics, ill get one of the car as it sits tomorrow, enjoy!
 

Attachments

  • ResizedImage_1408079853315[1].jpg
    ResizedImage_1408079853315[1].jpg
    88.3 KB · Views: 105
  • ResizedImage_1408079854491[1].jpg
    ResizedImage_1408079854491[1].jpg
    69.1 KB · Views: 113
  • ResizedImage_1408079854008[1].jpg
    ResizedImage_1408079854008[1].jpg
    62.5 KB · Views: 121
small update, getting closer to firing it up! got some small things taken care of.

had to redo the tb bolts, just transfered them all to studs from another manifold. got my alternator plug extended and cleaned up the oil pressure switch and sensor wiring. mounted my PTU on the DS of the manifold where the harness guide bolts too. plan on redoing that for a cleaner install later, but itll work for now.

still need to relocate my AFPR cuz it hits the hood where its at now, so i either trim the hood stucture or move the afpr somewhere else. also need to figure out where to mount my coil packs, and im thinking off the DS motor mount with a custom bracket.

ive also contemplated doing the ghetto COP wire up since i have them, but id prefer to do it with a proper Ignition amplifier. does anyone know of a cheaper amplifier than sparktec or hks etc? been toying with the idea of getting a ford EDIS4 module and setting up that system with a modified CAS or a kiggly crank trigger, but that would be a while due to cost/time.

i also want to make a new intake pipe to replace the stock accordion intake pipe, but once again, time and money.

another thing that kinda irritates me, is my new rear calipers have a slightly different mount boss for the ebrake cable, so i couldnt hook them up. coinciding with that, my tenzo seats are too wide too keep the stock center console and ebrake anyway, so i may do a fiberglass center console with relocated (centered) ebrake handle.

some pics of the engine bay currently

the other pics are of my daily: 92 mazda mx3, 2.5klde swap, klg4 intake, custom intake (waiting on parts), probe headers, 2.25" exhaust w/ flowmaster 40 series, dual catch cans, chebay coilovers and some rehashed 17s with nankang 205 40 17s.

built this over the last couple years for my buddy, then bought it from him after he got bored with it. need to swap the trans out (6 spd sentra SER trans going in its place). its a boat load of fun to drive, dynoed it at 168whp and 160wtq during my dyno class (mustang dyno) before the IM, intake and wheels. hoping to get a lil farther up with the add ons.

ill keep updating as i can![DOUBLEPOST=1410580442][/DOUBLEPOST]pics of the engine bay as it sits
20140912_195815.jpg


and some of my daily driver: 92 mazda mx3

2.5 klde swap, klg4 IM, custom intake (waiting on parts), dual catch cans, probe headers, 2.25" exhaust with flowmaster 40 muffler, chebay lotek coilovers and struts, emr panther 429 17"s with nankang ns20 205 40 17.

dynoed 168 whp and 160 wtq before the IM, intake and wheels/tires, hoping for a bit of an improvement now, need to swap to a bigger throttle body at some point.
20140912_195936.jpg
20140912_195912.jpg
20140912_195922.jpg

20140912_195800.jpg
 
Last edited:
they are still being worked on, but not alot. they basically bolt in, but the upper mount requires trimming the b pillar plastics or a longer bolt with a spacer to get out past the plastic.
 
more slow updates!

no i havent given up, i just dont get alot of time to work on it, and have been watching her sit on stands in the driveway, as my buddies truck needed the heads removed to pull some frozen studs out so it was taking up the whole shop.

basically ive ordered a bunch more parts, finished a few small things and am hoping to have her running in a few weeks

i picked up a hood strut kit, fluidampr, srs catback 3" a few other small pieces. i also refinished my hyundai wheels, just stripped, primed and painted with a graphite metalic, the came out nice i think. the clear came out super smooth. new tires are waiting for those as soon as i can get them mounted. i also got an oil cooler and a thermostatically controlled sandwich adapter (need to get this drilled/tapped for my oil pressure and temp sensors), as well as some parts to put together an intake (no more stinking rubber accordion for me).

today i got the exhaust mocked up and removed the fart can muffler. i ended up making my own cat delete pipe and new rear muffler/tip pipe. the welds arent pretty, but they penetrated well and arent gonna be breaking anytime soon. i also mocked up my t25 actuator for the cyclone manifold (it needs some reinforcing) so im hoping to finish that in the next week or so. lastly i mounted my coil pack, and started looking at what is needed to move my heater controls so i can mount my gauges.

after that stuff and some wiring, cleaning, modifying and double/triple checking things im hoping to fire her up! then an alignment and do the break in on everyting.

heres some pics for all those who still check this out
 

Attachments

  • 20150405_155700.jpg
    20150405_155700.jpg
    71.2 KB · Views: 112
  • 20150407_175253.jpg
    20150407_175253.jpg
    114.4 KB · Views: 106
  • 20150407_175149.jpg
    20150407_175149.jpg
    99.2 KB · Views: 104
  • 20150407_175202.jpg
    20150407_175202.jpg
    90.8 KB · Views: 104
  • 20150407_175213.jpg
    20150407_175213.jpg
    75.3 KB · Views: 105
  • 20150407_122557.jpg
    20150407_122557.jpg
    62.5 KB · Views: 115
  • 20150407_140119.jpg
    20150407_140119.jpg
    59.8 KB · Views: 121
  • 20150407_162252.jpg
    20150407_162252.jpg
    99.6 KB · Views: 103
  • 20150407_175023.jpg
    20150407_175023.jpg
    76.1 KB · Views: 104
  • 20150407_175056.jpg
    20150407_175056.jpg
    74.1 KB · Views: 103
  • 20150407_175114.jpg
    20150407_175114.jpg
    78.1 KB · Views: 118
  • 20150407_175127 (1).jpg
    20150407_175127 (1).jpg
    68.7 KB · Views: 106
  • 20150407_175224.jpg
    20150407_175224.jpg
    71.7 KB · Views: 99
one more post to the never ending build thread

trying to wrap up all the loose ends with this thing.
got my gauges mounted up and some of the wiring done. oil cooler mounted. exhaust finished and bolted up. synapse bov mounted. hardpipe intake mocked up.

ive picked up some other parts and pieces as extras and future add ons as well, but time is a premium when working two jobs and house work is on the table.

heres some pics, ill try to keep up on the progress reports.
 

Attachments

  • 20150915_135712.jpg
    20150915_135712.jpg
    29.4 KB · Views: 78
  • 20150915_135637.jpg
    20150915_135637.jpg
    35 KB · Views: 87
  • 20150915_153700.jpg
    20150915_153700.jpg
    59 KB · Views: 93
  • 20150915_182115.jpg
    20150915_182115.jpg
    46.4 KB · Views: 89
  • 20150915_182136.jpg
    20150915_182136.jpg
    48.3 KB · Views: 86
  • 20150916_174632.jpg
    20150916_174632.jpg
    49 KB · Views: 91
  • 20150916_174144.jpg
    20150916_174144.jpg
    62.5 KB · Views: 100
  • 20150918_190834.jpg
    20150918_190834.jpg
    38.2 KB · Views: 83
  • 20150918_190926.jpg
    20150918_190926.jpg
    43.6 KB · Views: 89
dont get much time to work on this thing, work is crazy, but thats what i get for being #1.

got alot of the ancillary wiring done, relays for gauges, repaired some of the ign harness and stereo harness, fuel pump rewire, finished the battery wiring etc.

finished my hard pipe intake and got my catch cans finished, just need to hook them up. plan on running all the vacuum lines soon. putting the finishing touches on my t25 actuator for the cyclone as well, just have to drill some holes and tighten it down.

as some christmas presents to myself, i ordered a hallman pro MBC with the in-cab knob, and a new 1g lower timing belt cover.
as i hacked up my stock one trying to get it to fit with the fluidampr and the belt running on the inner ribs.
i believe im going to switch the belt to the outer pulleys, as the clearance to the oil pump shaft bolt is...very small. millimeters to be exact. also, the jaysracing relocation kit is at max extension with a 40" belt (they supply a 42" for the normal pulley), so it will just make things easier to move it out farther.

got pics figured out, its just a bit more time consuming than it used to be.

20151201_214531.jpg

my ugly Alumawelded hard intake pipe. nasty looking, but strong.
20151202_220522.jpg

installed with bov hooked up. wish i had a hard pipe for the bov but that can come later.
20151202_220558.jpg

a view from the backside.
20151223_163206.jpg

breather tube on VC drilled and tapped to 3/8" npt. used shaving cream/gel to fill the hole and catch shavings, rinsed out with water. voila.
20151223_163616.jpg

3/8" vs stock fitting.
20151223_163645.jpg

hyundai VC's apparently do ok with small, 90* vent fittings.
20151225_181516.jpg

got two of these pretty nice (imo) 3 piece cans for 35 shipped. they were open inside, so i made some baffles and put a stainless scrubby in for a filter.
20151225_181540.jpg

pic of the baffle i made (x2) to support the filter element.
20151225_181629.jpg

inside. the baffles took about 1 hr to make due to all the small cuts for lips/ledges inside, but they fit tight, even up against the caps.
20151225_181703.jpg

and a nice stainless filter, courtesy Walgreens on christmas day, 7:30pm. haha.
20160105_180534.jpg

mounted up. the front mount has a gusset and is actually quite strong. some day i will improve the mounting so its cleaner and stronger.
20160105_180548.jpg

lines to the VC, nothing too special. i may swap the PCV valve to the side in the future to get rid of the sharp bends.
20160105_180559.jpg

same thing here, the line takes and immediate 90* turn under the TPS and wire harness. eventually id like to do a wire tuck and clean all that up.
20160105_184138.jpg

couple all-thread couplers and a touch of welding, and we have a secure, strong and adjustable actuator arm for the cyclone.
20160105_184217.jpg

when i moved the belt out, the larger pulley made the belt hit the motor mount. i may attempt to move it back in later, as the alt pulley is mere MM from the frame. ive already cut up one $130 cover and my stock on, so if i buy another, ill make sure i only have to do minimal mods to make it work.
20160112_173717.jpg

this was my temporary solution. whipped out the die grinder, shaved the mount down about 3/16" of an inch. clears good.


look for more updates soon! im finishing up vacuum lines and trying to get the damn heater controls mounted. then im hoping to heat the shop a bit, add fluids, and get it fired up. god, didnt i say this 2 years ago?
 
Last edited:
update: she runs! pretty damn well too.

had one small leak from the thermostat housing nipple, and first start up showed the most infantismal amount of oil from the valve cover. it was only ~15* out on first start, and oil pressure was about 95 for the first 30 sec. once warm, it settles to about 20-25 at idle. changed the oil after a couple fan cycles, looks pretty good aside from the shizloads of assembly lube.

got timing, idle, BISS etc set, replaced all the coolant temp sensors and switches, new stock o2 sensor. having a slightly lean idle around 15.8-16.1 afr, but i might have an exhaust leak at the o2-DP seal. cant feel it but the gaskets i got orignally werent the greatest, so i have vibrant fire-ringed gaskets on the way.

rewired a new oem stereo harness in the car, that was a bi***. routed the wiring for the gauges and got the hvac controls relocated. they arent centered and ill probably redo them later, but they function and look good enough for me atm. i still have to do some painting, but the hard part is over.

i still need to put the front end back together (if i remember how) and get the interior back in the car, break the motor and clutch in, make sure its all good, then continue with the small things. speakers and a stereo will be next. dying seat covers, redoing headliner and visors, new carpet etc. will probably make a small sub setup since i dont plan on putting the back seats back in.

going to start on the evo8 ecu patch harness tomorrow probably, have an evo8-1g maf adapter on the way, then once shes all broke in, ill start tuning.

only pics i have are of the finished engine bay and hvac relocation finished product. if i could get a vid up here (i dont have a hosting site as of now) i would. but that can come later. enjoy!

20160216_153031.jpg

theyre a little to the left. theres a plate that mounts them to the center console, then the radio bezel is about 1/2" in front of that. will make mods or removal easy if need be.
20160216_153022.jpg

pull back shot with gauges
20160216_171338.jpg

with the single din slot cut in.
20160127_215352.jpg

and the dirty/clean engine bay.

more updates to come soon!
 
got some more done today, hoping to have the rest of the interior and front end put on tomorrow (if i can remember how!) got the battery relocation finished aside from an alt/fuel cut (still figuring how im going to do that) seat belt relocation finished (i burnt stuff! :cry::cry:), center console in, underdash wiring and and plastics back in, and stereo wiring finished for now. if i can get the rest of the front end and ancillary stuff assembled, i hope to take it for the break-in drive tomorrow.

a few pics for posterity's sake
20160301_123821.jpg

cut the support piece
20160301_123833.jpg

unbolt and remove support
20160301_134324.jpg

drill bolt hole larger to approx 3/8 or 11-12mm to fit rod through. now granted, i will have to remove my license plate and install the actuation rod while at the track, which doesnt worry me.
20160301_134343.jpg

i bolted my Flaming River Big Disconnect kit to my center support on the rear
20160301_134402.jpg

in the on position
20160301_134412.jpg

in the off position
20160301_143118.jpg

and the whole setup with new 150A circuit breaker and FP rewire relay.
20160301_212343.jpg

its not a great pic and my phone took a shit before i could take the other pics, but this is the sum of the 2g seatbelt swap.
youd need to weld a small plate above the original motor hole, so you can bolt the bracket to it for support. a spacer is needed behind the upper B-pillar plastic with various washers/spacers for mobility and proper function of the upper pivot. past that, bolt to the lower location behind the original lap-belt bolt location.

if i get it on the road tomorrow ill update then!:hellyeah:
 
Last edited:
small pictureless update. runs awesome! i have been driving the car for the past couple weeks, did the break in oil changes and am now on my 1500 mile change, running rotella 10w40 and one bottle of amsoil zddp additive. seeing idle pressures around 18-20psi and 5500-6k is around 75-80psi, thermostatic oil cooler is working good holding temps to right at 180-185*F when warmed up. seeing 17-18in/hg at idle with pretty much perfect 14.6-14.9 afr at idle.

had a couple oil leaks to fix behind the front cover, just didnt have some bolts with sealant installed. also had a couple exhaust leaks, the gaskets i used initially were garbage and almost instantly failed, causing my lean idle condition. swapped them out for some single layer steel and oem gaskets, no more problems. one other issue i had is my down pipe hits the t-case by about a 1/2", but its right at the flex sections, so until i can alter or swap it, it will have to do. also my t-case needs the updated yoke as its leaking a touch.

first 300 miles or so i left the boost on wastegate pressure ~10 lbs, pretty boring but safe since my cyclone doesnt open until 10psi. spools quick tho!
after the most recent oil change, i installed the hbc with in-cab controller in my a/c switch position (love it) and slowly started turning boost up. since i dont have a tuning solution ive been consulting with my buddy who is pretty proficient at tuning with link (i know theory but less actual practice with boosted cars) and he advised me to turn up till i hit fuel cut or the afrs got too low. i was leary about this, but i crept it up till 17psi and still am not seeing more than 10.8afr under load. yesterday i did turn it up incrementally waiting for fuel cut till 20psi, it kept the same afrs and pulled great, but i didnt feel comfortable leaving it there, especially with the motor so fresh and no logging information right now, so i turned it back down to 17lbs. it runs awesome, but i want to do it right and not pop this motor after such a long drawn out build, so link is next up on the purchase list.

passed that its been running great, initial compression test was dead on at 140 across the board, then after i did the most recent oil change i did a second, sitting at 165 psi across the board. pretty happy with it! only running issue is the FIAV causes surging at cold idle, ive got a few extra tb's so im going to try and get a valve to adjust if i can and swap it in, trying to get it to work as its supposed to, as i dont want to delete it unless theres no other option.

stay tuned for more updates! ill post pics soon hopefully.
 
Support Vendors who Support the DSM Community
Boosted Fabrication ECM Tuning ExtremePSI Fuel Injector Clinic Innovation Products Jacks Transmissions JNZ Tuning Kiggly Racing Morrison Fabrications MyMitsubishiStore.com RixRacing RockAuto RTM Racing STM Tuned

Latest posts

Build Thread Updates

Vendor Updates

Latest Classifieds

Back
Top