The Top DSM Community on the Web

For 1990-1999 Mitsubishi Eclipse, Eagle Talon, Plymouth Laser, and Galant VR-4 Owners. Log in to remove most ads.

Please Support Morrison Fabrications
Please Support Morrison Fabrication

Oldman could you "grade" my porting?

This site may earn a commission from merchant
affiliate links, including eBay, Amazon, and others.

This site may earn a commission from merchant affiliate links, including eBay, Amazon, and others.

kmoore

15+ Year Contributor
1,241
13
Mar 8, 2006
St, Louis, Missouri
Hey guys, I just got my Evo III16g turbo and I started doing my port work. Everything is gasket matched. Nothing is "cleaned" up because I want to see what Oldman thinks of everything first. I will polish everything up to a mirror shine wants Oldman approves. Oldman, I read your posts and how you graded someone's porting, so if you could, do the same for me, that would be great!

Onto the pictures:
First the Exhaust Manifold (gasket matched to a 7cm gasket):

You must be logged in to view this image or video.


You must be logged in to view this image or video.


You must be logged in to view this image or video.


O2 housing (haven't done the turbo side of the housing yet):

You must be logged in to view this image or video.


You must be logged in to view this image or video.


You must be logged in to view this image or video.


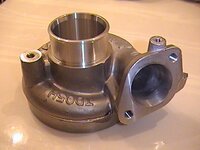
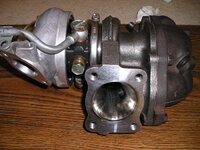
And onto the exhaust housing of the turbo (matched to a 7cm gasket). Is the wastegate portion opened up enough?:

You must be logged in to view this image or video.


You must be logged in to view this image or video.


Thanks for all your guys' help. Keep in mind that I am not finished polishing the parts out.
 
The exhaust mani needs more work. The divider looks fine, don't port it any farther. It looks like there's a few square edges where the runners meet the collector, smooth out those transitions so the runners blend with the collector in a smooth curve.

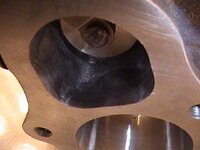
The O2 outlet looks fine. There's still a few lips and square edges inside that can be smoothed down for better flow. The divider between the wastegate passage and main passage should be narrowed and knife edged as best as possible. It may be hard to reach it since it's deep inside, just do your best. There's also a ridge that can be taken down near the O2 sensor bung, blend it with the rest of the housing and outlet.

The exhaust housing looks good. If you're running low boost, like less than 15psi, then port the wastegate passage a little more so there's a smooth curve on the top going into the wategate passage. Again, no square edges allowed. You can also port the wastegate outlet for less boost creep if needed.
 
The key is the O2 housing and the port back into the exhaust. It looks hogged out pretty well. Other then that, this isn't rocket science. It's a DSM not the starship enterprise. It looks fine. Toss it on.
 
For the exhaust manifold I have tried to round off where the runners meet the collector. The pictures don't show it very well but I will try to round them out a little better.

For the O2 housing I will knife edge that divider when I go to polish everything up. And I will port above the O2 sensor bung a little more so it is straight through.

For the exhaust housing, I plan on running 20+ psi, so would the housing right now suffice? Again, I will make everything smooth and round when I go to polish everything up. And yes I do plan on porting the wastegate outlet so the flapper opens up a full 90*.


My main concern is that I don't port too much and port through the actual housing, creating a hole. That is my biggest concern. I will go port some more now...
 
Don't go too crazy on the turbine housing. Thinning the wall makes it more likely to develop cracks.
 
Don't go too crazy on the turbine housing. Thinning the wall makes it more likely to develop cracks.

+1,
I've had personal experience with this, be careful.

Do you think that it is time to polish that up? Is the wastegate passage exposed enough?

Looks pretty good, I would try that. Btw wheres oldman?? Slacker.. LOL..
 
Looks not bad, the turbine housing inlet looks to be fine, just abit on the rough side, so once you clean it up, it should be good. I would also be smothing out the divider wall on the WG outlet side of the turbine housing. You will notice a lip on the divider wall, on the WG hole side. Remove/angle this lip so you have a nice smooth path for WG airflow.

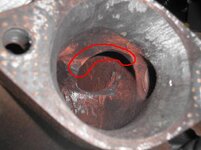
As for the mani, I wouldn't have removed any material on the divider/dirverter as its already common for it to crack in this area. Smooth it out but I wouldn't remove anymore material. For the O2 housing you can still remove abit more material further back (if you can reach) on the WG path divider wall. Try to make the area where it rejoins the exhaust flow as large as you can, as this area is abit of a restriction in stock form. I would also smooth the area out on the opposite side of the divider on the WG passage as well.

For the exhaust manifold I read that you want to knife edge the divider. I can make it flat again if you think it would help the strength?

So what parts do you think are completely finished (ready for polishing) and what parts need more work?
 
Updated pictures:

O2 housing: ported down the divider a little more and knifed edged it the best I could. I also ported the turbo side of the O2 housing as well. All I did for the turbo side is just gasket matched it:

You must be logged in to view this image or video.


You must be logged in to view this image or video.


You must be logged in to view this image or video.


Turbo inlet/WG outlet: I did not touch the Turbo inlet since you guys said it was good. I ported the WG outlet though. I ported behind the flapper door so it would indeed open up a full 90*. And daren p, I see what you mean now with that little lip on the other side of the WG outlet. I will knock that wall down as well. Take a look at these pictures and tell me what you think.

Also, should I port the turbine exhaust outlet of the housing?:

You must be logged in to view this image or video.


Here's that wall you were talking about Daren p (right?):
You must be logged in to view this image or video.


You must be logged in to view this image or video.


The black represents how much I would have to take off so that it is both gasket matched and that little lip is gone. Should I take off this much?:
You must be logged in to view this image or video.


Here is the turbine exhaust outlet, should I port this to match also?:
You must be logged in to view this image or video.


Thanks for all your guys' help so far. I am ready to clean these parts up, so any other help before I do that would be great. Thanks!
 
So what parts do you think are completely finished (ready for polishing) and what parts need more work?

IMO, I wouldn't remove any more material from any the pieces. Bruce will probably say to remove more material above the WG passage (seniors are never satisfied :p).

Now comes the truly gratifying part. Polish things up and then post some pictures for us to admire.;)

Strong work.:thumb:

And yes, that is the wall that Daren was referring to. If you feel that taking it all the way down to make it flat would leave the divider wall too thin then you can at least reshape it so that instead of being at a 90* angle make it like a ramp (hope that makes sense).
 
Kyle, I'd check to see how that gasket compares to your O2 housing but I wouldn't take off that much material off the divider wall, I'd rather leave some "meat". On the turbine outlet side I wouldn't go porting this as you can cause issues with flow if your not careful. What I did on my evoIII & would recommend would be to just use a sanding wheel, etc to remove all the roughness, makeing it nice & smooth but this still retains the same shape. Obviously don't touch the area thats already smooth by the turbine wheel.

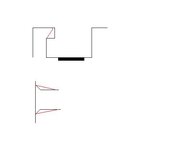
Yes that was the lip I was talking about on the WG outlet side. You don't have to completely remove that lip, you can remove some material & then grind the lip down/in on a 45 deg angle so you no longer have a lip & instead have a nice smooth angle. I can post some pics of what I mean, if this doesn't make sense, when I get a chance (probably tomorrow). As for porting behind the flapper, this isn't required as the flapper will maybe open 45 deg at most (limited by the actuator, not the housing)

That O2 looks much better now on the WG outlet side. I'd probably take of abit on the opposite WG outlet wall (the wall that adjacent to the outside of the housing, around the O2 sensor area) just to smoth that area out abit more. On the inlet of the O2 housing, I would bring that port further into the housing & make it less abrupt of a port (ie so it doesn't change port size so abruptly) as this can hinder airflow. When changing size that much you probably want to take that into the O2 housing atleast twice as far.

As mentioned above turbine inlet looks good as far as gasket matching & removing additional material over the WG enterence, just abit rought in the pic. So if you can get it smothened out in the "finishing stage", you should be good to go.

For the divider in the mani, I would just leave it the way it is now. If you grind it flat again, you'll end up shortening the dirverter which may produce extra turbulance at the turbine inlet.

Edit: Here 2 quick sketches, red line is what needs to be done. Top one is a side view looking at the WG outlet & the divider lip & how I was talking about making it a smooth 45, without removing the whole lip. Second pic is a side view of the O2 inlet ports & how you should bring the port much further down (but don't make the port any deeper in the area you've already done)
 

Attachments

  • porting.jpg
    porting.jpg
    6.2 KB · Views: 2,051
When I was talking about removing some more material on the O2 housing WG outlet, the area circled in red is what I was talking about. Don't have to remove a tonn of material, just look at it & remove what you think will reduce WG flow & create turbulance.
 

Attachments

  • O2.jpg
    O2.jpg
    35.9 KB · Views: 1,630
daren_p said:
As for the mani, I wouldn't have removed any material on the divider/dirverter as its already common for it to crack in this area.

Looks like there is already a crack. There is going to be no meat there to displace heat so I see it having a few more cracks to boot.

Remove the small amount on the WG outlet that Daren spoke of so that it doesn't back up gas on that lip.

Then you should be good after everything is polished. The better polish that EVERY piece of exhaust is the better flow you will have. The exhaust is unlike the intake, you want it as smooth as possible.
 
Daren P thanks for all your help. I really appreciate it.

I am going to work on the O2 housing and I will get rid of that lip on the WG outlet. More pics to come, then polishing time...
 
Alrighty guys... the final product. Here is all the pieces polished up:

Turbo inlet:
You must be logged in to view this image or video.


You must be logged in to view this image or video.


You must be logged in to view this image or video.


You must be logged in to view this image or video.


Tubine outlet:
You must be logged in to view this image or video.


You must be logged in to view this image or video.


O2 housing:
You must be logged in to view this image or video.


You must be logged in to view this image or video.


Exhaust Manifold:
You must be logged in to view this image or video.


You must be logged in to view this image or video.


Thanks for all the help. And let me know what you guys all think.
 
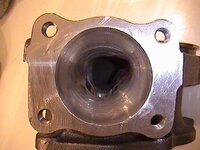
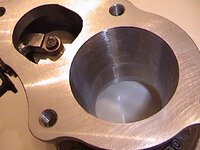
Looking much better now. If you feel like doing even more porting you can always port out the compressor outlet abit to match your jpipe. You can see I did this to my evoIII in the pics below. Also a pic of the WG outlet divider lip that I smoothed out but looks like you took care of this. Quality of the pics isn't the best as they were taken with a video cam but you get the idea.
 

Attachments

  • porting1.JPG
    porting1.JPG
    48.3 KB · Views: 1,579
  • porting2.JPG
    porting2.JPG
    50.9 KB · Views: 1,551
  • porting3.JPG
    porting3.JPG
    41.4 KB · Views: 1,535
  • porting4.JPG
    porting4.JPG
    43.2 KB · Views: 1,544
Boy Daren, great minds think alike LOL. I also polished the rough portion of the turbine outlet and I also ported the compressor outlet. Here is a before and after although you can't see the compressor outlet very good in the "after" shot (but enought to get the idea). Last picture.......finally! everything ready to go on.
 

Attachments

  • Miscellaneous 023.jpg
    Miscellaneous 023.jpg
    57.4 KB · Views: 1,474
  • Miscellaneous 013.jpg
    Miscellaneous 013.jpg
    73.9 KB · Views: 1,444
  • Miscellaneous 011.jpg
    Miscellaneous 011.jpg
    53.4 KB · Views: 1,465
Man, you guys are making me look bad.LOL

So does everything look alright? Do you think everything is ready to be put back on the car?

Keep in mind that this is my first time EVER porting and I am still learning throughout this whole process.

Thanks again for all the help
 
Man, you guys are making me look bad.LOL

So does everything look alright? Do you think everything is ready to be put back on the car?

Keep in mind that this is my first time EVER porting and I am still learning throughout this whole process.

Thanks again for all the help


As Daren suggested, you could consider porting the compressor outlet. If you do make sure that you don't make it bigger than the opening of your J-pipe. And be gentle because we all know how soft aluminum is. Also, if you have a wire brush stop to clean your burr periodically as aluminum can clog it up.

The only other thing that you might do is some more polishing. The smoother the better. Not only to give you just a bit more velocity of the exhaust stream but also makes it more resistant to carbon buildup, or so I've read.

Great. Thanks a lot Romeen
 
Yes the smoother the better because it doesnt allow carbon to build up. Carbon build up traps heat, and creats spots that get hotter then the surrounding metal.
 
Smooth that O2 housing right out!
This is from a few years ago when I still had a stock turbo and stock O2 housing:

You must be logged in to view this image or video.

You must be logged in to view this image or video.


Like everyone is saying make sure you try and smooth and round/radius edges on your manifold and such.
 
I ported behind the flapper door so it would indeed open up a full 90*.
You must be logged in to view this image or video.
This was a complete waste of time because the Mitsu actuator will never let the flapper arm open to 90 degrees. If you don't believe me, send 20psi to the actuator with a regualted blowgun and see for yourself just how far it opens.
 
This was a complete waste of time because the Mitsu actuator will never let the flapper arm open to 90 degrees. If you don't believe me, send 20psi to the actuator with a regualted blowgun and see for yourself just how far it opens.

Well, thank you for that, I will now just put back all that metal so that I didn't waste my time. :rolleyes:

It was already stated that it doesn't open up a full 90*. I now know that. I got time, so me wasting 10 minutes porting that out, isn't a big deal.


Guys I will smooth everything out a little more, especially that O2 housing...
 
Support Vendors who Support the DSM Community
Boosted Fabrication ECM Tuning ExtremePSI Fuel Injector Clinic Innovation Products Jacks Transmissions JNZ Tuning Kiggly Racing Morrison Fabrications MyMitsubishiStore.com RixRacing RockAuto RTM Racing STM Tuned

Latest posts

Build Thread Updates

Vendor Updates

Latest Classifieds

Back
Top