The Top DSM Community on the Web

For 1990-1999 Mitsubishi Eclipse, Eagle Talon, Plymouth Laser, and Galant VR-4 Owners. Log in to remove most ads.

Please Support Rix Racing
Please Support ExtremePSI

'92 GSX The 'Baby Beast' - 2.3l HX40 Wire tucked Auto

This site may earn a commission from merchant
affiliate links, including eBay, Amazon, and others.

This site may earn a commission from merchant affiliate links, including eBay, Amazon, and others.

TSimage

Supporting VIP
1,842
17
Jan 10, 2006
Sacramento, California
After a romp building an NSX and a Kenne Belle Ford Lightning I had the DSM bug bite me again. With my 'Mona Lisa' The Raven build being torn apart for the 3rd time after having fun driving it around on the street I figured I'd take that build even more into the 'Race' category and because of that I wanted to replace it with something a little more tame and on a more street friendly scale than a forward facing large framed turbo. So instead of an all out Beastly HX52 build this will be the smaller HX40 "Baby Beast" project.

The build break down:

-Auto (Kiggly 5 friction front clutch, Translab shift kit)
-Precision Converter
-2.3l 6 bolt built motor (9:1 compression Manley rods and pistons with Eagle crank. All parts were brand new and zero balanced and blue printed About 2K miles still on conventional 20-50 oil with oil changes every 500miles)
-1g +1mm valves
-SuperTech HD Dual springs
-FP4 cams
-Magnus V3 cast manifold
-90mm Q45 TB
-Custom full 3" exhaust with 3" V band O2 eliminator setup (DP and O2 housing are one piece) No cats
-Holset Super HX40 Pro 7 blade billet wheel BEP .70 T3 (Thanks Justin)
-FIC 1850s
-Dual Aero 340 Stealth pumps
--8an supply -6an return w/ Fuelab SS screen filter and AFPR
-Full DLink V3
-SD: 4bar omni and GM IAT
-Hallman ES MBC
-Kinetic 1000hp Race FMIC 3in/3out
-TiAL BOV
-AEM Twin Fire Ignition
-NGK BR7ES at .020
-100shot Single nozzle


Ultimate goals is to break the 600whp barrier on the Auto with the Holset, something that has never been done. Ultimately we are talking a mid 9s capable build that is geared towards street use. :D

Car was a bit rough when I picked her up (Car has a full 1GA Talon swap with 1GB Talon rear coming)-

DSCF1149.jpg


and the engine bay needed attention first-

DSCF1158.jpg


DSCF1159.jpg


I hate clutter and I HATE dirt. I like to be bale to work on my cars with no gloves and have ZERO dirt on my hands so I went in and did a quick tuck and clean up to see if I could bare looking at it further-

DSCF1180.jpg


DSCF1181.jpg


Before-

DSCF1182.jpg


After-

DSCF1183.jpg


Some re wiring-

DSCF1186.jpg


The VC was a bit beat up so I begin sanding it down and gettign it ready for a quick re spray-

(This pic is what it looked like BEFORE the sanding LOL.. yeah it was that beat...)
DSCF1189.jpg


DSCF1192.jpg


Purp!

DSCF1194.jpg


Couple more layers-

DSCF1198.jpg


Definite improvement (letters still need to be polished)

DSCF1208.jpg


Naturally at this point I knew more needed to happen. The 3065 was epic but I wanted a bit more top end and above all else I needed to get rid of the 5spd because "I've been there.. done that, and never again.."

More pics to come of the tear down.
 
Last edited:
Looks good! I'm a little bit jealous, that's a very clean 1g IMO :D

Its getting there little by little but as it all unfolds I think the final product will definitely be something I can be proud of.:hellyeah:
 
So the first goal was to get all of the parts together that I'd need for the M/T to A/T swap. I lucked out and a local (literally a few minutes away) had a parts car in good condition that he picked up for the motor for a pretty trick Datsun 510 4G63 build I hope to get my hands in on later down the line. :hellyeah:

And when I said I wanted all the parts I meant ALL the parts.

From the harness to the pedals to the rear end to the console to the tcu to the mounts etc..

DSCF1264.jpg


I even ended up with a cooler, drive shaft and few other tid bits in there to top it all off.

DSCF1268.jpg


First thing I did was pull the pan and pull the valve body to inspect and install my Translab kit.

DSCF1269.jpg


Looks good-

DSCF1270.jpg


Lets get to work-

DSCF1272.jpg


DSCF1274.jpg


Lets get those springs changed-

DSCF1277.jpg


Check out the difference in size between the stock medium and heavy springs. OMG

DSCF1280.jpg


Change!-

DSCF1282.jpg


DSCF1283.jpg


DSCF1287.jpg


Got all my holes drilled and cleaned up- (Never mind the glare ons ome of the holes, all is well)

DSCF1522.jpg


Did some porting on the filter area-

DSCF1525.jpg


Not show were changing out the steel check balls to the lighter and improved ones in the kit as well as the other spring swaps and valve cleaning in the other areas of the VB.

Next up I'll post up some pics from the Kiggly Front clutch upgrade when I get a chance to load them up. :rocks:
 
Front clutch needed to go too so I ordered up a Kiggly Front clutch kit which contains 5 frictions instead of the stock 4. (Thanks to the guys at MAP for getting the order in quick and cheaper than anyone else. I was the first to order a few of the items from this build from them so at least I have paved the way for you guys to be able to get them even faster now that they have it all on file. hit up Nate for the absolute best prices and customer service. I have ordered parts from him within 10 minutes of the shipment cut-off period and still got them out to me same day!)

DSCF1433.jpg


First things first is to pull the pump. The first and second clutches will normally stay attached to it..

DSCF1488.jpg


DSCF1489.jpg


I went ahead and checked the frictions in my 2nd clutch and they looked great (actually most of the frictions had a list some life left that I am sure it would have lasted just fine driving normal but some 600awhp launches on this bad boy would quickly kill them. Regardless of that the First clutch was separated and brought in-

DSCF1491.jpg


After that it was time to soak my new frictions as instructed for roughly 30minutes in trans fluid. Mine soaked a while longer than that I am sure-

DSCF1490.jpg


DSCF1492.jpg


Simply remove the clip and pull the old out-

DSCF1493.jpg


These bad boys would have been fine for lower power but it wasn't worth the risk considering how easy it is to change.

DSCF1494.jpg


Now put the new ones in there making sure to line up the missing teeth on the steels. I simply marked on the clutch body itself where the old missing tooth sections go and put these in the same spot.... All done!-

DSCF1495.jpg
 
Last edited:
I guess in this post I'll start touching on the work going on inside of the interior. It wont be anything fancy like my Black Talon. Most likely this shell will never see a cage, but who knows what might change in the future. In the mean time there is some SEVERE weight to drop and since I have to do all of the following to get my harness out for the rewire and tuck I figured I might as well go in on the rest of it and upgrade some gauges, add in some touches and get rid of a lot of weight through the seats and removal of crap I don't need.

I got the dash board off and now its time to drop some severe weight... For those of you who wonder just how its possible to save damn near 60lbs removing the A/C system etc I'll show you 1G guys what is lurking behind that massive dash board, an equally massive blower setup-

DSCF1367.jpg


GTFO!-

DSCF1369.jpg


Next on the list is to remove the interior sound deadening /insulation.. This WILL piss you off removing because it was literally placed ont he fire wall then everything else was bolted in over it so you'll have to tug and pull and remove a lot of crap you never figured you'd have to..

DSCF1370.jpg


DSCF1371.jpg


CYA!

DSCF1372.jpg


MUCH better...

DSCF1375.jpg


Now Its time to focus on my main reason for opening up the dashboard in the first place, the main harness..

DSCF1376.jpg


Push the clips and the inter harness pulls back through the interior-

DSCF1380.jpg


Hard to get to but once you get to it its easy to remove-

DSCF1381.jpg


Step 1 done...

DSCF1383.jpg
 
Ok now here we are-

DSCF1401.jpg


Time to attack those holes on the fire wall that I wont be needing.

BUT before I do, I had to get a quick mock up of things to come-

Magnus V3 added-

DSCF1410.jpg


Modified T3 manifold (modified to clearance the HX40) and the Q45 90mm TB added-

DSCF1414.jpg


Not bad! I needed all the motivation I could get. Now the work begins!

DSCF1422.jpg


DSCF1423.jpg


Now its time to begin stripping off all of the oil and paint. If I am going to repaint this engine bay it will be done right. None of this respray BS.-

DSCF1426.jpg


DSCF1427.jpg


Next on the list after a nice mineral spirits scrub/bath is to plug the bigger holes and then start glassing everything and getting it read for paint.
 
looks good i used bondo on my holes for practice not bad for my first time cant wait to get a awds shell should have one before summer, gonna make it my new project car nice job.
 
May I ask what you do for a living that you can afford these cars? It's freaking unbelievable the work and money you put in your cars.

Major props! :thumb:
 
looks good i used bondo on my holes for practice not bad for my first time cant wait to get a awds shell should have one before summer, gonna make it my new project car nice job.

Bondo alone over time will crack in the holes or fall out due to all the vibration. I use it only to smooth things out since the grinding makes it a bit bumpy. Thanks for the props on the build and I wish you the best on yours as well. Hopefully I can help give you some ideas in the mean time. If you have any questions, just ask.

:hellyeah:


May I ask what you do for a living that you can afford these cars? It's freaking unbelievable the work and money you put in your cars.

Major props! :thumb:


I'm an Architectural Engineer through the SheetMetal Union. I do well but I'm no millionaire LOL. I think my biggest plus is I am great with money and making it work how I want so I find good deals that in end can turn around and make me a profit or break even. I think this has really helped me moving from project to project is that I've managed to always come out on top doing so. Doing a majority of my work myself helps I must say so be a stickler for details and the first time you do anything take your time. After than it is like riding a bike. :thumb:

My neighbor was dumb founded when he saw my wiring harness thrown about as I snipped and pulled wires and plugs and tossed them without even second guessing it LOL. He was like, "How do you know you are taking out the right stuff??! You're a mad man!" Lol, I told him "I just know.." After my umpteenth tuck it is all the same although this Auto harness is a lot more complex than most. I think the Auto 1GA harness is one of the biggest, thickest harness out of all the years due to the extra crap that it has that keeps you from being able to do a simple tuck. The 1GB 5spd harness is childs play in comparison.
 
Looks great!

Also, thanks for the auto trans pics! That helped me with mine!
 
Looks great!

Also, thanks for the auto trans pics! That helped me with mine!

Awesome! That's the main reason I did it because when I was searching there were no pics of the front clutch or where it came from or what it looks like, anywhere. I guess now people have more of an idea what they are looking for.

A word to the wise is that if you are having trouble getting that front pump to come out take a rubber mallet and give it a few whacks on the out side of the bell housing and it'll come out after the bolts are all removed. I tried everything until desperation kicked LOL.


This is a great build!:hellyeah: Subscribed....
Can't wait to see how it turns out!:D

Thanks a bunch buddy. I hope everyone is pleased with how it turns out, I know I have been thus far. My end goals are 550-600whp through the AWD Auto. I expect low 1s at the very worst and mid 9s at the best.

Plenty of HX40 builds have put down great numbers but never in a consistent auto so hopefully we can see some great times out of a pure HX40 turbo.
 
Lmk ive done a wire tuck before move mine into the cabin last wire tuck looked good really got rid of a lot, ac wires lights under fenders and bumper so forth ill do anothehr once i get my tsi shell, that will really be a project car ground up over years LOL. Right now rebuilding engine and buying parts. good work again. i also may have connectors pm me if you need one.
 
Lmk ive done a wire tuck before move mine into the cabin last wire tuck looked good really got rid of a lot, ac wires lights under fenders and bumper so forth ill do anothehr once i get my tsi shell, that will really be a project car ground up over years LOL. Right now rebuilding engine and buying parts. good work again. i also may have connectors pm me if you need one.


I've been doin DSM wire tucks for the past decade or so LOL. I'm good to go my man but thanks for the kind offer. I only do a complete fuse box relocation. I use to do the lazy boy method back in the day where you relocate it under the passenger light or the fender area but it still looks like crap in person. People make it look good in their pics but there is still a fat wire running through the drivers side of the engine bay. Ironically most pictures you'll see will be at an angle that doesn't show this but in person its still there. One solution I did a few years back was to shorten the fuse relocation an d actually relocated it on the drivers side. What this did was re-position the fuse box so it was completely invisible but at that point where you have done all that work you might as well put the damn thing inside the car away from the elements.

This car will be like my black one where all of the wires will come out of the square hole behind the motor where the shift cables once were. The fuse box will be mounted under the dash, still easy to access but completely out of site. I still want the use of my glove box so that is out of the question.

__________


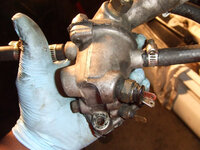
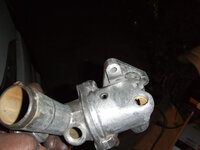
A little attention to detail; Relocating the sensors on the TStat housing helps hide the wires as well. As you know, from factor the sensors all face forward but depending on your setup and how much you've deleted there are duplicate places the sensors can be mounted on the BACK of the Tstat housing thus hiding the only forward positioned wires considering an O2 sensor delete.


Here is how it comes factory with both sensors up front-

DSCF1407.jpg


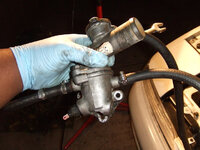
Now this is a little trick for all of you looking to clean things up a bit, also helps keep the wires from breaking so easily due to the sudden 180 degree turn they have to take. (stupid Mitsu engineers..)-

DSCF1408.jpg


Its that easy and looks a million times better as well-

DSCF1409.jpg


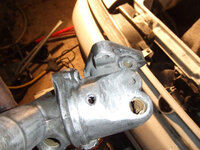
Now if you wanna get fancy you can take it another step and actually 'shave' your Tstat housing on the front so there is no evidence that that engineering mistake ever existed. Most will just put plugs or bolts in but if you are going through this much effort to tuck and shave an engine bay, don't skimp on the details.

DSCF1428.jpg


DSCF1430.jpg


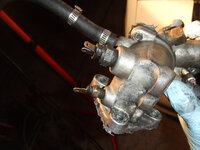
Now get that bad boy welded up and you're good to go with your new Tstat housing that EVERY SINGLE DSMer will point at and ask you "Hey what car did you get that from?"

DSCF1620.jpg


DSCF1621.jpg


If I could do it again I'd polish it out even more to make it perfectly smooth or even glass it but it gets the job done LOL
 

Attachments

  • DSCF1407.jpg
    DSCF1407.jpg
    64.8 KB · Views: 44
  • DSCF1428.jpg
    DSCF1428.jpg
    62.5 KB · Views: 44
  • DSCF1409.jpg
    DSCF1409.jpg
    55.9 KB · Views: 49
  • DSCF1408.jpg
    DSCF1408.jpg
    53.3 KB · Views: 47
  • DSCF1430.jpg
    DSCF1430.jpg
    40.5 KB · Views: 48
That tstat looks amazing. I like moving the wires to the back as well. I will be doing that soon, now that my heater core recently found its way to the scrap pile.
 
That tstat looks amazing. I like moving the wires to the back as well. I will be doing that soon, now that my heater core recently found its way to the scrap pile.


Thanks for the encouragement!

I'm glad others can see into the small details and appreciate them. I think that is what separates the great builds from the good ones is the willingness to go above the basics to add a personal touch that takes a lot more effort than the final project shows haha.

__________


Ok so back to business.

Next on the list is taking the engine bay down to the bare metal and removing the seam putty to give a professional look. I could have just painted over everything and called it a day but thats not the proper way to do it and in person you can usually tell who took the easy way out. (You'd be surprised what pictures can hide in the right angle/lightning :hmm:)

DSCF1426.jpg


After that a nice scrub with purple power at about 80% concentrate and then a final cleaning with mineral spirits to ensure it was ready to go

DSCF1427.jpg


After that I made small backing plates for the larger holes and epoxied them in place from the back. After that I took a shaping hammer and shaped the plates by giving them some "love" so that they leveled with the fire wall. Following this procedure I did my first etching primer coat followed by a masking primer coat to see the imperfections that will need to be glassed. Things such as the proportioning valve, ruber plugs, etc were all removed, primered and painted on the side.-

DSCF1431.jpg


The holes that were blocked were the original wiring harness entrance, A/C port area, Heater core entrance, Clutch Master cylinder (yay for auto!) and we're good to go. The wiper hole would be done the same way but I'll show that on the black car when I start that progress thread back up. This however is still a 100% complete street car in the fact it will maintain its wipers etc. The Raven is technically a street car too but considering it has never left the house on anything other than drag slicks it is not much of a car meant for 'water sports'

Work on the engine bay is just beginning, almost looked good enough to stop :D but I'm not even close to being done..
 
Last edited by a moderator:
Thanks for the encouragement!

I'm glad others can see into the small details and appreciate them. I think that is what separates the great builds from the good ones is the willingness to go above the basics to add a personal touch that takes a lot more effort than the final project shows haha.

Exactly. And that tstat has always bothered me on these cars. My eye is always drawn to that huge eyesore even on the cleanest bay.

The way you cleaned that part up is perfect.
 
Exactly. And that tstat has always bothered me on these cars. My eye is always drawn to that huge eyesore even on the cleanest bay.

The way you cleaned that part up is perfect.

Thanks again for the props. I hope others can appreciate it too. I think its something noticed more so in person than in pictures but only time will tell. :thumb:

__________


Ok so now the glassing begins:

DSCF1443.jpg


This is just to finish leveling out some of the larger holes or imperfections caused by grinding the welds.

DSCF1444.jpg


Final result after primer-

DSCF1450.jpg


Not bad!. Not perfect but a HUGE improvement.

So with that out of the way it is time to turn back to wiring (yuck..)

The 1Ga harness is unique in the fact that it has a lot more wires in the fuse box considering it has a lot more circuits operating not only the lights but the motors as well. Instead of removing the Fuse box in one solid piece I prefer to separate the wires that ajoin the 2 sides from the fuse box and the interior plug.-

DSCF1449.jpg


After that I cut them in half so that I can re route the wires through the radiator support (I'll show that process later)

DSCF1453.jpg


DSCF1454.jpg


Here's the crazy fuse box wires nest I get to pick through and adjust when it is relocated to the interior of the car

DSCF1451.jpg


DSCF1452.jpg


Using my own wiring DIY/How-To which is the most complete and only one currently in place for the 1gs (http://www.dsmtuners.com/forums/blo...ntinues-pt-5-wire-tuck-harness-mod-guide.html) I once again shortened up my fuse box to the proper length (roughly 1/3rd of its orginal) -

DSCF1475.jpg


Its still not done yet as I need to run the wires from the front of the car along the fender to the interior but its an important step out of the way. :rocks:
 
I don't celebrate the holiday itself but to use a tired phrase.. "Christmas came early"

DSCF1385.jpg


BIG inside of a BIGGER box!

DSCF1386.jpg


My super-sized trans cooler-

DSCF1388.jpg


Gauge/switch panel for nitrous and trans temp.-

DSCF1389.jpg


Modified Saturn Alternator-

DSCF1390.jpg


Nitrous goodies-

DSCF1391.jpg


DSCF1392.jpg


Nice step in the right direction. I'll be running a single nozzle wet 100shot, something a bit more simple than the direct fogger setup on the Raven. At the same time getting a second Saturn alternator will keep me from having to cannibalize my 200amp one from the black car as well and this way the baby beast has its own. This will hopefully solve my alt issues I have been having as well.

Next on the todo list will be the rearend swap as well as the main harness layout. At the moment I am not sure if I will be swapping to the larger Auto harness since I will eventually be running a full ratcheting setup like was first done on the Raven for street use. At this point I wont need the eprom TC either and the amount of space I will save under the dash as well as through the main entrance into the engine bay is substantial.

After I do some more research on just how useful the wired sensors and what not are on the trans I will decide if they will go or not. The common consensus is that they can go but we'll see. I never missed them driving around in the other car but who's to say there aren't gains to be had.

If not, tell your friends I have an available complete and excellent condition Auto harness from a 94 as well as a 2 plug eprom TCU all in great working order.

DSCF1425.jpg
 
Looks good love the nos, i love builds cant wait to get my tsi, so i can get to buidling it up. Great job.
 
Looks good love the nos, i love builds cant wait to get my tsi, so i can get to buidling it up. Great job.

I actually wanted a ZEX kit because the purple would better fit the final color scheme butt hat is just the ricer in me. ROFL Its a 100 shot single nozzle that I might just use to spray down the track partially as well. The manifold it set up for a direct fogger setup but this car will never need it. A single is about as far as it'll go. One thing to remind myself is this is still a 100% DD street car build.

I guess I gotta draw the sanity line somewhere LOL.

__________

So more parts unboxing!

The basis of the build was to test the ability of a pure HX40 turbo by putting the first billet 7blade T3 .70 setup on a 2.3 auto that I am aware of. My original plan was test the new CTE PTE turbos, either the 6262 (similar power) or the 6266 (more power) but even so the HX40 seems to be the new "Everyone wants one" turbo in the community. I'm sure the Evo crowd will have lots of PTE numbers for all to see so its up to us DSMers to see what these Holsets are all about.

To get the job done I wanted to make sure that I had the ABSOLUTE perfect specimen to us. I turned to Justin (JusMX141) our local turbo rebuild guru to find me the perfect piece. After all, Justins name is tacked on to most of the high powered, PROVEN HX cars in the community with the most important being Dave who currently hold the Holset record.

Most of you may know there are MANY variations of the HX turbos, the 40 in particular.

There are the smaller 8 blade and 6blade 56mm units and then the "Super" 60mm series of turbos being the larger 6blade and the baddest of them all the billet 7 blade. (I'll let yo gues which one I wanted :cool:)

justin had just gotten in a unit and a brand spankin new billet 7blade wheel. It was destiny.


NSFW- Turbo pr0n!

Posted originally by Justin when it arrived-

BilletHX40-1.jpg


BilletHX40-2.jpg


BilletHX40-3.jpg


Holset part number-

BilletHX40-4.jpg


I purchased the turbo rebuilt to Justin's specs used on Dave's 6blade and Batmowheel record setting HX40 setup from the restrictor to the detail Justin pays to sealing up known areas that can form minute leaks, top notch for sure and the shipping only follows suit.

DSCF1435.JPG


Foam, bubble wrapped, ziplocked etc.

DSCF1436.JPG


DSCF1437.JPG


I CAME.. :D

DSCF1441.JPG


So next up I needed to land a .70 T3 BEP housing. Unarguably the best after market housing available for taking advantage of the Holset's full power range. (Other than the bulky/heavy stock TS) I don't believe in choking turbos up for something as frivolous as 'spool'. If you want 'better spool' grab a cheaper HX35 and call it a day.

The boys at MAP came through. I basically have Nate on speed dial and he can and has found me ANYTHING I have needed for the CHEAPEST price HANDS DOWN. No if ands or buts. He will quote you a cheaper price from the getgo and if you buy enough product the guys at MAP have been known to go even lower. I shop no where else. :thumb: He got me all of my Kiggly parts and other build items for ridiculous savings and naturally this was going to be no different. Best prices, fastest shipping, No stupid CA 10% tax. YES PLEASE!

She's purdy!..

DSCF1446.JPG


DSCF1448.JPG


So as a means to recap. For your turbo rebuild needs or even purchasing, there is NO ONE better in our community than Justin. Don't short side yourself buying these things off of eBay and guessing on their condition and if you must Justin offers the cheapest rebuild service with Holset brand parts and an attention to detail that has produced some of the most reliable rebuilt units regardless of their type. If you want the best, goto the best. Its one less thing to worry about and with the turbo being one of the biggest and important elements of any build, spend the extra few hundred on that rebuild for the peace of mind vs praying every time you go WOT or turn the boost up.

Apart from that if you are looking to build the best car possible with name brand parts that are proven and of the highest quality with out long wait times, horrible customer service, high tax rates and putting you in the poor house "MAP is where its at!" (I'm trade marking that Nate I'll let you guys use it for a royalty. :p) These guys will not only meet but BEAT any price and do it faster. :thumb:
__________

In my next post I'll address the upgrades I needed to utilize to take advantage of the 3" V band outlet and the issue many run into trying to fit these turbos in the engine bay without spending too much on some of these higher end manifolds that still don't fit well. When it comes to non twin scroll manifolds, why bother spending high end prices. With TS though, you get what you pay for which is why I'm having my Raven manifold custom built by Joe Petit at RedJackRacing (That and the fact its a pretty tricky forward facing setup with a custom intercooler to boot.)
 
Last edited by a moderator:
Sweet love this build man looking to get a hx 40 myself that will be the next turbo i get, still building.
 
I have a question for you on the thermostat housing. Am I understanding this right, all you did was turn it 180 degrees and then smooth out what used to be the back of the housing?
 
Support Vendors who Support the DSM Community
Boosted Fabrication ECM Tuning ExtremePSI Fuel Injector Clinic Innovation Products Jacks Transmissions JNZ Tuning Kiggly Racing Morrison Fabrications MyMitsubishiStore.com RixRacing RockAuto RTM Racing STM Tuned

Latest posts

Build Thread Updates

Vendor Updates

Latest Classifieds

Back
Top