The Central Hub for DSM Community and Information

For 1990-1999 Mitsubishi Eclipse, Eagle Talon, Plymouth Laser, and Galant VR-4 Owners. This is where the DSM platform history is documented and archived. Log in to help us in our mission, and to remove most ads from the browsing experience.

1994 EVOLUTION II RWD from Sweden

This site may earn a commission from merchant affiliate links, including eBay, Amazon, and others.

Lot of stuff done today saturday:

My morning started with my alarmclock on vacation,... no signal. so I oversleept an hour..

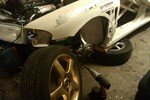
Engine out again: (probably for the last time


engine/gearbox separated.


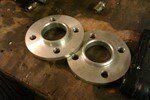
Oilpan gets bigger volume, 0,8L bigger:


Done:


Time to reassemble after checking main bearings & rodbearings:


Flywheel beeing fitted., using 135 NM:


Oilpan fitted again & painted with ruststopper, will be painted tomorrow:


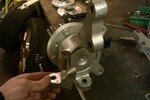
Sebbe & Jimmie measuring the clutch:


Also put in some welded reinforcement plates. where i had to cut to make
room for the intercoolerpipes:


Engine beeing fitted with gearbox/clutch, all bolt for the enginemouns etc etc:


Strange looking driver...


Engine/gearbox, steeringshaft, all fitted.


Sebbe fabricating the "pipe" for the clutchmastercylinder:


A litte tight between gearbox & propshafttunnel... SO...


I made a small "hatch" down by the pedals:


Cleaned the headbolts:


& fitted them:
 
O-ring for the throttlebody:


glued in place since it would fall off othrwise when attaching it:


done:


Really hate carelectrics....


heatmats


had to split the entire VEMS electricals for the ECU to make the cables reach the nre places.
 
Wow! Just wow! :applause: This is really coming along nicely. The intake manifold looks great! :thumb: Thanks for all the updates and good luck with the rest of it.

Thanxs man, Yeah, i have been on this since January, but with no job, its taken "too" long really, houldvé been finnished a while ago, i really wanted to race this year, but as it looks right now, the premiere will be in March, on ICE .. i will compete in the "flying 1000meters (kinda like Bonneville, but on ICE).
 
11 hours on my own today at the garage, no-one to talk to = more done on the car.

Finnished the entire electrical re-make


Now ALL cables are by the firewall, non in the front.
Also fitted the heatmats to make som extra protection against "heat"...


Fitted my MSD ignitors (whats the name for these?)


Seen from the inside behind the dash


New cable for alternator/starter:


Cut down the alternatorfitting to half the size it was :) I like saving weight...
Also painted it.


Grinded a bit on the alternator itself plus a little on the front of the engine so i have just a little room for adjusting the alternatorbelt :)


The homemade thermostathousing :)
 
More done - again

Turbo & downpipe fitted again for me to finnish the exhaust:


propshaft fitted:


Nice to know i made some inspectionhatches , easy to reach the propshaft/gearlevel.


Starter fitted:


Began the final parts of the exhaust:


Simons 3" muffler with re-done fitting to 3,5"


Nicklas welds the exhaust.


Rear facing muffler i welded togehter with the FIA-proven katalytic converter at the very rear of the car, since i run on E85, the cat dont get
very hot, but rules simply state there has to be a cat on the car, so at the rear is the best place.
 
Last edited:
Great stuff man!

I couldn't see if it's been said yet, but the "hardy disk" that goes between the output shaft and prop shaft is called a guibo over here and sometimes more generically a flex disc. Most people outside the BMW crowd won't have any idea of what you're talking about, and will probably think you're attempting some racial slur by saying guibo. ROFL
 
Thanxs for the info :) & thnxs for taking the time to look in on my build therad !

-------------------------------

More done......

Welded AN8 to the fueltank.


Stock crankcaseventilation in the valvecover shut off:


Fuelrail testfitting


a bit of grinding & then it fit well
 
handmade gasket for the oilreturnline:


in place:


An10 for the returnline:


rear brakeline in place:


new cabel between alternator starter:


new adjustable rod for alternator:
 
Fitted my MSD ignitors (whats the name for these?)


ignition coils, or just coils are what we usually call them :)

Everything is looking great! I really like the exhaust and how it exits the car. :thumb: Looks bad to the bone! Good luck with the handmade gasket on the oil return line. It has to be better than the stock one.:pray: I can never get those to seal right.LOL Nice work and thenks for the updates once again.

Thanxs man, i was thinking like, aluminium melt around 600C, the exhaust might reach 1100C at most, but in the centre part of the turbo i just cannot be this hot + the oil itself will help cool the gasket a little, so "it should" work :)

----------------------------------------------

Third time´s a charm, right ?

This is the 3.rd version of my AEM fuelrail, hehe

Oe end drilled to make an AN8 weldable coupling fit


AN8:


Welded by Pelle the welderman:


Sandblasted after welding, here you see the old holes welded shut, in the opposite end there will be an AN6 coupling:


Fuelpreasureregulator stripped for welding an AN coupling to it:l=http://forumbilder.se/show.aspx?iid=ab620121048141c25]
ab620121048141c25.jpg
[/url]

Pelle welding:


Welded, sandblasted & done:


AN-couplings from my sponsor: JJ Autoparts


5 meters Ethanol approved AN8 steelbraided hose:


The hose i think will be enough


Fuelline will go through the passengercompartment from rear firewall
to front, here is the front:
 
I put togehter some AN8 hoses for the fuelsystem:


done:


An10 for the turbos oil-returnhose:


fitted the fuelpreassureregulator in the enginebay:


My Bosch 1680cc injector have been tested at Tezz Motorsport


VIDEO0034 - YouTube

6cm long 4" pipe for the airfilter/hose:


oilfeederline:


Fuelrail painted black & injectors fitted:


injectorcables fitted below the intake:


More hoses done:

Fuelpreasureregulator painted & fitted to the inner arch:


Return from Fuelrail to Fuelpreasureregulator via an AN6:


Put together the rest of the fuel-system, damn if i didnt miss the
last AN8 connector :-(


Fuelsystem, up to the right you see the small fuelfilter wich will be replaced
with a bigger version, also the pump will be mounted to an alu-plate which
itself will be rubbermounted:
 
had it planned for yesterday to put everything together regarding the head... very funny indeed when noticing that one hydraulic lifter was missing :-(

filled up with Motul Racing oil, 6,4L with the new built oilpan:


hydraulic lifter/the other parts :)


lifters...


the others :)


intake cam in place:


One lifter missong...
 
Fuelpreassureregulator re-done again, now with AN6 on both IN / OUT lines:


New AN6 teflonhose through passengercompartment.


New AN6 non teflonhose in enginebay:
 
The lost valvelifter in place with the cams:


There:


New waterpump testfitted:


did not fit, the waterpipe would have gone straight through the
compressorhousing of the turbocharger:


made a cut...:


Off to my friend Pelle the welderman again :


done:


new cambelt wheels:


parts in place:


Hexbolt with extra low "head" for the gearlever:
 
Last edited:
Quite proud of myself 2-day, i managed to all by myself fit the cambelt perfectly :) (never done that before)

Turned the engine several rounds & the re-tightened the belt again :worship:

20nM (as specefied)


135nM ARP studs (used once before) with new bolts/washers


drilled 9mm & tapped M10x1 in number 2 cylnder/exhaust for the EGT.


All done here, blue gasket sealant applyed:


Valvecover in place:
 
A picture from Home :)


fitting the dumpvalves with alu-bolts, with a special rubber gasket/sealant


done:


fitted alternator + cables + the adjuster, just sorry nothing fit correctly...


Here you see the alternatorbelt if stretched would rub the oilpump-bolt - not good.


So i made a new 30mm lower mount for the alternator :)
The right one´s the new lower version !


here you see the difference in height, placed on top of the old one
 
god damn!!! wish we could import these. Im working on finshing my 93 mirage rhd and body evo 1 conversion!
 
god damn!!! wish we could import these. Im working on finshing my 93 mirage rhd and body evo 1 conversion!

Thanxs: sounds like a cool project you got there !

..........................................................................

Waterpump-belt:


fitting the new guages:


the lower waterpipe:


fitted:


Intercooler fittings:


in place with twin dumpvalves:


new powercables for the fuelpumps:


A little tight:


4" airfilter from K&N + flexible hose for the filter:
 
another long EVO day..

MOTUL Racing coolant:


relocated & shortened the turbo oilfeederline a bit:


new hose for the coolant tank:


tuuuurbo...
 
ignitioncables. TAYLOR RACING, 9,5mm handmade to the correct lenght.
(came in a roll + pieces)


Thermostat, Volvo B230 80 degree, with mods, 6 2mm holes to allow slightly higher flow:


drilled 3 holes for the wastegate & dumpvalve vacumhoses to go through
the radiatorshroud :)


Also a new "vacum"-hose for the coolant overflowtank:


And fitted the overflowtank:


I have no idea as to what stock item passed through ths "hole" here,
but it was perfect for the vacumhose for the turboguage:

 
Thermostathhousing all done & rewelded for the third time, now it fits


fitted:


Water/coolant filled:


Oilcooler will sit here:


Today i changed to oilcoolers position again, back to the first one.
But this time it sits vertical instead of horizontal as before:


New AN8 oilcooler feederlines:


Handbrake / gearlever:


Some engine view´s:


Finally got back my Versitile Engine Managment system, VEMS, which has been upgraded:
 
Last edited:
While waiting for some parts i have decided to re-do the steering - AGAIN.
imag0841.jpg


imag0847.jpg


Also a set of 12mm spacers for the rear wheels
imag0846.jpg


i should have shown you guys what i found out had been wrong with the suspentionset-up with my
car ever since i started the build back in 2007, but i found it a year ago for the first time when i
started to tear down the car for the N/S engineinstallation.

the front controlarms...
after removing the steeringarm & spindle so the controlarm
was on its own attached to the car.
at this moment its supposed to "fall" down like an hinge, right ?

I could take my 86kgs & stand on the outer part of the arm & it would NOT move at all. TOO tight/hard busings anyone ?

So these i midifyed to the better.

But today i decided to take care of the same kind of bushings in the rear of the car:

trailingarms rear:
imag0856.jpg


All done/fixed:
imag0857.jpg


Video #1: almost cant move the arm at all:
[ame=http://www.youtube.com/watch?v=QsDFLgQrCns]VIDEO0063 - YouTube[/ame]

video #2: needed a hammer to remove the "pin":
[ame=http://www.youtube.com/watch?v=etC38Jld6HE]VIDEO0065 - YouTube[/ame]

video #3: slightly better movement:
[ame=http://www.youtube.com/watch?v=J4ixbYlj6sU]VIDEO0064 - YouTube[/ame]
 

Attachments

Add Value - Be Respectful - No Trolling - No Misinformation - Participate Often!
Support Vendors who Support the DSM Community

Build Thread Updates

Latest Classifieds

Back
Top