The Central Hub for DSM Community and Information

For 1990-1999 Mitsubishi Eclipse, Eagle Talon, Plymouth Laser, and Galant VR-4 Owners. This is where the DSM platform history is documented and archived. Log in to help us in our mission, and to remove most ads from the browsing experience.

IMG_9908.jpeg

99 Spyder GS-T - old school as possible

Nostalgic build and summer cruiser

This site may earn a commission from merchant affiliate links, including eBay, Amazon, and others.

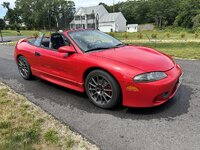
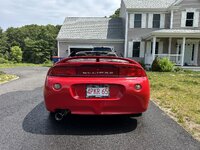
The winter came with best intentions of doing the work to make this car safe and I did nothing because I’m a lazy POS. Warm weather hit and I was left wanting to drive the car with bad wheel bearings so the work ethic organically came back. I bought the parts for the wheel bearings/brakes and they sat past their return period. This left me with Rockauto mis-labeled Timkin rear wheel hubs and bearings (FWD models are actually AWD- and still MIUSA unlike the fronts that were correct) and Brembo brake pads that don’t fit Outlander front calipers.

I bought new outlander front calipers, matching pads (Bosch in place of the brembos), powerstop front and rear drilled and slotted rotors, Timkin front wheel hubs and bearings, SKF (made in Japan) rear wheel bearings and hubs, and some front sway bar tie rods as the old ones needed cut to remove the old suspension.

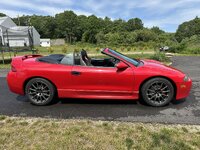
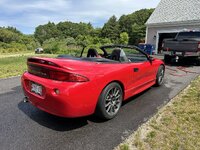
Somewhere along the lines of part hoarding I picked up some lightly used Tokico blues and springs. They’ll drop the car 1.5 inches, evidently. The struts/shocks were in great shape. And removing my old suspension I found it to be: factory and entirely blown out. It’s cool to see AGX parts with Mitsubishi part numbers on them!

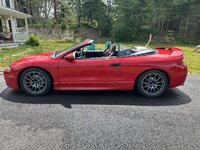
“Since I am in here, I might as well…” drop the car with a new suspension. I’ve never pulled a cars suspension before. Having a Rusty Project Car made this a royal PITA. This forum was great in providing me motivation and advice from guys doing this back in 2006.

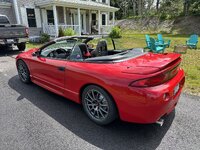
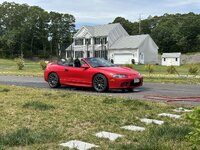
Next up: cut up my stainless 3 inch exhaust and install a Magnaflow muffler and thermal exhaust tip. Since Thermal doesn’t make GST exhausts anymore, I’ll have to fab up the “We Have Thermal Exhaust At Home” myself.

IMG_8910.jpeg


IMG_8911.jpeg


IMG_8925.jpeg


IMG_9084.jpeg


IMG_9093.jpeg


IMG_9092.jpeg


IMG_9141.jpeg


IMG_9150.jpeg


IMG_9153.jpeg
 
Last edited:
Finished cutting up and welding my Chinese stainless 3 inch exhaust. Added a flex pipe, magnaflow muffler, and a 4” thermal tip

1G throttle body was rebuilt to fix the boost leak around the throttle body shaft

Tomorrow it’s an oil change, wideband calibration, and tying up some loose ends before letting it rip for the summer.

IMG_9514.jpeg


IMG_9519.jpeg


IMG_9532.jpeg


IMG_9534.jpeg


IMG_9538.jpeg


IMG_9541.jpeg
 
I used some vacuum tubing to fill the transmission with oil. I felt pretty clever about this given the constraints of the charge piping for the FMIC.

Upon filling the manual transmission with redline MT-85, the driver side axle began leaking oil. My hopes for driving the car today were crushed. I can see why people give up on project cars given the wide range of peaks and valleys of emotion.

I ordered a OEM Front Axle Seal from extreme PSI. I will need to remove the hub to get the axle out. A days worth of work. Luckily all those bolts are fresh with anti seize 😂

I’m going to work on getting the turbo drain line to cease leaking at the turbine housing. And now I have time to put in the new Infiniti speakers for the audio system. Positive attitude. Thank you for reading, gentlemen.

IMG_9550.jpeg


IMG_9551.jpeg


IMG_9553.jpeg
 
I used some vacuum tubing to fill the transmission with oil. I felt pretty clever about this given the constraints of the charge piping for the FMIC.

Upon filling the manual transmission with redline MT-85, the driver side axle began leaking oil. My hopes for driving the car today were crushed. I can see why people give up on project cars given the wide range of peaks and valleys of emotion.

I ordered a OEM Front Axle Seal from extreme PSI. I will need to remove the hub to get the axle out. A days worth of work. Luckily all those bolts are fresh with anti seize 😂

I’m going to work on getting the turbo drain line to cease leaking at the turbine housing. And now I have time to put in the new Infiniti speakers for the audio system. Positive attitude. Thank you for reading, gentlemen.

View attachment 766533

View attachment 766534

View attachment 766535
I'm doing my trans fluid this weekend. Have some mt-90 for mine.
 
I'm doing my trans fluid this weekend. Have some mt-90 for mine.
I’ve read it’s either 90 or 85 which is optimal. 90 is much easier to find IIRC.

Today I did the “cool tuner stuff” that I’ve been putting off: installed an Apexi SAFC2 “Imamura Project” and a HKS Turbo Timer Type 1. The type 1 was a 2 year hunt, but I found one in Canada. And it was unboxed. So taking it out and installing it felt like time traveling.

The SAFC2 came with a jumper harness for the ECU. So everything is tied into that harness for simplicity. I removed the MAF signal from the SAFC2 so the unit is purely for looks and immersion.

IMG_9555.jpeg


IMG_9556.jpeg


IMG_9557.jpeg


IMG_9558.jpeg


IMG_9559.jpeg


IMG_9560.jpeg


IMG_9561.jpeg


IMG_9562.jpeg


IMG_9563.jpeg
 
Last edited:
Following audio advice from 20 year old posts on this forum has its caveats.

The front dash mounted drivers on these infinity sound systems are truly unique. They are 2.5” cone transducers (speakers). There are a very limited selection of cone transducers out there- most 2.5” solutions dome tweeters.

This forum recommended Bose 301 cone transducers to replace them. As a former Bose Mechanical Engineer, this excited me. I found some on eBay after a few months of searching and never bothered to pop the dash transducers out to compare measurements.

The infinity transducers: 2.5” in diameter.
The grill cover: 3.0” in diameter

Bose 301 transducers (cone tweeters): 3.0” in diameter

Damn it. They fit. But the grill will be tricky to modify to sit on the transducer without interfering with the cones travel. It’ll buzz if I’m not careful. For now they rest in the pocket, no adhesive, as they fit pretty snug and gravity should work until I brain a solution to cut up the grill and it’s surround to mount to the top of the Bose transducers.

I desoldered the old wire harness from the Infinity speakers that were obviously blown and resoldered it to the Bose replacements.

Using the audio system before replacing the rest of the transducers tells me that these were the culprits in sounding awful. The door drivers as well as the trunk all sound ok. The Bose drivers do play louder and bias the music forward, but they sound very very good. So I don’t mind it. I can always play with fade on the head unit.

I also added a photo of the SAFC2 and the turbo timer powered up. The nostalgia runs deep in me. It brings me back to my high school years, bopping around in my friends 1995 Black GSX with a SAFC on the dash.

IMG_9574.jpeg


IMG_9575.jpeg


IMG_9576.jpeg


IMG_9577.jpeg


IMG_9578.jpeg


IMG_9573.jpeg
 
Last edited:
Transmission output seal was toast from me being a monkey and humping the coconut. Replaced it with a ExpremePSI part that came in 2 days, which was wonderful.

Looks like I’ll need a new jackstand or I’ll just have to drive onto wood to raise the front. The lowering springs make the car look sick with Evo X wheels.

Brakes don’t work, and the throttle blips when I push in the brake pedal. I put a check valve in the brake booster to intake manifold vacuum line as the OEM valve was missing so I’m sure I need to tighten up that line a bit. It’s definitely leaking. Tomorrow hopefully I can get it back on the road for the summer 🙏🏻

IMG_9585.jpeg


IMG_9586.jpeg


IMG_9587.jpeg


IMG_9603.jpeg


IMG_9604.jpeg


IMG_9605.jpeg


IMG_9606.jpeg
 
Build update-

I have had issues with brake engagement. After the caliper swap, I've bled the brakes twice with two different methods- a passive, one man kit which is a bottle and tubes, and rely on the brakes to be pumped to bleed the lines. And a Harbor Freight vacuum pump. The rear lines can be successfully bled with both methods. The vacuum pump got air out of the lines I didn't know was there, which was great!

The front calipers? Not so much success. The one man kit bleeds just fine, but the vacuum pump sucks air. This might be the fact that the calipers are new and air can get around the pistol seals. I'm not sure where it's coming from.

The other issue- brake pressure doesn't build. The brake pedal rebounds, but it gets squishy and takes a ton of pumping to get the brakes to engage. To test the components, I pulled the brake booster vacuum line off and tested the valve- it works just fine (interesting that the one way valve in my 1999 brake booster line was close to the brake booster nipple). I removed the line and built a custom one out of new tubing and a new valve- still didn't solve the squishiness.

I turned the car off and pumped the brakes. The brake gets firmer, but not rock solid. And within a few seconds, the pressure subsides and the brake pedal is squishy again. This points me to a bad brake booster.

Since the lines from the master to the front calipers are short, the air pulled in the lines with vacuum could be from the master cylinder. Either way, I'm ordering a new master cylinder and a new remanufactured brake booster from rockauto. And will report back if this fixes my brake failure.

The only thing I can think of is that the booster sitting for so long idle caused the diaphragm to deteriorate. And the brake bleeding and whatnot caused it to die. It's over 25 years old, so a replacement is in order.
 
Found the soft brake issue(s):

Booster wasn’t working as good as it should. I had made a custom vacuum line with one way valve out of Silicone tubing. No. Bad. It was ballooning and collapsing and making a delayed brake.

I also installed the outlander calipers on the wrong sides of the car. The bleed valves were at the bottom of the caliper so air was being trapped in the piston. I’m an idiot. I bled the brakes on this car 4 times. And got it off and on the jack stands only to find the brakes took three pumps to activate poorly. And this was the root cause - air in the lines due to the bleeder valve being down instead of up 😂

The brakes work great now. There still is a boost leak I have to chase. But it should be good to go for the car show this Saturday.

Took the boy to go fill the tank. And he got some icecream for his candor. He was very excited for me. The Apexi SAFC2 and the HKS Type 1 turbo timer really send me back to my high school days.


IMG_9891.jpeg


IMG_9892.jpeg


IMG_9894.jpeg


IMG_9898.jpeg
 
Last year I bought a clearanced Easy On top (no color choice, luck of the draw) and then bought some of the window seals from junkyards and eBay. The previous owner installed a pretty nice top very poorly, tossed some of the window rubber seals, and left the bent and broken top tensioner arms. So I had to buy new ones from eBay as well as new tensioner cables.

The guides to install a top are very shitty at best. And this top didn’t come with instructions. Using some guides from this forum for removal were helpful. But the install I had to use a man’s 3g eclipse guide to give me the framework.

Easy on does have the center marked and the rear rib / bow line marked on the top which is invaluable. That line goes on the top edge of the rear bow. Everything else was a massive trial and error thing. But it’s done. The headliner I reused and the bow clips are 50% installed. But it’s good enough.

You need a good 1/4” electric staple gun. 3m spray advise. Clamps to help set the top and hold it while you stretch it. And a fish hook for the tensioner cables. As well as pliers for all of the snap fit fasteners. This job takes time but is doable.

I need to repair the rear window roller and the top motor mechanism now.

IMG_2908.jpeg


IMG_2909.jpeg


IMG_2915.jpeg


IMG_2918.jpeg


IMG_2920.jpeg


IMG_2921.jpeg


IMG_2970.jpeg


IMG_2971.jpeg


IMG_2972.jpeg


IMG_2974.jpeg


IMG_2977.jpeg


IMG_2978.jpeg


IMG_2983.jpeg


IMG_2986.jpeg


IMG_2987.jpeg


IMG_2989.jpeg
 
when digging around in the rockers and top well for fasteners I dropped, I found old tan pieces of top material. This car came from the Illinois plant with a tan top. And in my research, it is impossible to tell what color they came with from vin and order numbers. You had to be knowledgeable about color combos and dealer orders. Evidently when custom building these cars, you could pick the top color. But thats forum chatter I picked up, so who knows.

I have also ordered clear tail light lenses from an entrepreneur on Facebook. I have a spare set of tails. So that’s the next fun project.

IMG_2995.jpeg


IMG_2998.jpeg


IMG_3006.jpeg
 
Ever since I got this thing running nearly 2 years ago, it has never been able to build boost above 10 psi. It always had moments where it would. But it would always end with boost break up.

I bought a Greddy profec b boost controller and did countless boost leak tests. Rebuilt my throttle body and all of its gaskets- this spyder is tight! I bought a smoke machine thinking maybe the used FMIC I installed had some silent holes in it.

Fast forward to this week. I read about spark plug gapping and gapped the NGK BR7’s to 0.020” and I was able to reach 20 PSI, sometimes! And then I read more about old wires and plugs. The wires on the donor 4g63t were OEM. The plugs were newer. But the wires were quite possibly 30 years old.

Bought some performance OML 10mm wires and gapped NGK BR8’s, installed them with a newly painted Evo valve cover, and now I finally know what makes these cars a blast to drive. The small 16g rips to 20psi, and my scaled base tune keeps the AFR around 11, which is safe for now.

I am in love with this car, again. And my 8 year old son took a spin with me and said “I can’t believe I’m saying this, but I think I like the eclipse more than the Corvette (C5).” A boost junky is born.

IMG_3167.jpeg


IMG_3188.jpeg


IMG_3207.jpeg
 
Last edited:
While waiting for plugs and wires (and a cool OML Hat that came as swag) from Rockauto, I programmed the 3000gt keyfob to the car. And I also programmed my Flipper Zero to be a keyless remote, too.

Year 2000 meets year 2026

IMG_3149.jpeg


Last edited:
Add Value - Be Respectful - No Trolling - No Misinformation - Participate Often!
Support Vendors who Support the DSM Community

Latest posts

Build Thread Updates

Latest Classifieds

  • Wanted 2g ISO Rear Pass EDM Tail light
    Looking for only a passenger rear EDM tail light for my 2g. Please lmk if you have one lying...
    • Gabriel Pena
    • Updated:
    • Expires
  • Wanted 4G63 ISO built short block
    Looking for either a 7 bolt split thrust or 6 bolt
    • Gabriel Pena
    • Updated:
    • Expires
  • For sale 2g 95-98 Talon air bag.
    2g Talon airbag. Really good condition. Can ship ups ground. Message 702-741-6987
    • Galant665
    • Updated:
    • Expires
  • For sale 2g 1996 Eagle Talon TSI AWD
    I have a 96 Eagle Talon AWD standard tranny for sale. The car still ran when I parked it. I had...
    • eli1977
    • Updated:
    • Expires
  • For sale 2g 2g front strut shock cup. MR103156. New.
    Mitsubishi Oem # MR103156 front suspension strut cup. New. Message 702-741-6987.
    • Galant665
    • Updated:
Back
Top