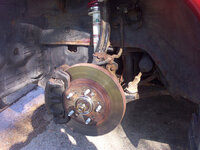
The reason I'm writing this is for those of us who do suspension work our selves. Its nearly impossible to pull the ball joints from the hub both upper and lower with out ripping the boots. Here is a quick and lasting fix for putting everything back together.
First things first If you find that your ball joints are no longer "good" or safe then replacing the boot will not fix the problem. It would be best if you replaced the arm. 2G's can not get ball joints alone. The whole arm must be purchased. This is not a boot fix its a replacement. You will need new boots from the dealer or in my case I took all the unripped ones from the junkyard. This fix worked for me, but im not making promises for you. If something happens or you screw up its not my fault and im not responsible for it.
Tools Needed.
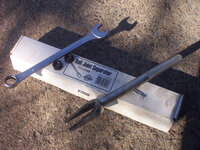
Ball Joint seperator ( rented from auto zone 17 bucks ) 3rd pic below.
7/8 inch wrench 3rd pic
Flat head screw driver
Hammer
Rachet
Plyers
STEP 1. Jack up the car and use jack stands. No one wants to read about you in the paper.
STEP 2. Remove the wheel. Thats pretty Self explanitory.
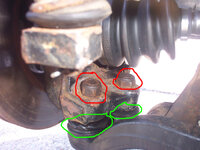
STEP 3. If you peek behind the rotor you will see two bolts ( I used 7/8 wrench ) just below the CV Boot. I have them out lined in in red in the 2nd picture below. I used a 7/8 inch wrench to remove these bolts. Dont try getting a socket in there... not enough room, Ofcourse. Remove these 2 Bolts.
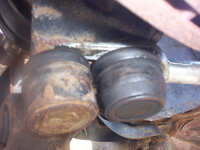
STEP 4. We will start with the Lower compression arm first. Thats the one that looks like a boomerang. Slide your ball joint seperator between the hub and boot of the ball joint shown in the 4th Pic below. Be sure to not rip the other boot when doing this if its still good. The ball joint seperator will slide all the way around the arm were working on and then slightly over lap the straight arms ball joint boot, thats ok no harm done. At this time we have gotten as far as we can with out the use of a hammer. To actually pull it from the hub you will have to whack the back of the ball joint seperator to creat enough force to pull it from the hub. A couple good hits will get it out, but remember its in there good.
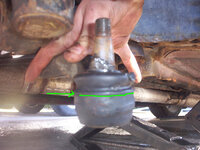
STEP 5. I assume you have poped the ball joint free from the hub. The next step is a breeze. Get your flat head screw driver and place it in the small crack that seperates the boot from the actual arm. Pic 5 shows that crack out lined in green. Now that you have your flat head there give it acouple taps with the hammer. Its should start to seperate rather easily. The beginning seperation can be viewed in the 6th Pic below. proceed to work the entire boot off untill it can just slide off up the thread.
Now that its off you will check to see the condition of the ball joint. Now I cant tell you exactly how it should feel, but loose is what we dont want. If you can pull the ball joint up and down inside of its " cup " then dont bother continuing, you will need a new ball joint. Also if the grease on the inside of the ball joints is non existant and the ball joins looks dry and/or rusted then replace it. Its only a matter of time before it will pop loose on you.
STEP 6. I trust if your this far you have made good judgement on the condition of your ball joints. From you collection of boots select the exact match to place back over the joint on the arm. Pic 7 Shows the asortment I rounded up from the junk yard. The ones outlined in green are the lower joint replacments, and the ones outside the green are for the upper. The boot goes on the same way it came off. Get some fresh grease in the boot and around the ball joint. You cant use enough so load it on. After you have done this Slide the boot down the ball joint and get it seated on there. It might take some minor effort but it will go on. I used the flat head and placed it on the metal edges of the boot and tapped it down with the hammer. Pic 8 shows this method.
STEP 7. If your replacing the Ball joint on the lower straight arm then go about that now the same way you did the first if not then STEP 7 will be putting the ball joint back in the hub secure. To do this you will slide the ball joint shaft up through the hub where it came out of and start threading the nut. The problem here is that once you thread the nut so far it will also spin the ball joint and thread along with it. That does not not allow it to actually thread down and get tight. To prevent this you have have to place a jack on the bottom of the ball joint and raise it up forcing it in to the hub. That will create enough friction that you can torque the nut down tight. Thats how you replace the ball joints for the lower arms on all 2G's.
UPPER BALL JOINT
STEP 1. Assuming you still have the wheel off, the upper ball joint is easily visable. You can see it here in the 9th Pic. Remove the nut and slide the seperator between the joint and the arm as shown in the 9th Pic. Just like before you will have to hammer the ball joint seperator to make enough force to pull it from the hub assembly.
STEP 2. Once its seperated the A arm the upperball joint is seated in it will beable to move up and down enough for you to move the hub arm just of out the way. Now we are going to remove the boot just as before. Find the line that seperated the boot from the arm. The place your flat head in the crack and tap the back with a hammer and start to seperate the boot from the arm like Shown in Pic 10. Go around the whole way untill the boot can slide down the joint over the threads.
STEP 3. With the boot off your joint should look healty like here in Pic 11. Lots of grease and still tight. If yours looks as good as mine we will now match up the old boot with a new one of the same size and fit shown in pic 12. Put some new grease in the boot and around the ball joint if needed. Slide the new boot up the joint and get it seated. Use a screw driver to get it set on the arm as shown in 8th Pic.
STEP 9. Putting it all back together. Swing the arm connected to the hub back under the ball joint and slide the ball joint through. Thread the nut on hand tight. The same problem will occur with the top of the ball joint spinning with the thread. To stop this you will have to squeze the A arm and the Hub arm Tight and use a rachet to tighten the nut. Heres where I held the 2 arms..Pic 13.
After its torqued tight, check all the nuts you have loosend and make sure everythings tight. Now, your done. Put the wheel back on and lower the car.
No worries, now you can safly drive in rain and dust again. Have fun and stay boostin. Im off to finish the superbowl now.
Ill get pictures 6 - 13 up when I figure out why its not working.


