The Central Hub for DSM Community and Information

For 1990-1999 Mitsubishi Eclipse, Eagle Talon, Plymouth Laser, and Galant VR-4 Owners. This is where the DSM platform history is documented and archived. Log in to help us in our mission, and to remove most ads from the browsing experience.

2014-04-09_18-49-05_609.jpg

JW's GSX - Green Manalishi

Build it quick, light and fast (over a long period of time…..)

This site may earn a commission from merchant affiliate links, including eBay, Amazon, and others.


Been a couple of minutes. Updating the under body chassis. Adding Volk metalcraft suspension parts. Still 59k miles. But the fuel from ‘08 has been removed from the fuel tank and disposed of. Refreshing the chassis, fixing some jack rash on the ‘subframe’ and black oxide hardware, powder coating, and cleaning. Pictures to follow.

Thanks to all who keep the platform from becoming obsolete.
 
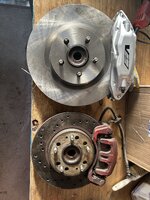
Front upper control arms. Under coating on the road side. No discernable marks noting production information.
Mine first pic
Justin DuBois next pic

Good info link:

IMG_0384.jpeg


IMG_0388.png
 
Last edited:
Not an illusion. The right side arm is not straight. But I’ve got a set of volk metalcraft front lower arms on the shelf.

Both arms have a white stencil 1210NA. Left has a cast in 4. Right has a cast in 2.

IMG_0369.jpeg


image.jpg
 
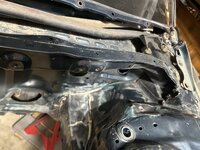
Left and right frame rails. Is that ‘wrinkle’ on the right side supposed to be there? Obviously the right side is missing some sheet metal. Does anyone have a picture or link to correct looking front frame section?

IMG_0402.jpeg


IMG_0403.jpeg


IMG_0404.jpeg


IMG_0405.jpeg
 
Thanks for the photos. That clears it up. The exterior panels appeared to be straight, but the left fender is aftermarket. I’ll try and slide hammer and massage the frame rail out, but not too concerned. Now on the right side, I’ll weld in a section of sheet metal to replace the section that was modified for ‘cold air intake’.
 
Last edited:
Couldn’t find the forward engine pick mount in storage. (It’s red, I’ve seen it many times since I took it off because ‘it was excess weight ?’ It’s in one of the boxes or spare parts stashes, though I resorted the garage boxes in vane). So, I made one out of a section of a front leaf spring mount that I removed from my 1979 Ramcharger because I installed a Jungle’s winch bumper. (Good upgrade for sure).
See pics of raw material and final assembly ready for the engine hoist.

The rear pick point I could find. But I added a thick washer to hopefully keep the attachment point to the hoist balance / leveler from getting bent up after I flattened it out from previous use.

IMG_0442.jpeg


IMG_0444.jpeg


IMG_0448.jpeg


IMG_0447.jpeg


IMG_0450.jpeg
 
Last edited:
Subframe pulled without issue. Very smooth actually.

Just a bit of brake fluid corrosion and a snapped off bolt for rear roll stop mount. The brake fluid leak, for sure me. The snapped bolt, not me.

Are those factory marks on the underside of the front subframe member?

IMG_0466.jpeg


IMG_0461.jpeg


IMG_0468.jpeg
 
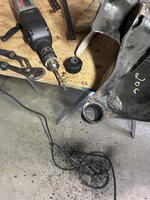
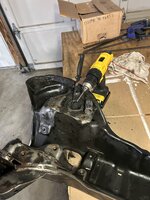
Removing the front subframe rubber bushings. (An 120vAC electric drill does a better job than a 20vDC cordless. You don’t have to wait for the batteries to charge.)

Four of these are a lot easier than the rear bushings, as there isn’t a metal outside collar. Haven’t taken out the last two. But I’m thinking the press and the right sized pipe section should do the trick.
 

Attachments

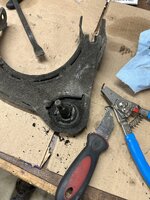
Front upper ball joint. Needs a good cleaning and grease repack, but feels somewhat firm.

Do you guys recommend upgrading to the +/- 1 deg ball joints?
 

Attachments

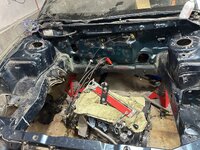
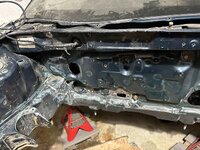
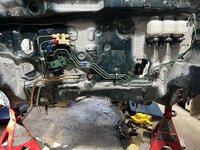
Firewall to be refreshed.

Couple of things to address: weld up unnecessary random screw holes , abandoned wire chases, and unneeded heater core penetrations (because ragged edge superformance cars don’t have HVAC).

The sharp eye may see a second wiring rubber bulkhead fitting blockout where the AC once was. Engine harness separate from chassis harness, chassis wiring running to center console fuse panel (though driver kick panel fuse block is still utilized via under dash wiring, as necessary). It’s just the way it should have been. Not ran through the drivers side fender area.
 

Attachments

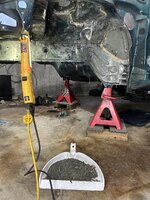
Bought a bench grinder (finally). Can’t believe I “didn’t need” one of these for all these years.
Cleaning up some fasteners for the black oxide treatment. Then I’m going to sharpen up the box of iffy drill bits.
IMG_0536.jpeg


IMG_0537.jpeg


IMG_0535.jpeg
 
Bought a couple lengths of piping. Cut 5” sections. Setup the 20 ton press and used a 13/16 socket to press out the front subframe bushings. It worked so slick. Pinched the 2.5” aluminum pipe to fit inside the lower control arm mount location. 1-1/2” sch40 pipe to support the underside of the subframe. Used a level to ensure I was pressing pretty straight.
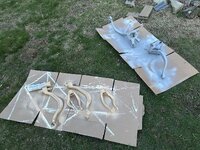
I’m going to powder coat the front and rear subframes.
Question: should I press the aluminum bushings before or after powder coating? I’m leaning towards before so I don’t scratch up the final coating. I will adjust the I’d of the bushings for a nice friction fit, and lube up the bushing with high pressure grease which should act as a dielectric and prevent dissimilar metal corrosion.

IMG_0559.jpeg


IMG_0553.jpeg


IMG_0552.jpeg


IMG_0554.jpeg


IMG_0556.jpeg


IMG_0561.jpeg


IMG_0566.jpeg
 
Last edited:
Front subframe with Volk metalcraft aluminum bushings.

Used the flap wheel, calipers and a ‘handle’ to bring the id of the bushings into a manageable + tolerance. Still pressed in, but not too tough.

Rear is next.

IMG_0596.jpeg


IMG_0597.jpeg


IMG_0598.jpeg


IMG_0589.jpeg
 
Last edited:
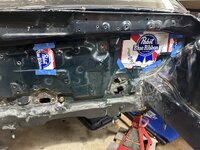
Under body work today.

There was a sticky oily black layer in some parts. I could scrape with a plastic drywall scraper, if it was oil soaked enough. Used foaming engine degreaser. This stuff takes the green paint off but leaves the primer layer.

Used a wire wheel to remove the whitish undercoating. (Because race cars don’t have sound deadening and don’t drive in foul weather).

The white suit, gloves and face shield were a must.

I’m maybe half done after 6hrs on the floor creeper. Very little rust, just along the edge of a couple sheet metal seams.

But I do have some hours ahead to pullout the ‘subframe rails’.

IMG_0654.jpeg


IMG_0656.jpeg


IMG_0659.jpeg


IMG_0662.jpeg


IMG_0663.jpeg


IMG_0655.jpeg
 
Rear subframe update This all took place over many days in the garage. (Started in November, albeit lazy over winter and got serious again in mid-March):

Compared my ‘96 subframe to my ‘95
‘95: 593 BFHN (non-abs)
‘96: #725 BFH ABS (abs equipped)
Cool right?

Rear Differential bushings out, (they are fluid filled) new torque solutions aluminum bushings in.

Rear subframe bushings out - including steel sleeves. Liberal use of air hammer applied. (Note: Torque solutions poly bushings are sized for the sleeve to remain. Big deal here)

Special thanks to gofer!! Provided me with (currently not available) Volk metalcraft aluminum bushings. To be sized and pressed in shortly.

Boston Performance designs aluminum rear differential front snout supports (kit includes two mounts and a steel tab to be welded on) purchased many (many) years ago. Thanks Boston Hatcher

12mm x 1.25 tap for differential snout threads.
14mm x 70mm bolt plus washer and nut for 4th differential attachment point.

Next up powder coating.

IMG_0247.jpeg


IMG_0036.jpeg


IMG_0257.jpeg


IMG_8855.jpeg


IMG_0250.jpeg


IMG_0451.jpeg


IMG_0670.jpeg


IMG_0667.jpeg


IMG_0676.jpeg


IMG_0677.jpeg


IMG_0678.jpeg
 
Last edited:
So we get to the original point of the under chassis refresh. Which now also includes the engine and front subframe removal.

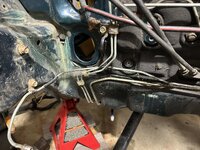
I wanted to upsize the fuel line to 3/8 SS tubing. FYI, near as I can tell you need to drop the subframe, so I did the work. Went quick, and as a side note, I can rehab the engine bay.

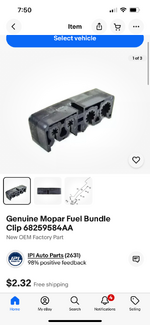
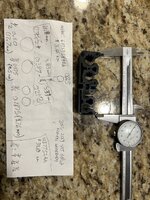
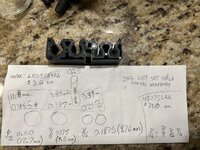
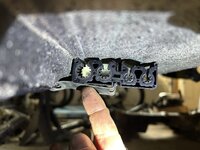
Needed to rework or purchase different brake and fuel line clips. I found the Genuine Mopar Fuel Bundle Clip 68259584AA. They are the clips for a Challenger Hellcat, because that’s a good roll model for performance. Received the parts and took some measurements. This thing is massive. Sized for 1/2” fuel, 3/8” return, and dual 3/16” brakes. The smaller version has a smaller fuel supply but priced 10x more. Did a little mockup. The big boys will work.

So, I only want to drop the subframe once, I’m going to buy 1/2” SS fuel line. Use the 3/8 for return; I’ll have capacity to be a drivetrain snapping machine, hopefully not.

Previously, I had abandoned the engine bay charcoal vent canister but left the vent line in the engine bay with a rubber vent line routed to the side of the vehicle. As the Mopar clip only has 4 spots, I’m going to route the vent to a charcoal canister near the fuel filler neck.

Anyone have any experience sourcing a compact deep breather charcoal canister?
 

Attachments

Add Value - Be Respectful - No Trolling - No Misinformation - Participate Often!
Support Vendors who Support the DSM Community

Build Thread Updates

Latest Classifieds

  • For sale 2g 2G Grey A Pillar Plastic Set
    2G Grey A Pillar Plastic Set $50 + shipping & paypal fees* all tabs and clips are on the...
    • jersygsx
    • Updated:
    • Expires
  • For sale 2g GSX/GST OEM Front Knuckle Set
    2G GSX/GST OEM Front Knuckle Set $140 + shipping & paypal feesYou must be registered to see...
    • jersygsx
    • Updated:
    • Expires
  • For sale 1G DSM POWER STEERING HOSE / PUMP
    Came off stock 1G, won’t be using. Buyer covers shipping / fee.
    • The_Partout_Spot
    • Updated:
    • Expires
  • For sale 1G DSM AUTO W4A33 SHIFTER CABLE
    went with ratchet shifter, buyer covers shipping / fee.
    • The_Partout_Spot
    • Updated:
    • Expires
  • For sale 1G DSM W4A33 PUMP
    Off a stock auto dsm trans, won’t be using. Buyer covers shipping / fee.
    • The_Partout_Spot
    • Updated:
    • Expires
Back
Top