Atmospheric O2 Dump Installation How To
This is a step by step how to intended for users who are installing an atmospheric O2 dump. This installation was performed on a 1990 FWD eclipse but will be very similar to an installation on any 4G63 DSM equip with a stock style turbine housing (14B, 16G, Etc.). The installation is fairly easy but will require a fair amount of tools. Because you are working on an exhaust system, fasteners are often times very difficult to remove. Having the right tools will definitely cut your install time in half. Also included are some suggestions on how to fabricate a dump tube extension and heat shield intended to keep your alternator from cooking and keep engine compartment temperatures down.
Removal
1) Disconnect the negative battery cable. Youll be working near the alternator and will be very surprised if you bridge the power terminal to the manifold with a wrench. If youve ever arc welded it works much the same way but youre holding the electrode with your hand. Cool stuff.
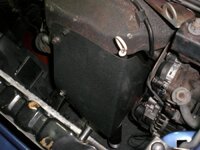
2) Remove the A/C condenser fan. You will open up some room to work, and possibly be forced as in my case to leave this off due to fitment issues. 2 bolts on top, one on bottom, 10mm (RED) .
3) Disconnect the plug connecting the O2 sensor to the harness. The plug is held in a clip located on the passenger side of the head right where the block and head meet. Unclip the sensor form the upper heat shield and lay it aside.
4) Remove the upper heat shied. There are 3, 12mm bolts (RED) .
5)Remove the lower heat shield. There are 5, 12mm bolts (RED) .
6) Remove the dipstick. There is 1, 14mm bolt ( BLUE) securing it to the block. After removing the bolt wiggle and pull up and the tube will pop out of the block.
7) After you remove the dipstick tube you can now remove the lower heat shield. It may be difficult to get out but wiggle and pull and it will work free.
8) Now you will need to remove the O2 sensor. Removing it now will help you in a couple ways. First the housing is still attached to the car. It wont move when your applying massive amounts of torque to get it to break loose (and believe me you will have to). Also removing it at this point will open up space to get to one of the rearward bolts on the housing. The only problem with removing it on the car is that you will have to use an O2 sensor socket. This is a specialty socket that has a notch cut up one side for the O2 sensors wire to protrude from. They dont work very well when the sensor is extremely tight, and will often round off the bolt sides. If this is the case and the socket feels like it is going round off, stop. You could try to heat the housing with MAPP or propane torch. If you choose to do this, do not heat the sensor, only heat the housing. You may be unable to remove the sensor and will have to work around it. The stock O2 sensor I removed from my car was 22mm.
9) Remove the 2, 19mm bolts attaching the down pipe to the O2 housing (RED) . These bolts are always impossible to get off. This is how to do it easily. Buy a bottle of MAPP gas and a torch head. You can fine these items at any home depot and possibly a local auto parts store all for under 35 dollars. Take the MAPP gas and heat the bolts until they are glowing red hot. Hold the flame about 3 inches from the bolt, not directly on it. Be careful not to burn down the car, this stuff burns hot. When the bolts are red hot remove the torch and back the bolts off the O2 housing studs. If you have and impact wrench it works best to use this. If you do not however, use a ratcheting breaker bar. You may have to heat the bolt multiple times. Without an impact the bolt will cool as you are removing it, getting tighter every turn as it gets cooler. If this happens just heat the bolts again and repeat. Oh yeah, if your working is 30 degree weather your MAPP gas wont work very well. Run hot water over the bottle until its nice and warm. Repeat as necessary.
10) Remove the 1, 14mm bolt (BLUE) securing the down pipe to the car. The down pipe should be loose now. If its not give it a couple taps to free it up.
11)Remove the O2 housing bolts (RED) . There are 3, 14mm bolts and 1, 14mm nut attached to a stud. You can use the MAPP gas on the top bolt but thats all the help youre going to get. In (BLUE) is a better shot of the down pipe secure bolt.
Use a ratchet with a shallow 14mm with a 3 inch extension on the 3 bolts. On the nut/stud use a 14mm ratchet wrench. The housing should now pull off.
11A) If you did not remove the O2 sensor earlier as described, you will need to do this now.
Clamp the O2 housing in a vise and use a box end wrench to crack the sensor loose. Use MAPP gas to heat the housing to ease removal.
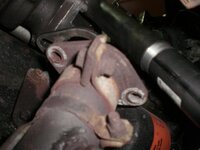
As you can see I broke 2 of the O2 housing bolts in the turbine housing. F**k. There a couple of things you can do. If there is enough of the bolt left you can use a pipe wrench to try and remove it. Clamp the housing in a vise and heat the housing with MAPP gas, then twist them out with the pipe wrench. If you broke the bolts off flush youre screwed and have to do one of the following. If youre lazy like me, you just swap in another turbine housing. This will be the easiest option. Otherwise, get out your drill and go to work. Dont bother with an easy out youll be wasting your time. Drill out the fastener and tap the hole. Make sure you can find new bolts to fit your newly taped hole. You better have some beer to go along with the latter option.
Installation
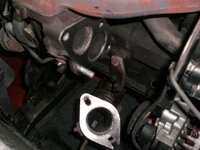
Installation is pretty straight forward. For me there were a few problems with installing an O2 dump (at least the one I did in particular). The first problem was the dump tube didnt extend long enough to dump below the car (most do not). Instead it dumped near the radiator, which isnt so good for coolant temps. The second problem is that you loose the use of the stock lower heat shield. I know most people dont have them to begin with but believe it or not they are there for a reason. Not only is the O2 dump youre installing placed much closer to accessories such as the alternator, but its also not made of thick cast like the stock O2 housing. This means your new dump absorbs less heat and will emit much more heat into the engine compartment. It is a good idea to make sure your dump extends below the vehicle out of your engine bay, and all your components are protected from exhaust heat.
Make sure you have the following:
Down pipe gasket- Mitsubishi part # MB687002
Turbine to O2 housing gasket- Mitsubishi part # MB687002 MD124675
Nuts and bolts and lock washers to attach the down pipe to the new O2 housing.
Anti-seize
Dielectric grease
1) Place your new gasket on the turbine housing and then install the O2 housing. Coat all 4 bolts with Anti-seize and tighten.
2) Install the downpipe gasket. You will no longer have studs coming out of the O2 housing. Use bolts and nuts to attach the downpipe to the O2 housing. Use lock washers on each side and coat the hardware with Anti-seize for ease of future removal.
3) Install the 14mm hold bolt on the exhaust bracket attached to the downpipe. Due to fitment issues this step may have to be skipped, unless you want to take the time to move the clamp bracket on the downpipe so the hole lines up again.
4) Reinstall the O2 sensor. It is probably easier to do this while the O2 dump is still off of the car, but installing the O2 sensor before installing the housing itself will mean you will have to work around it. I installed it later, but do whichever is easiest. Put a small amount of Anti-seize on the O2 sensor threads. Be sure not to get it on the sensor tip.
5) Install the upper heat shield. Route the O2 sensor wire back to the harness plug making sure it does not contact ANY metal parts. Apply some dielectric grease to the connector, plug it into the harness and clip it back in its place. Use the stock heat shield clips to route the wire over the manifold.
At this point the O2 dump is installed in working order. The following I would recommend performing if not already taken care of.
Dump pipe extension
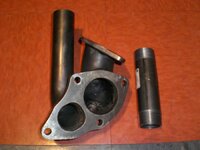
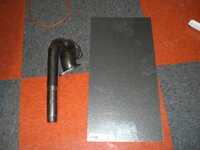
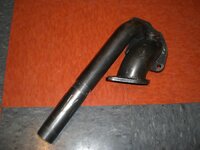
You want to make sure your dump pipe is actually dumping to atmosphere, not into your radiator, lower core support, Etc.. I used a small piece or pipe I purchased at home depot to extend my dump tube so that it wasnt dumping into my engine compartment. Besides preventing damage and raising engine bay temperatures, extending the dump pipe below the car actually will help performance. By placing the dump tube orifice in the cars wind stream, air blowing across the pipe actually draws out the exhaust, sort of like a venturi in a carburetor. The pipe I bought was threaded. I gave it a couple turns into the bottom of the dump tube and it held securely. Port the top of the inner diameter of the extension pipe on the end you are inserting into the dump tube to reduce any flow restrictions.
Heat shield
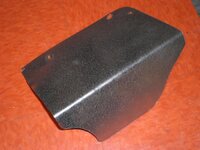
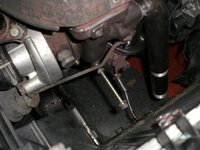
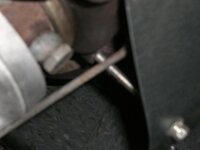
Due to your new go fast part, you will no longer be able to use the lower heat shield. Its ok. Just make another one. Go to home depot and buy a piece of 12x24 sheet metal. Take it home and cut it in half. Cut and fold to match the image. Use 2 stock upper heat shield bolt holes to secure the top. The bottom is a bit tricky. Find a bolt approximately 3 inches long . Use a 5/16 or metric equivalent die to thread the bolt all the way to the base of the head. Insert the bolt unto the heat shield and put a nut on the bolt sandwiching the sheet metal between the bolt head and nut. Do not tighten it yet. Thread the long bolt into the lower heat shield bolt hole(red). Tighten the nut on the 3 inch bolt until the heat shield is pinched between the two. Tighten the top two bolts and youre done.
6) Take your DSM out for a test beat, under the legal speed limit of course. Since I have done the install I have noticed a performance increase. The ass dyno seems to be reading higher than before, but I havent had a chance to get it back onto the Dynojet. P.M. me if you have any questions about this how to or the install.
Here are some more pictures.
I got a better shot of the heat shield bottom support bolt, a shot of a MAPP gas bottle.
Assembled, the extension pipe for the O2 housing added on about 5 inches of length to the original dump tube.
Paint the heat shields to match and you would never know they weren't stock.
Attachments
-
 7897890000.jpg61.1 KB · Views: 5,376
 -
 circle (2).jpg74 KB · Views: 5,397
 -
 CIMG0014 color.jpg55 KB · Views: 5,385
 -
 CIMG0022 color.jpg56 KB · Views: 5,339
 -
 324556 (2).jpg46.1 KB · Views: 5,343
 -
 CIMG0026 (2).jpg50.3 KB · Views: 5,346
 -
 6557567 (2).jpg35.9 KB · Views: 5,547
 -
 CIMG0024 (2).jpg41.9 KB · Views: 5,283
 -
 CIMG0036 (2).jpg43.9 KB · Views: 5,286
 -
 CIMG0046 (2).jpg46.6 KB · Views: 5,263
 -
 CIMG0012 (2).jpg43.6 KB · Views: 5,227
 -
 CIMG0040 (2).jpg20.7 KB · Views: 5,150
 -
 3442 (2).jpg37.6 KB · Views: 5,103
 -
 CIMG0044 (2).jpg56.2 KB · Views: 4,902
 -
 CIMG0018 (2).jpg34.3 KB · Views: 4,575


