
tmoney20g
Proven Member
- 890
- 229
- Apr 16, 2014
-
hammonton,
New Jersey
Hi guys! First post about anything DSM related in years! 10 years ago I could tear down a dsm in my sleep, had every bolt size and torque spec memorized, and some of you may have even used my msd dis-2 how-to @ http://my.prostreetonline.com/2013/09/03/how-to-install-a-msd-dis2-in-a-dsm/
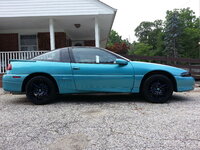
I'm now 37 and I missed the turbo sounds of my 92 fwd laser (12.7 @ 113 at Atco), so I'm back at it again.
So last summer I found a torquise 92 talon awd in Delaware. 222,000 miles or so, had some mods done already, but the owner passed away due to cancer back in 2011 (I think). His wife held on to the car for a couple years and finally decided to sell it. It has now become my 15th (or so) lifetime DSM. Included with the car was a huge folder of stuff, all his receipts, another Haynes manual for me, and other various paperwork from oil changes and stuff. Its nice when a car comes with records.
Pics in previous owner's driveway:


Just getting it on to the trailer was an issue, because the rear brakes were locked up, so it took a couple hours to just re-arrange the car's position in the driveway using a jack and pushing the car around on axis. Then I pulled it up the car trailer with some nifty portable winch thing I bought from HF. So I got it back to south Jersey, unloaded it, and it sat in my garage all winter.
First project: Rear subframe
Jan 2014 - April 2014
When I got the car home, I knew she'd be a jackstand queen for most of 2014. So I lifted her up front and rear, and jackstanded the 4 points. Tires and rims came off first, and were tossed to the junkyard. For christmas, I ordered myself new black slotted/drilled rotos from brakeperformance.com, reman'd calipers from advance, and a black foliatech paint kit for the calipers. I also ordered Wheels/Tires from Discount Tire (17x7.5 Konig Deception Black with Blue Ball stripe / 215/45/17 Falken Ziex ZE-612 tires).
Pic of car in garage:
 Pic of wheels/tires:
 Pic of painted calipers:
(pic soon)
Pic of black rotors:

I went with these rims because I wanted something that looked good, were black, easy to clean, and only had the 5 lug holes meant for this particular car, and not the rims that have 10 lug holes to fit 5x100 and 5x114. I have always been a fan of falken tires, and since I plan on driving the car all year, I'd like tires that are somewhat quiet, yet provide good all-season performance. $862 shipped for the wheels/tires/mounted/balanced, plus hub rings and the tuner lugs. For whatever reason, they sent me chrome tuner lugs, thanks for that, when I ordered black rims. I also decided on the KYB AGX's, (as I've had them before) and Eibach Sportline springs. From my past DSM days, I had random poly bushing kits laying around, so I pieced together what I had, and what I was missing, and ordered all the stuff I was missing in order to have the entire car covered, including the subframe/mustache bushings that I found on here.
FINALLY, it stopped snowing after this brutal winter, and I unbolted the driveshaft to the rear, and proceeded to drop the rear subframe. I tried to unbolt the camber bolts, and seriously, they're all time-welded to the bushings. Upper CA, Lower CA, trailing arms, etc. Forget it. I got out the sawzall and cut out the 2 upper control arms bolts to the subframe, but this is rediculous. So I spent some time looking around on Ebay and the like, seeing if I could find a used subframe crossmember, lower control arms, and trailing arms. Those I didn't find, so I went to car-part.com, and took a chance contacting a guy that listed trailing arms pretty cheap. Turns out he's a dsm junkyard specialist. Stevie Miller at Miller Import Parts sent me a subframe and trailing arms from a 93 awd at a great price, and shipped them immediately.
Pic of my banged up subframe:
 Pic of 93 subframe:

So yay, I could finally work on it instead of just looking at it and getting frustrated with it.
Saturday April 12th:
Today I planned on making some progress. I took the factory rear struts, lower control arms, and new rear springs / agxs over to my buddy's shop.
LCA: we torched out the factory bushings and sleeve, pounded out the factory ball joint. I wire brushed the LCA's for a an hour or two, and prepared to primer them. I picked up dupli-color spray etch/primer from Advance, on sale ~$5 a can. This stuff is awesome!
Pic of Primed LCA's:

From RockAuto I ordered six (6) mevotech ball joints and 2 rear sway endlinks, so they're on their way.
On to the struts/springs. My buddy has this wall-mounted spring compressor, and lemmetellya, what a difference using that versus they way I had always done it, on the bench, with 2 huge adjustable wrenches, and the same "spring compressor" kit most of us have. After surveying the existing components to be re-used (strut mounting top, bellow, bump stop) I knew I'd need additional new parts. The bellow cap and strut hat weren't too rusty, but I decided to wire wheel those as much as possible, etch/prime, and flat black paint them. I picked up new strut mounting hardware and bellow kits from Advance and re-assembled everything once all my painting was done.
Pic of assembled rear strut:

This week I wanted to make more progress on the prepping of the subframe crossmember and trailing arms. I only have an 8 gallon compressor, and my buddy only opens his shop every other Saturday, so I was on my own. Die grinder with a wire-wheel doesn't go very far on a little 8 gallon compressor, so I decided on something else. I went to HF again, picked up the 1 litre blast gun and the engine cleaning wand. 2 air tools I *could* use with my 8 gallon comp.
The nearest Home Depot that has the kiln dried sand isn't a week night drive for me, so I'll hold off on that for now. But I still wanted to try it, so I raided my wife's baking supplies for baking soda. I filled up the container on that and proceeded to blast the subframe crossmember in a couple spots. It sure cleaned the surface, and removed tiny bits of paint, but it wouldn't really take rust off the metal. We'll see how the sand does on the rust spots.
Update 4/26/14:
Just got home from my week-long wedding trip in Mexico at like 1am, got some beauty sleep, and went off to Home Depot to get the "commercial" fine sand to try out this sand blaster thing. Grabbed 2 50lb bags for 10 bucks, and headed back home to pick up some parts to work on today. I figured I'd work on the subframe cross-member and the mustache. First I burned out the old subframe bushings and cleaned up those holes, then set up a little sandblasting stand to start on the mustache. (in the pic you can see the subframe hanging off the truck, with nice cleaned out bushing holes.

I also wire-brushed the 4 large washers that were rubber covered from the original subframe bushings. They'll just get the etch/primer and flat black spray. Here's the washers with a coat of primer, and the result of the sand blasting the mustache:
 Here's the first coat of spray etch/primer on the mustache:

Update 5/3/14:
It was an off-week since my buddy has his daughter every other week, but he was doing stuff outside so I had a chance to do some work over there anyway. Since I didn't know how much time I'd have over there, I figured I'd bring something small to work on, which was one of the trailing arms. After yanking the hub/bearing/seal with a slide-hammer, I setup my little sandblasting station again, and got to work:
 Primed TA and dust shield:

I'm now 37 and I missed the turbo sounds of my 92 fwd laser (12.7 @ 113 at Atco), so I'm back at it again.
So last summer I found a torquise 92 talon awd in Delaware. 222,000 miles or so, had some mods done already, but the owner passed away due to cancer back in 2011 (I think). His wife held on to the car for a couple years and finally decided to sell it. It has now become my 15th (or so) lifetime DSM. Included with the car was a huge folder of stuff, all his receipts, another Haynes manual for me, and other various paperwork from oil changes and stuff. Its nice when a car comes with records.
Pics in previous owner's driveway:
Just getting it on to the trailer was an issue, because the rear brakes were locked up, so it took a couple hours to just re-arrange the car's position in the driveway using a jack and pushing the car around on axis. Then I pulled it up the car trailer with some nifty portable winch thing I bought from HF. So I got it back to south Jersey, unloaded it, and it sat in my garage all winter.
First project: Rear subframe
Jan 2014 - April 2014
When I got the car home, I knew she'd be a jackstand queen for most of 2014. So I lifted her up front and rear, and jackstanded the 4 points. Tires and rims came off first, and were tossed to the junkyard. For christmas, I ordered myself new black slotted/drilled rotos from brakeperformance.com, reman'd calipers from advance, and a black foliatech paint kit for the calipers. I also ordered Wheels/Tires from Discount Tire (17x7.5 Konig Deception Black with Blue Ball stripe / 215/45/17 Falken Ziex ZE-612 tires).
Pic of car in garage:
(pic soon)
Pic of black rotors:
I went with these rims because I wanted something that looked good, were black, easy to clean, and only had the 5 lug holes meant for this particular car, and not the rims that have 10 lug holes to fit 5x100 and 5x114. I have always been a fan of falken tires, and since I plan on driving the car all year, I'd like tires that are somewhat quiet, yet provide good all-season performance. $862 shipped for the wheels/tires/mounted/balanced, plus hub rings and the tuner lugs. For whatever reason, they sent me chrome tuner lugs, thanks for that, when I ordered black rims. I also decided on the KYB AGX's, (as I've had them before) and Eibach Sportline springs. From my past DSM days, I had random poly bushing kits laying around, so I pieced together what I had, and what I was missing, and ordered all the stuff I was missing in order to have the entire car covered, including the subframe/mustache bushings that I found on here.
FINALLY, it stopped snowing after this brutal winter, and I unbolted the driveshaft to the rear, and proceeded to drop the rear subframe. I tried to unbolt the camber bolts, and seriously, they're all time-welded to the bushings. Upper CA, Lower CA, trailing arms, etc. Forget it. I got out the sawzall and cut out the 2 upper control arms bolts to the subframe, but this is rediculous. So I spent some time looking around on Ebay and the like, seeing if I could find a used subframe crossmember, lower control arms, and trailing arms. Those I didn't find, so I went to car-part.com, and took a chance contacting a guy that listed trailing arms pretty cheap. Turns out he's a dsm junkyard specialist. Stevie Miller at Miller Import Parts sent me a subframe and trailing arms from a 93 awd at a great price, and shipped them immediately.
Pic of my banged up subframe:
So yay, I could finally work on it instead of just looking at it and getting frustrated with it.
Saturday April 12th:
Today I planned on making some progress. I took the factory rear struts, lower control arms, and new rear springs / agxs over to my buddy's shop.
LCA: we torched out the factory bushings and sleeve, pounded out the factory ball joint. I wire brushed the LCA's for a an hour or two, and prepared to primer them. I picked up dupli-color spray etch/primer from Advance, on sale ~$5 a can. This stuff is awesome!
Pic of Primed LCA's:
From RockAuto I ordered six (6) mevotech ball joints and 2 rear sway endlinks, so they're on their way.
On to the struts/springs. My buddy has this wall-mounted spring compressor, and lemmetellya, what a difference using that versus they way I had always done it, on the bench, with 2 huge adjustable wrenches, and the same "spring compressor" kit most of us have. After surveying the existing components to be re-used (strut mounting top, bellow, bump stop) I knew I'd need additional new parts. The bellow cap and strut hat weren't too rusty, but I decided to wire wheel those as much as possible, etch/prime, and flat black paint them. I picked up new strut mounting hardware and bellow kits from Advance and re-assembled everything once all my painting was done.
Pic of assembled rear strut:
This week I wanted to make more progress on the prepping of the subframe crossmember and trailing arms. I only have an 8 gallon compressor, and my buddy only opens his shop every other Saturday, so I was on my own. Die grinder with a wire-wheel doesn't go very far on a little 8 gallon compressor, so I decided on something else. I went to HF again, picked up the 1 litre blast gun and the engine cleaning wand. 2 air tools I *could* use with my 8 gallon comp.
The nearest Home Depot that has the kiln dried sand isn't a week night drive for me, so I'll hold off on that for now. But I still wanted to try it, so I raided my wife's baking supplies for baking soda. I filled up the container on that and proceeded to blast the subframe crossmember in a couple spots. It sure cleaned the surface, and removed tiny bits of paint, but it wouldn't really take rust off the metal. We'll see how the sand does on the rust spots.
Update 4/26/14:
Just got home from my week-long wedding trip in Mexico at like 1am, got some beauty sleep, and went off to Home Depot to get the "commercial" fine sand to try out this sand blaster thing. Grabbed 2 50lb bags for 10 bucks, and headed back home to pick up some parts to work on today. I figured I'd work on the subframe cross-member and the mustache. First I burned out the old subframe bushings and cleaned up those holes, then set up a little sandblasting stand to start on the mustache. (in the pic you can see the subframe hanging off the truck, with nice cleaned out bushing holes.
I also wire-brushed the 4 large washers that were rubber covered from the original subframe bushings. They'll just get the etch/primer and flat black spray. Here's the washers with a coat of primer, and the result of the sand blasting the mustache:
Update 5/3/14:
It was an off-week since my buddy has his daughter every other week, but he was doing stuff outside so I had a chance to do some work over there anyway. Since I didn't know how much time I'd have over there, I figured I'd bring something small to work on, which was one of the trailing arms. After yanking the hub/bearing/seal with a slide-hammer, I setup my little sandblasting station again, and got to work:
Last edited:

")

