

Dyesuperman
10+ Year Contributor
- 523
- 22
- Mar 10, 2009
-
Minot,
North Dakota
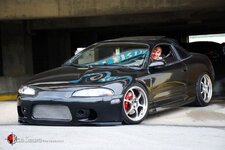
This is the build for my 1995 GSX. Before I begin talking about it though, a little history might bring the build together more. Lets start with my former car.
I was in love with my red 1995 GST and planned on keeping it and doing the AWD swap because I hated FWD. I bought all of the swap parts except for the transmission. I started collecting parts like fuel setup, turbo, ecmlink, etc. It was super clean for having 190,000 miles on it and ran perfect. Never had a problem with it the whole time I owned it. It had a few bolt-ons but nothing major done to it.
Here it is shortly before I sold it


What it looked like when it left my house

Sometimes I think I should have just kept that car and done the AWD swap but then I consider how much I like the GSX and I change my mind..Now, a little about the GSX since that is what this build thread is even for.
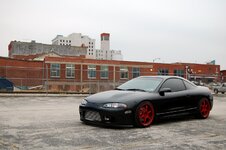
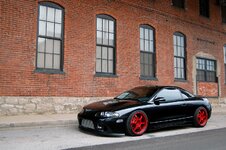
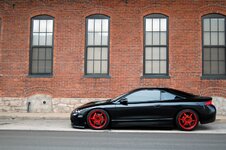
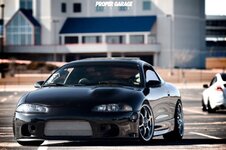
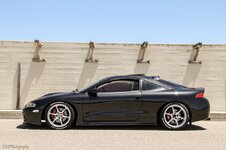
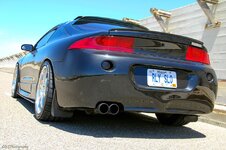
A local guy owned the GSX and I knew a little about it from friends and such. 50 trim turbo, cams, gram lights, lowered, looks amazing, etc. Well one night sitting at Hooters, a friend mentioned that the guy is trying to sell it and I immediately became interested. When I got the guys number I never really thought that a week later I would own a new car. Talked to the guy that night and got the low-down on the car. 1995 GSX with 115,000 miles and a fairly new paint job. It had been sitting for a good while and was recently moved to the guy's friend's house because it was about to get towed from the place it had been at. I went to look at it on a snowy day, the car was covered in snow and sure enough it wouldn't even start. He said the e85 was probably bad since it had been sitting so long. The front bumper was taped on and there was barely any interior in the car. Inside was trashed, no headliner, carpet, nothing. Had an aftermarket sunroof in an original hard top car (Probably the most saddening thing about the whole car). The turbo had no filter on it and therefore had some shaft play and the HID wiring was a mess. None of this bothered me though; I was infatuated with the car for some reason. I should have just walked away then but I couldn't, I wanted the car. Now you may be asking yourself why I was stupid enough to buy this car, let alone pay $4500 for it. Well, because underneath all of its problems, it had a good amount of cash in it, with many of the parts on it things that I already had and could then sell and make back my money.
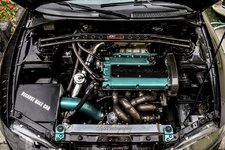
Here is what was on the car when I bought it:
Turbonetics T3 50 Trim Turbo (Already had H1C)
Turbonetics T3 Manifold
Custom 5-bolt O2 Housing
3" Turbo-back Exhaust
1050cc FIC Injectors (Already had 1200cc RC Injectors)
Aeromotive AFPR (Already had)
255 Walbro Fuel Pump (Already had)
Gram Light 57c wheels (Had wheels on the GST)
Tokico Blue Shocks and Springs (Had Tein SS Coilovers on the GST)
HKS 272 Cams
Greddy FMIC (Had a VRSF FMIC)
Greddy BOV
Ecmlink V3 (Just bought, came in 2 days before I bought the GSX)
Speed Density Setup
Double Synchro 1-2 by Jacks Transmission
ACT 2600 PP (Already had same PP)
ACT Street Disk (Already had Southbend Clutch)
Rebuilt Head 10k ago
1G CAS
AEM Uego Wideband
Autometer Boost Gauge
Shaved spoiler, wiper, and antenna
I think that pretty much covers the majority of parts on it when I bought it. I sold my nearly stock 190k mile GST for $4,000 and bought the 115k mile GSX with mods for $4500. As you can see, I had quite a few spare parts and ending up selling some to recuperate my money. I then sold Ecmlink w/ ECU ($525), the Greddy FMIC ($250), and 255 Walbro Fuel Pump ($55) for a total of $850 which covered the difference in the car price and the taxes on the GSX. I then had a spare clutch, AFPR, all awd parts, and turbo. I swapped out the suspension from the GST to the GSX and then bought stock wheels to sell with the GST so I could keep my aftermarket wheels. So began the journey of fixing the numerous problems with the GSX and greatly increasing my knowledge of DSMs.
*I do want to note that my plans have changed while I have owned this car, and I think you will be able to see the direction I am going with it. I want it to be different than most other DSMs...not something just to go fast but to look good while doing it. I have also recently decided that at this time in my life (this being my only form of transportation), I don't need something that has partial weight loss at the cost of losing comfort parts. This is the reasoning behind adding a few things at the most current part of this build thread.
Table of Contents
February 13, 2011 – Getting the car
http://www.dsmtuners.com/forums/dsm...urney-450awhp-daily-driver.html#post152838167
February 16, 2011 – FMIC and fuel replacements
http://www.dsmtuners.com/forums/dsm...urney-450awhp-daily-driver.html#post152838185
February 17, 2011 – Coilovers on and newly found rebuilt head
http://www.dsmtuners.com/forums/dsm...urney-450awhp-daily-driver.html#post152838210
February 23, 2011 – Current Pictures and Lean Issue Fixed
http://www.dsmtuners.com/forums/dsm...urney-450awhp-daily-driver.html#post152838262
March 2, 2011 – Broken Exhaust Housing Bolts
http://www.dsmtuners.com/forums/dsm...urney-450awhp-daily-driver.html#post152839286
March 20, 2011 - 2.4 Block, Rods, and Bearings
http://www.dsmtuners.com/forums/dsm...urney-450awhp-daily-driver.html#post152840565
May 3, 2011 – Head Studs, Wideband Woes, First Track Times
http://www.dsmtuners.com/forums/dsm...urney-450awhp-daily-driver.html#post152841686
May 6, 2011 - HD Lip and Exterior Photoshoot
http://www.dsmtuners.com/forums/dsm...urney-450awhp-daily-driver.html#post152849245
May 7, 2011 – Painted calipers, wiring cleanup, fuel pump rewire
http://www.dsmtuners.com/forums/dsm...urney-450awhp-daily-driver.html#post152858168
May 23, 2011 - Pictures!
http://www.dsmtuners.com/forums/dsm...urney-450awhp-daily-driver.html#post152861909
May 27, 2011-New downpipe needs modified
http://www.dsmtuners.com/forums/dsm...urney-450awhp-daily-driver.html#post152862706
June 25, 2011 - Carpet in, wastegate checked
http://www.dsmtuners.com/forums/dsm...urney-450awhp-daily-driver.html#post152862834
July 6-22, 2011 – Saturn alternator swap, car troubles, and track passes
http://www.dsmtuners.com/forums/dsm...urney-450awhp-daily-driver.html#post152863735
July 24, 2011 – Cam gears, quick release bumper kit, video from track
http://www.dsmtuners.com/forums/dsm...urney-450awhp-daily-driver.html#post152865889
July 30, 2011-August 4, 2011 – Evo Brakes bought and in
http://www.dsmtuners.com/forums/dsm...urney-450awhp-daily-driver.html#post152866074
August 9, 2011 – Hit and Run
http://www.dsmtuners.com/forums/dsm...ney-450awhp-daily-driver-2.html#post152868031
August 17, 2011 – Evo Brake Install
http://www.dsmtuners.com/forums/dsm...ney-450awhp-daily-driver-2.html#post152868988
September 2, 2011 – Photoshoot
http://www.dsmtuners.com/forums/dsm...ney-450awhp-daily-driver-2.html#post152870229
Mid October, 2011 – Clutch install and track times
http://www.dsmtuners.com/forums/dsm...ney-450awhp-daily-driver-2.html#post152871192
October 27, 2011 – Hit and run...again. Old wheel test fit with brembos
http://www.dsmtuners.com/forums/dsm...ney-450awhp-daily-driver-2.html#post152871307
November 18, 2011 – Moved. Black interior, vented hood, misc acquired
http://www.dsmtuners.com/forums/dsm...ney-450awhp-daily-driver-2.html#post152872625
November 29, 2011 – Stripping the vented hood
http://www.dsmtuners.com/forums/dsm...ney-450awhp-daily-driver-2.html#post152877202
December 30, 2011 – Parts hoarding, master/slave cylinder replaced and no cutting required intake ducting
http://www.dsmtuners.com/forums/dsm...ney-450awhp-daily-driver-2.html#post152877241
January 3, 2012 - Road trip over the holidays
http://www.dsmtuners.com/forums/dsm...ney-450awhp-daily-driver-2.html#post152881586
January 4, 2012 – Black Interior Install
http://www.dsmtuners.com/forums/dsm...ney-450awhp-daily-driver-2.html#post152886397
January 6, 2012 – Removed wheel spacers, solid carrier bushings, solid motor mount
http://www.dsmtuners.com/forums/dsm...ney-450awhp-daily-driver-2.html#post152886487
January 11, 2012 – More work on the hood
http://www.dsmtuners.com/forums/dsm...ney-450awhp-daily-driver-2.html#post152886523
January 12, 2012 – Snow Pictures
http://www.dsmtuners.com/forums/dsm...ney-450awhp-daily-driver-2.html#post152887562
January 20, 2012 – Turbonetics Housing Machined for Holset
http://www.dsmtuners.com/forums/dsm...ney-450awhp-daily-driver-3.html#post152887918
January 23, 2012 – Little bit of hood work and fog light bezels in
http://www.dsmtuners.com/forums/dsm...ney-450awhp-daily-driver-3.html#post152893293
January 30, 2012 – Holset rebuilt, Downpipe wrapped, AC parts going in, and mud flaps acquired
http://www.dsmtuners.com/forums/dsm...ney-450awhp-daily-driver-3.html#post152893631
February 3, 2012 – Made a fan shroud
http://www.dsmtuners.com/forums/dsm...ney-450awhp-daily-driver-3.html#post152895014
February 8, 2012-February 10, 2012 – Aerocatch hood latches in, oil pressure gauge installed, cigarette lighter relocated
http://www.dsmtuners.com/forums/dsm...ney-450awhp-daily-driver-3.html#post152895107
February 20, 2012 – Holset is on
http://www.dsmtuners.com/forums/dsm...ney-450awhp-daily-driver-3.html#post152895132
March 20-27, 2012 – Pulling the motor and transmission
http://www.dsmtuners.com/forums/dsm...ney-450awhp-daily-driver-3.html#post152935570
April 22, 2012 – Finally dipped into the 11s
http://www.dsmtuners.com/forums/dsm...ney-450awhp-daily-driver-4.html#post152960308
June 24, 2012 - Prep for the S3 Magazine Shoot
http://www.dsmtuners.com/forums/dsm...ney-450awhp-daily-driver-4.html#post153014841
July 14, 2012 - A/C Install
http://www.dsmtuners.com/forums/dsm...ney-450awhp-daily-driver-4.html#post153045064
July 14, 2012 - Car Show Trip
http://www.dsmtuners.com/forums/dsm...ney-450awhp-daily-driver-4.html#post153045097
July 22, 2012 - Hood is finally on
http://www.dsmtuners.com/forums/dsm...ney-450awhp-daily-driver-4.html#post153045112
August 11, 2012 - Broken pressure plate, new clutch in
http://www.dsmtuners.com/forums/dsm...ney-450awhp-daily-driver-4.html#post153077173
September 16, 2012 - BLT, E85 goo, and goodies (and car hit...again)
http://www.dsmtuners.com/forums/dsm...ney-450awhp-daily-driver-4.html#post153091337
http://www.dsmtuners.com/forums/dsm...ney-450awhp-daily-driver-4.html#post153099310
November 30, 2012 - S3 Magazine feature and recent pics
http://www.dsmtuners.com/forums/dsm...ney-450awhp-daily-driver-5.html#post153150004
December 23, 2012 - New crankcase pressure evac setup (ie-new valve cover)
http://www.dsmtuners.com/forums/dsm...ney-450awhp-daily-driver-5.html#post153166591
January 26-February 16, 2013 - Headliner work, powder coating, wire tuck, water pump replacement, ebc install
http://www.dsmtuners.com/forums/dsm...ney-450awhp-daily-driver-5.html#post153214310
January 26-February 16, 2013 – Manifold porting, TOB replacement, 6 bolt longblock acquired, car back running
http://www.dsmtuners.com/forums/dsm...ney-450awhp-daily-driver-5.html#post153214311
March 21, 2013 - Heatshield made
http://www.dsmtuners.com/forums/dsm...ney-450awhp-daily-driver-6.html#post153235365
April 1, 2013 - Got married a month ago, Import Alliance trip, control arm bushings changed, and goodies from the junkyard
http://www.dsmtuners.com/forums/dsm...ney-450awhp-daily-driver-6.html#post153238189
April 1, 2013 - Control arm bushings changed, goodies from the junkyard, and snow
http://www.dsmtuners.com/forums/dsm...ney-450awhp-daily-driver-6.html#post153238190
April 14, 2013 – Solar wing acquired
http://www.dsmtuners.com/forums/dsm...ney-450awhp-daily-driver-6.html#post153248072
May 14, 2013 – Pictures from meet
http://www.dsmtuners.com/forums/dsm...ney-450awhp-daily-driver-6.html#post153265717
June 3, 2013 – Plastidipped wheels black
http://www.dsmtuners.com/forums/dsm...ney-450awhp-daily-driver-6.html#post153275844
June 9, 2013 (I don't really know this date, so it's going here) – Evo 3 Intake manifold purchased and installed, exhaust leak fixed
June 21 – July 1, 2013 – New license plate came in, meet pics
September 11, 2013 – Long delay for military, broken lip, s2k cluster, bought M45, twin scroll manifold, ported head etc.
http://www.dsmtuners.com/forums/dsm...ney-450awhp-daily-driver-6.html#post153327057
September 28, 2013 – Car shipped to me, brake line fixed, new lip, and wheel curbed somehow -_-
http://www.dsmtuners.com/forums/dsm...ney-450awhp-daily-driver-7.html#post153355426
October 19-November 15, 2013 – New track times (11.75@124 with video), broken lip, and built 6 bolt block purchased
http://www.dsmtuners.com/forums/dsm...ney-450awhp-daily-driver-7.html#post153377227
November 30, 2013 – Twin scroll holset setup, -16an radiator setup, fab work, car back running video
http://www.dsmtuners.com/forums/dsm...ney-450awhp-daily-driver-7.html#post153378081
December 8, 2013 – IFO "Best Clean Car," headlight intake, new lugnuts, and 11.6@123 run
http://www.dsmtuners.com/forums/dsm...ney-450awhp-daily-driver-7.html#post153378855
December 15, 2013 – Wekfest Trip, aka photoshoot
http://www.dsmtuners.com/forums/dsm...ey-450awhp-daily-driver-10.html#post153382449
January 5, 2014 - Demolished lip repair, cracked exhaust manifold, huge exhaust leaks fixed
http://www.dsmtuners.com/forums/dsm...ey-450awhp-daily-driver-11.html#post153384041
January 13, 2013 - Plastidipped wheels again, added mudflaps, car running again
http://www.dsmtuners.com/forums/dsm...ey-450awhp-daily-driver-11.html#post153384041
I was in love with my red 1995 GST and planned on keeping it and doing the AWD swap because I hated FWD. I bought all of the swap parts except for the transmission. I started collecting parts like fuel setup, turbo, ecmlink, etc. It was super clean for having 190,000 miles on it and ran perfect. Never had a problem with it the whole time I owned it. It had a few bolt-ons but nothing major done to it.
Here it is shortly before I sold it
What it looked like when it left my house
Sometimes I think I should have just kept that car and done the AWD swap but then I consider how much I like the GSX and I change my mind..Now, a little about the GSX since that is what this build thread is even for.
A local guy owned the GSX and I knew a little about it from friends and such. 50 trim turbo, cams, gram lights, lowered, looks amazing, etc. Well one night sitting at Hooters, a friend mentioned that the guy is trying to sell it and I immediately became interested. When I got the guys number I never really thought that a week later I would own a new car. Talked to the guy that night and got the low-down on the car. 1995 GSX with 115,000 miles and a fairly new paint job. It had been sitting for a good while and was recently moved to the guy's friend's house because it was about to get towed from the place it had been at. I went to look at it on a snowy day, the car was covered in snow and sure enough it wouldn't even start. He said the e85 was probably bad since it had been sitting so long. The front bumper was taped on and there was barely any interior in the car. Inside was trashed, no headliner, carpet, nothing. Had an aftermarket sunroof in an original hard top car (Probably the most saddening thing about the whole car). The turbo had no filter on it and therefore had some shaft play and the HID wiring was a mess. None of this bothered me though; I was infatuated with the car for some reason. I should have just walked away then but I couldn't, I wanted the car. Now you may be asking yourself why I was stupid enough to buy this car, let alone pay $4500 for it. Well, because underneath all of its problems, it had a good amount of cash in it, with many of the parts on it things that I already had and could then sell and make back my money.
Here is what was on the car when I bought it:
Turbonetics T3 50 Trim Turbo (Already had H1C)
Turbonetics T3 Manifold
Custom 5-bolt O2 Housing
3" Turbo-back Exhaust
1050cc FIC Injectors (Already had 1200cc RC Injectors)
Aeromotive AFPR (Already had)
255 Walbro Fuel Pump (Already had)
Gram Light 57c wheels (Had wheels on the GST)
Tokico Blue Shocks and Springs (Had Tein SS Coilovers on the GST)
HKS 272 Cams
Greddy FMIC (Had a VRSF FMIC)
Greddy BOV
Ecmlink V3 (Just bought, came in 2 days before I bought the GSX)
Speed Density Setup
Double Synchro 1-2 by Jacks Transmission
ACT 2600 PP (Already had same PP)
ACT Street Disk (Already had Southbend Clutch)
Rebuilt Head 10k ago
1G CAS
AEM Uego Wideband
Autometer Boost Gauge
Shaved spoiler, wiper, and antenna
I think that pretty much covers the majority of parts on it when I bought it. I sold my nearly stock 190k mile GST for $4,000 and bought the 115k mile GSX with mods for $4500. As you can see, I had quite a few spare parts and ending up selling some to recuperate my money. I then sold Ecmlink w/ ECU ($525), the Greddy FMIC ($250), and 255 Walbro Fuel Pump ($55) for a total of $850 which covered the difference in the car price and the taxes on the GSX. I then had a spare clutch, AFPR, all awd parts, and turbo. I swapped out the suspension from the GST to the GSX and then bought stock wheels to sell with the GST so I could keep my aftermarket wheels. So began the journey of fixing the numerous problems with the GSX and greatly increasing my knowledge of DSMs.
*I do want to note that my plans have changed while I have owned this car, and I think you will be able to see the direction I am going with it. I want it to be different than most other DSMs...not something just to go fast but to look good while doing it. I have also recently decided that at this time in my life (this being my only form of transportation), I don't need something that has partial weight loss at the cost of losing comfort parts. This is the reasoning behind adding a few things at the most current part of this build thread.
Table of Contents
February 13, 2011 – Getting the car
http://www.dsmtuners.com/forums/dsm...urney-450awhp-daily-driver.html#post152838167
February 16, 2011 – FMIC and fuel replacements
http://www.dsmtuners.com/forums/dsm...urney-450awhp-daily-driver.html#post152838185
February 17, 2011 – Coilovers on and newly found rebuilt head
http://www.dsmtuners.com/forums/dsm...urney-450awhp-daily-driver.html#post152838210
February 23, 2011 – Current Pictures and Lean Issue Fixed
http://www.dsmtuners.com/forums/dsm...urney-450awhp-daily-driver.html#post152838262
March 2, 2011 – Broken Exhaust Housing Bolts
http://www.dsmtuners.com/forums/dsm...urney-450awhp-daily-driver.html#post152839286
March 20, 2011 - 2.4 Block, Rods, and Bearings
http://www.dsmtuners.com/forums/dsm...urney-450awhp-daily-driver.html#post152840565
May 3, 2011 – Head Studs, Wideband Woes, First Track Times
http://www.dsmtuners.com/forums/dsm...urney-450awhp-daily-driver.html#post152841686
May 6, 2011 - HD Lip and Exterior Photoshoot
http://www.dsmtuners.com/forums/dsm...urney-450awhp-daily-driver.html#post152849245
May 7, 2011 – Painted calipers, wiring cleanup, fuel pump rewire
http://www.dsmtuners.com/forums/dsm...urney-450awhp-daily-driver.html#post152858168
May 23, 2011 - Pictures!
http://www.dsmtuners.com/forums/dsm...urney-450awhp-daily-driver.html#post152861909
May 27, 2011-New downpipe needs modified
http://www.dsmtuners.com/forums/dsm...urney-450awhp-daily-driver.html#post152862706
June 25, 2011 - Carpet in, wastegate checked
http://www.dsmtuners.com/forums/dsm...urney-450awhp-daily-driver.html#post152862834
July 6-22, 2011 – Saturn alternator swap, car troubles, and track passes
http://www.dsmtuners.com/forums/dsm...urney-450awhp-daily-driver.html#post152863735
July 24, 2011 – Cam gears, quick release bumper kit, video from track
http://www.dsmtuners.com/forums/dsm...urney-450awhp-daily-driver.html#post152865889
July 30, 2011-August 4, 2011 – Evo Brakes bought and in
http://www.dsmtuners.com/forums/dsm...urney-450awhp-daily-driver.html#post152866074
August 9, 2011 – Hit and Run
http://www.dsmtuners.com/forums/dsm...ney-450awhp-daily-driver-2.html#post152868031
August 17, 2011 – Evo Brake Install
http://www.dsmtuners.com/forums/dsm...ney-450awhp-daily-driver-2.html#post152868988
September 2, 2011 – Photoshoot
http://www.dsmtuners.com/forums/dsm...ney-450awhp-daily-driver-2.html#post152870229
Mid October, 2011 – Clutch install and track times
http://www.dsmtuners.com/forums/dsm...ney-450awhp-daily-driver-2.html#post152871192
October 27, 2011 – Hit and run...again. Old wheel test fit with brembos
http://www.dsmtuners.com/forums/dsm...ney-450awhp-daily-driver-2.html#post152871307
November 18, 2011 – Moved. Black interior, vented hood, misc acquired
http://www.dsmtuners.com/forums/dsm...ney-450awhp-daily-driver-2.html#post152872625
November 29, 2011 – Stripping the vented hood
http://www.dsmtuners.com/forums/dsm...ney-450awhp-daily-driver-2.html#post152877202
December 30, 2011 – Parts hoarding, master/slave cylinder replaced and no cutting required intake ducting
http://www.dsmtuners.com/forums/dsm...ney-450awhp-daily-driver-2.html#post152877241
January 3, 2012 - Road trip over the holidays
http://www.dsmtuners.com/forums/dsm...ney-450awhp-daily-driver-2.html#post152881586
January 4, 2012 – Black Interior Install
http://www.dsmtuners.com/forums/dsm...ney-450awhp-daily-driver-2.html#post152886397
January 6, 2012 – Removed wheel spacers, solid carrier bushings, solid motor mount
http://www.dsmtuners.com/forums/dsm...ney-450awhp-daily-driver-2.html#post152886487
January 11, 2012 – More work on the hood
http://www.dsmtuners.com/forums/dsm...ney-450awhp-daily-driver-2.html#post152886523
January 12, 2012 – Snow Pictures
http://www.dsmtuners.com/forums/dsm...ney-450awhp-daily-driver-2.html#post152887562
January 20, 2012 – Turbonetics Housing Machined for Holset
http://www.dsmtuners.com/forums/dsm...ney-450awhp-daily-driver-3.html#post152887918
January 23, 2012 – Little bit of hood work and fog light bezels in
http://www.dsmtuners.com/forums/dsm...ney-450awhp-daily-driver-3.html#post152893293
January 30, 2012 – Holset rebuilt, Downpipe wrapped, AC parts going in, and mud flaps acquired
http://www.dsmtuners.com/forums/dsm...ney-450awhp-daily-driver-3.html#post152893631
February 3, 2012 – Made a fan shroud
http://www.dsmtuners.com/forums/dsm...ney-450awhp-daily-driver-3.html#post152895014
February 8, 2012-February 10, 2012 – Aerocatch hood latches in, oil pressure gauge installed, cigarette lighter relocated
http://www.dsmtuners.com/forums/dsm...ney-450awhp-daily-driver-3.html#post152895107
February 20, 2012 – Holset is on
http://www.dsmtuners.com/forums/dsm...ney-450awhp-daily-driver-3.html#post152895132
March 20-27, 2012 – Pulling the motor and transmission
http://www.dsmtuners.com/forums/dsm...ney-450awhp-daily-driver-3.html#post152935570
April 22, 2012 – Finally dipped into the 11s
http://www.dsmtuners.com/forums/dsm...ney-450awhp-daily-driver-4.html#post152960308
June 24, 2012 - Prep for the S3 Magazine Shoot
http://www.dsmtuners.com/forums/dsm...ney-450awhp-daily-driver-4.html#post153014841
July 14, 2012 - A/C Install
http://www.dsmtuners.com/forums/dsm...ney-450awhp-daily-driver-4.html#post153045064
July 14, 2012 - Car Show Trip
http://www.dsmtuners.com/forums/dsm...ney-450awhp-daily-driver-4.html#post153045097
July 22, 2012 - Hood is finally on
http://www.dsmtuners.com/forums/dsm...ney-450awhp-daily-driver-4.html#post153045112
August 11, 2012 - Broken pressure plate, new clutch in
http://www.dsmtuners.com/forums/dsm...ney-450awhp-daily-driver-4.html#post153077173
September 16, 2012 - BLT, E85 goo, and goodies (and car hit...again)
http://www.dsmtuners.com/forums/dsm...ney-450awhp-daily-driver-4.html#post153091337
http://www.dsmtuners.com/forums/dsm...ney-450awhp-daily-driver-4.html#post153099310
November 30, 2012 - S3 Magazine feature and recent pics
http://www.dsmtuners.com/forums/dsm...ney-450awhp-daily-driver-5.html#post153150004
December 23, 2012 - New crankcase pressure evac setup (ie-new valve cover)
http://www.dsmtuners.com/forums/dsm...ney-450awhp-daily-driver-5.html#post153166591
January 26-February 16, 2013 - Headliner work, powder coating, wire tuck, water pump replacement, ebc install
http://www.dsmtuners.com/forums/dsm...ney-450awhp-daily-driver-5.html#post153214310
January 26-February 16, 2013 – Manifold porting, TOB replacement, 6 bolt longblock acquired, car back running
http://www.dsmtuners.com/forums/dsm...ney-450awhp-daily-driver-5.html#post153214311
March 21, 2013 - Heatshield made
http://www.dsmtuners.com/forums/dsm...ney-450awhp-daily-driver-6.html#post153235365
April 1, 2013 - Got married a month ago, Import Alliance trip, control arm bushings changed, and goodies from the junkyard
http://www.dsmtuners.com/forums/dsm...ney-450awhp-daily-driver-6.html#post153238189
April 1, 2013 - Control arm bushings changed, goodies from the junkyard, and snow
http://www.dsmtuners.com/forums/dsm...ney-450awhp-daily-driver-6.html#post153238190
April 14, 2013 – Solar wing acquired
http://www.dsmtuners.com/forums/dsm...ney-450awhp-daily-driver-6.html#post153248072
May 14, 2013 – Pictures from meet
http://www.dsmtuners.com/forums/dsm...ney-450awhp-daily-driver-6.html#post153265717
June 3, 2013 – Plastidipped wheels black
http://www.dsmtuners.com/forums/dsm...ney-450awhp-daily-driver-6.html#post153275844
June 9, 2013 (I don't really know this date, so it's going here) – Evo 3 Intake manifold purchased and installed, exhaust leak fixed
June 21 – July 1, 2013 – New license plate came in, meet pics
September 11, 2013 – Long delay for military, broken lip, s2k cluster, bought M45, twin scroll manifold, ported head etc.
http://www.dsmtuners.com/forums/dsm...ney-450awhp-daily-driver-6.html#post153327057
September 28, 2013 – Car shipped to me, brake line fixed, new lip, and wheel curbed somehow -_-
http://www.dsmtuners.com/forums/dsm...ney-450awhp-daily-driver-7.html#post153355426
October 19-November 15, 2013 – New track times (11.75@124 with video), broken lip, and built 6 bolt block purchased
http://www.dsmtuners.com/forums/dsm...ney-450awhp-daily-driver-7.html#post153377227
November 30, 2013 – Twin scroll holset setup, -16an radiator setup, fab work, car back running video
http://www.dsmtuners.com/forums/dsm...ney-450awhp-daily-driver-7.html#post153378081
December 8, 2013 – IFO "Best Clean Car," headlight intake, new lugnuts, and 11.6@123 run
http://www.dsmtuners.com/forums/dsm...ney-450awhp-daily-driver-7.html#post153378855
December 15, 2013 – Wekfest Trip, aka photoshoot
http://www.dsmtuners.com/forums/dsm...ey-450awhp-daily-driver-10.html#post153382449
January 5, 2014 - Demolished lip repair, cracked exhaust manifold, huge exhaust leaks fixed
http://www.dsmtuners.com/forums/dsm...ey-450awhp-daily-driver-11.html#post153384041
January 13, 2013 - Plastidipped wheels again, added mudflaps, car running again
http://www.dsmtuners.com/forums/dsm...ey-450awhp-daily-driver-11.html#post153384041
Last edited by a moderator:
")


 Also, I did do the leak down test but either the tester was bad or I did it wrong, so never got any results from that.)
