The Top DSM Community on the Web

For 1990-1999 Mitsubishi Eclipse, Eagle Talon, Plymouth Laser, and Galant VR-4 Owners. Log in to remove most ads.

Please Support STM Tuned

Street Build '97 Eclipse AWD GS-T (2006 to Present)

This site may earn a commission from merchant
affiliate links, including eBay, Amazon, and others.

This site may earn a commission from merchant affiliate links, including eBay, Amazon, and others.

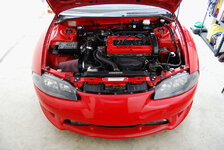
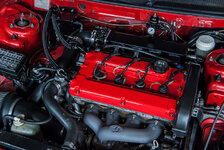
02MAY2010 - Built Head Install

The head install was once again uncharted territory but, guess who I had to help? My good buddy Kris had been there and done that so, he offered up the help and I took it. We did the head swap as fast as we could, the first picture I snapped was taken at 1:30pm (of Kris loosening up the head bolts) and the last one I snapped was taken at 5:00pm with the head torqued and the cams installed, with just the timing belt components and IM/EX to go. The removal/install probably took 6 hours but, if you ask Kris, we could have done it in 5 hours if I wasn't standing around taking pictures. LOL

DSC_0169.jpg


DSC_0170.jpg


DSC_0172.jpg


DSC_0173.jpg


DSC_0175.jpg


DSC_0178.jpg


DSC_0183.jpg


DSC_0184.jpg


DSC_0187.jpg


DSC_0185.jpg


:dsm:
 
Greatness is being achieved in this thread! Its like reading a book, super excited to see the rest of it. Inspirational and in a sort instructional. Great Job :thumb:
 
I have seen this car come along way. I appreciate you allowing me to help you out. It has been alot of good times and I am sure there are many more to come.

That must be your red 1g in the background!!! beautiful car.

Drew
 
Yea, this is the most complete and thorough build thread in this section, i love it. also love that your car is making such a nice powerband and running such great times on a turbo that's probably one of the most streetable and fastest spooling "little guys" out there

Really is an inspiration to me and a lot of others i'm sure. It's a lot of what has me wanting to try back with a 16g on the car now that i'm AWD too :D

Maybe i missed it but what's the details on the head and is that an MLS gasket or regular one sprayed down with copper? Also, what head studs did you use on this (hopefully i'm not just asking about the parts already listed in the profile, sorry if i am)
 
Haha. You're definitely asking questions I already answered in the build. LOL I just used standard ARP head studs (torqued to 90 ft/lbs which is tighter than most) and a Mitsu composite head gasket sprayed with copper. I would run a Mitsu MLS if the block was decked too, since I wasn't pulling the motor though I went with the composite.

If you've got any more questions about the head build its here. 29APR2010 - Fresh Cylinder Head & Intercooler Setup

I got your PM, sending logs shortly Glenn.

Sorry to disappoint with the slow updates the last few days, I had a pretty serious soccer injury Thursday night and I'm not as mobile as I was. Doctors are saying 4 - 6 months on my recovery, I'll try to update it but its a bit more work since I've got to hobble to my hard drive to get to the pictures. LOL

attachment.php


:dsm:
 
damn gofer, PM me about the injury, that stuff can't be taken lightly or you'll end up like my crippled ass, and i don't want that to happen to anyone, even a torn ACL not properly taken care of after surgery can ruin your ability to even mildly jog :(
 
03MAY2010 - "Bolt On" VR-Speed Factory FMIC Install

I didn't take any before and after shots of the install, just pictures of stuff that make the VRSF kit not an actual "bolt on" like its advertised. I was impressed with the quality and size of the core/piping in the kit but, to say the least, I was pissed once I started doing the install and realized that it wasn't a "bolt-on" FMIC kit like VRSF advertises (besides the radiator support which is a given).

I'll go through each picture, explaining why I took it. Don't get me wrong, the kits a hell of a deal, but if you think you're going to bolt it right in without making a few changes in your setup then you're wrong.

There are (3) things that require some extra work with this kit, which aren't mentioned in the VRSF website, that everyone should be aware of. The website mentions to modify the radiator support to get the IC pipe through to the core. It doesn't mention that the stock fog light bolt holes don't line up with the FMIC core support, nor does it mention the bolts included in the kit are huge and won't thread in. You must drill/tap new holes in the radiator core support to mount the FMIC up...

DSC_0193.jpg


If any of you have an A/T with the stock trans cooler you'd have even bigger problems with this kit. Here you can see the FMIC cores inlet hitting the A/T cooler bracket head on, beware of this BIG inconvenience if you drive an auto.

DSC_0194.jpg


The short route piping, once installed, makes you relocate your coolant overflow bottle because it gets in the way. It is like this on most short route intercooler setups however, it would have been nice to know when you start tearing the DSM apart because I assumed it bolted in. Heres a shot of why its in the way and my solution to the problem without creating a huge headache.

DSC_0195.jpg


DSC_0198.jpg


This is why I chose the VRSF kit over a few others like it, and I'll say it again, for the price its a good setup.

To start off deciding which IC core to spend your hard earned cash on you need to come up with a airflow figure at a specific boost level. I'll use my DSM results for an example here, just input what you want to come up with the correct number for your application.

I bought my 68HTA knowing that it was capable of flowing 47lbs/min and I was going to run about 30psi to get it there. So you've got to convert airflow to cubic feet minute (CFM) and boost pressure to pressure ratio (PR).
CFM = (L x RPM x VE x Pr) / 5660
PR = (14.7 + Boost) / 14.7
So just plug in the info and do the conversions for CFM and PR, here are the numbers for my application.
PR = (14.7 + 30) / 14.7 = 3.04
CFM = (2.0 x 6500 x 95% x 3.04) / 5660 = 663.32

46lbs/min @ 30psi = 663.32 @ 3.04​
Now you'll be able to figure out exactly what size of intercooler you'll want for your specific setup, below are the equations.
Minimum Cross Area = ((CFM / PR) + 12.84) / 11.63
Intercool Height = (Minimum Cross Area / IC Depth
Total Volume = (WHP - 50.17) / 0.533
Intercooler Width = (Total Volume / Minimum Cross Area)
So just plug in the info (I used 400whp as my goal and a 3.5" deep IC)
((663.32 / 3.04) + 12.84) / 11.63 = 19.87 sq/in (MCA)
19.87 / 3.5" = 5.68" (Height)
(400 - 50.17) / 0.553 = 632.60 cu/in (Volume)
632.60 / 19.87 = 31.84" (Width)​
So the perfect IC core size for my setup, using the above equations, is 32" x 6" x 3.5". Since size contraints do come into play its not always possible to find a IC core that "fits the bill" of the perfect core. For example, if the widest core for your application is 28.5" then you'll want a taller IC to make up that surface area you'll be losing. The ideal core for my numbers is 32" x 6" however, the VRSF core is 28.5" x 10" so I lose 4" off the width but gain it off the height so its perfect.

Here are the dimensions of the three kits we keep referring to, see which one fits your car the best.
VRSF - 28.5" x 10" x 3.5"
PR - 29" x 11" x 3"
ETS - 25" x 10"x 3"​
To make it fair, lets see what the numbers would come out had I used a 3" depth for the core.
((663.32 / 3.04) + 12.84) / 11.63 = 19.87 sq/in (MCA)
19.87 / 3" = 6.63" (Height)
(400 - 50.17) / 0.553 = 632.60 cu/in (Volume)
632.60 / 19.87 = 31.84"​
You'll notice the only thing that changed was the height of the core, and being that the PR core is 1" taller and 0.5" wider the 0.5" you lose in depth doesn't matter.

I wish we could know for certain each cores pressure drop or CFM, we just have to go off whats advertised. :idontknow: I pulled all the above info from here and just applied it to DSM's. ---> Intercooler Calculator

:dsm:
 
Last edited by a moderator:
13MAY2010 - Engine Wiring Harness Went Into My Axle

Right now after reading the title of this update you're probably wondering, what the hell is that? Well I can tell you its not a good thing and its exactly how it sounds, my wiring harness went into my axle while I was going 75mph. :coy:

Remember that A/T to M/T swap I did awhile back? Well, there are about 8 unused connections on the harness once you swap to a M/T and they were left in the engine bay ziptied off out of the way. When Kris and I did the head R&R we moved them and forgot about them, just so happened we sat them under the battery tray where the passenger side axle sits. I was going about 75mph and my car just shut-off, after popping the hood I noticed my front o2 sensor wire was being pulled EXTREMELY tight to the passenger side of the car over my exhaust manifold. I pulled the battery/battery tray and saw the worst scenario possible, the un-used connectors got caught in the axle and the harness was wrapped around it about 8 times like a big ass yo-yo. It completely chewed through the axle boot, grease everywhere, and through the wiring insulation and connectors that were busted up and all over the road behind the car. OMG

You can all probably guess how this ended. At the time I didn't have a garage and my good buddy Kris said I could get it towed to his place and leave it in his driveway while we fixed it.

013.jpg


015.jpg


:dsm:
 
ouch, aint that some typical DSM shit for ya LOL... i guess all in all if they weren't harness that were "in use" and only messed up a few thins around them it might not been that bad.. I'm sure it's going agian by now anyway. As for you talking about "slow updates" hell you've done two tonight, ihaven't done ONE since i initially put my build thread up LOL
love the car byt the way...what happened to that old auto setup from your car? i'm seriousely giving auto some thought again.especially with my lef tleg so sqollen at the knee this week i cna barely push a clutch (foot slipped off and put me in cross traffic at a light causse the leg went limp) not only did i barely escape being hit but felt like a dumb ass too LOL
 
Those 8 or so unused connectors didn't mean much, it was all the other sensor plugs that got ripped off their respective sensors and chewed up in the axle that did. LOL I lost a few plugs when the axle ate the harness, off the top of my head I know that I lost my starter solenoid connector, CTS plug, and VSS connector. Whatever plug didn't get chewed up in the axle and stayed connected, the associated wiring got stripped, cut, and shorted which basically blew the IGN SW fuse and the car instantly became a 3,000lb paperweight.

The old A/T setup Glenn was when my car was a GS-T, I put the A/T FWD trans and everything else that came off my car doing the swap in the donor shell before it went to the junkyard.

:dsm:
 
12JUN2010 - BJ SMIM Install

After my harness went into my axle and I parked my car to fix it Kris called his buddy with a spare '95 M/T harness laying around. So, while I was waiting for the harness to arrive I picked up a BJ's 2g SMIM from the man himself, BJ. With the car down and waiting for the harness I wasn't worried about pulling a few things and downing it even more, so I got to installing my new parts.

This BJ's SMIM looked nice and I heard lots of good things about it from the older DSMer's, including Kris. I also liked the fact that BJ took the time to fabricate a coil pack/IPT bracket on the underside of the manifold, one less thing to worry about when installing a SMIM.

DSC_0245.jpg


DSC_0246.jpg


DSC_0249.jpg


DSC_0251.jpg


DSC_0252.jpg


DSC_0254.jpg


So I started installing this thing, Kris helped a little too since I was in his driveway. Some of you may have noticed that all the sudden my cruise control box had disappeared too? Well, its funny how when your car is parked at a DSM buddy's house they start giving you these great deals on parts they've been trying to sell for years. Kris had a non-cruise throttle cable out of a Mitsubishi (we still don't know what :confused:
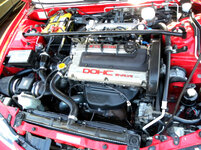
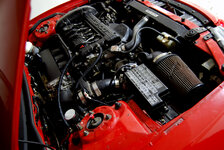
) laying in his garage and talked me into getting it from him, what a great friend! Anyone else notice that I ripped all the firewall insulation off the back of the engine bay? Look at all the red back there. :sneaky:

So, first things first, I moved the brake fluid reservoir bracket over and conveniently enough the holes were already there and lined up.

DSC_0243.jpg


Then I had to bend it up just a smidge to clear the corner of the SMIM, no biggie.

DSC_0256.jpg


Once I sorted out the brake reservoir issues I mocked up the IC piping and TB, who knew it fit?

DSC_0260.jpg


:dsm:
 
29JUN2010 - M/T Wiring Harness & Goodies From STM

I showed up to Kris' house and noticed that I had nearly half a gallon of coolant on the floorboard of my car, on the passenger side. Upon further investigation I had determined that my heater core had popped, which I believe was from a few months back when the head was lifting. When the head would lift it would pressurize my coolant lines to 17psi, then the radiator cap would open and push the coolant out to the overflow, but still maintain 17psi in those lines. Over time the internals of that heater core must have weekend from this and one of the seams on the copper pipe inside of it leaked... I was pissed because the carpet was all jacked up. You can see how I fixed the issue in that first picture of the fuel filter install, my car never had a heater in it after this either. Now onto the actual entry...

At this point my car had been down for quite some time, I was ready to get it back out on the road weeks ago and I was pissed at myself because of the reason why it was broke. The harness came in on June 21st and I had ordered a bunch of stuff from STM to go full blown E85 setup from tank to rail. The girlfriend bought me a FueLab AFPR for my birthday so I installed that too.

I got to work on the harness and removed all that old NASTY wire loom and tape, cut out and de-pinned everything that wasn't going to use, then wire loomed it back together. Unfortunately, I don't think I took any pictures of the harness other than the one because I was in such a hurry. No biggie though, later on in this build thread you'll see an actual wire tuck anyway so theres no reason to go into much detail here.

wiring harness (1).jpg


Installed the FueLab metal element fuel filter using the stock fuel filter bracket and FueLab AFPR. Also notice the -6AN line coming from the tank, just ran it from the fuel pump hanger along the stock fuel hardlines under the chassis and up through the front subframe.

DSC_0244.jpg


Then installed the rest of the STM goodies, -6AN from the filter to the rail and the rail to the AFPR all done with Proclassic hose.

DSC_0246.jpg


DSC_0270.jpg


:dsm:
 
woooooooooow, best thread ive ever read. its like a book LOL, all these ups and downs. kind of surpised of the low dyno numbers the first time around. thought for sure u could have put down 350. tuning was the answer, oh, and that bigger turbo too LOL. thank you so much for writing this.
 
When we vinyl wrapped it the material was on a big roll, sorry I can't help on the size because we cut it to fit. Basically though, just take a measuring tape and measure from where you want the vinyl to start to where you want it to stop. My recommendation, since I've already done the vinyl, is to buy a few can's of Plastidip and spray paint it if you're looking for a matte black appearance. Its not permanent just like the vinyl, its easier to work with than the vinyl was, and removal is 110% faster/easier as well.

Thanks for the compliments on the build thread, I appreciate it.

:dsm:
 
Last edited by a moderator:
woooooooooow, best thread ive ever read. its like a book LOL, all these ups and downs. kind of surpised of the low dyno numbers the first time around. thought for sure u could have put down 350. tuning was the answer, oh, and that bigger turbo too LOL. thank you so much for writing this.

Be patient. those numbers were on the stock head bolts. The head was lifting and pushing coolant out really bad. the new dyno is coming soon.
 
woooooooooow, best thread ive ever read. its like a book LOL, all these ups and downs. kind of surpised of the low dyno numbers the first time around. thought for sure u could have put down 350. tuning was the answer, oh, and that bigger turbo too LOL. thank you so much for writing this.

Be patient. Those numbers were on the stock head bolts. The head was lifting and pushing coolant out really bad. The new dyno is coming soon.
 
Support Vendors who Support the DSM Community
Boosted Fabrication ECM Tuning ExtremePSI Fuel Injector Clinic Innovation Products Jacks Transmissions JNZ Tuning Kiggly Racing Morrison Fabrications MyMitsubishiStore.com RixRacing RockAuto RTM Racing STM Tuned

Latest posts

Build Thread Updates

Vendor Updates

Latest Classifieds

Back
Top