The Top DSM Community on the Web

For 1990-1999 Mitsubishi Eclipse, Eagle Talon, Plymouth Laser, and Galant VR-4 Owners. Log in to remove most ads.

Please Support Kiggly Racing
Please Support Rix Racing

Street Build 1G Build: Return of the DSMer!

This site may earn a commission from merchant
affiliate links, including eBay, Amazon, and others.

This site may earn a commission from merchant affiliate links, including eBay, Amazon, and others.

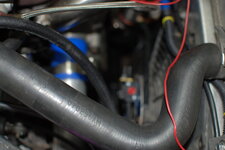
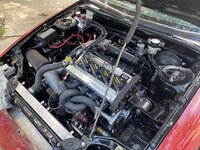
Installed the new fuel pressure regulator and filter. I don't know why but I just love the looks of these Fuel Lab pieces. They look so nice and I just had to have them. I got them for great deals on Black Friday.
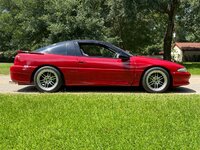
DSC_0660.JPG
DSC_0663.JPG
 
This is the new wiring setup with enlarged alternator wires (4awg?) for the new high output (160amp) Saturn alternator. Check out what that area looked like when I bought the car......
DSC_0661.JPG
DSC_0264.JPG
 
Cleaned up the valve cover a little. God, this was a pain in the ass. I half-assed it but in the future I'm going to get a nice powder-coated cover with some good AN pcv outlets"

DSC_0687.JPG
DSC_0688.JPG
DSC_0690.JPG
 
Cleaned up the valve cover a little. God, this was a pain in the ass. I half-assed it but in the future I'm going to get a nice powder-coated cover with some good AN pcv outlets"
View attachment 330567 View attachment 330568 View attachment 330569

Looks 100x better! On my next valve cover job I'll be using aircraft paint stripper see how it works.

Why did u decide to go with an aluminum drives haft instead of rebuilding the stock one. With those poly mounts u may notice a ton of vibrations. Let us know how she rides.
 
Looks 100x better! On my next valve cover job I'll be using aircraft paint stripper see how it works.

Why did u decide to go with an aluminum drives haft instead of rebuilding the stock one. With those poly mounts u may notice a ton of vibrations. Let us know how she rides.
I actually did use the aircraft stripper and I wasn't very impressed. I know when I used it 10 years ago I had much better luck but not this time around. It barely did anything.

There were multiple reasons for going with the aluminum. The obvious is that it's better for the drivetrain and performance. Regardless, I knew I was going to have to buy 2 new carrier bearings and the DSS replaces one of them and the lobro joint. Just the fact that you don't have to buy an extra carrier bearing and lobro joint is a ton of savings. I got the driveshaft for $500 brand new and sent back my carrier bearing, so in the end it only cost me $450 for a brand new DSS shaft. No rebuild BS or anything that I might screw up. However, the car has not been a Lincoln Cadillac. I'm still only at the beginning stages of getting the problems ironed out, but I do expect some drivetrain noise to stick around.
 
I'm debating whether to rebuild my driveshaft or buy an aluminum one. Thoughts @GST with PSI ?

TLDR: If I had to do it again, I would have just rebuilt the stock driveshaft. However, if I bought another aftermarket driveshaft, I'd opt for a carbon fiber unit.

The biggest complaint I have with the DSS aluminum driveshaft is the noise. It's a 5+ foot long piece of hollow aluminum, and every little noise the driveline makes is amplified times 10 over through that f***ing thing. It's especially noisy on decel. I've tried everything I know to reduce the noise to no avail. It's not horrible, but I bet if most people rode in my car they's ask what in the hell is making noise. Again, it's not horrible, but still annoying, especially considering what the DSS shaft costs. I've talked to quite a few people who've experienced the same issue...One of which said he hated it so much he ditched DSS altogether and picked up a PST carbon fiber shaft: http://www.pstds.com/

The second issue is with the DSS heavy-duty shafts. For the Galant VR-4, the only driveshaft available is the HD shaft, which is 3.5" in diameter. There's no "standard" 3" option offered like the one for the DSM. Now, this may be a Galant specific problem, but I had a hell of a time getting the 3.5" HD driveshaft to clear everything. I had to modify my exhaust as well as numerous hangers and shields to get the driveshaft to stop hitting stuff. The fit is tight, and my exhaust is routed exactly like the stock system (CMP 3" system). I don't know how similar the DSM undercarriage is to the Galant, but I'd assume you guys may run into some of the same issues if you opt for the 3.5" HD shaft. I don't know if anyone running one on a DSM, so please chime in if you are...

One of the main reasons I opted for the DSS shaft in the first place was because I couldn't find a boot kit for the stock lobro joint. That meant I had to get a new joint, which put a stock driveshaft rebuild on par with what it would cost to buy a DSS shaft. However, I later learned ExtremePSI has the boot kits for the lobro joint, which makes rebuilding the stock unit more cost effective.

You do save some time by not having to replace a few U joints, but you still have to rebuild the rear 3rd of the stock driveshaft, with means 1 U joint and 1 carrier bearing.

Regarding any performance gains or otherwise, I haven't really noticed any. I'd venture to say until you get into real racecar status, you probably won't see them. You'll know when you're at real racecar status when you start destroying U joints and driveshafts. Until then, I'd say stick with the stocker. That's what I'd do if I got another go at it.

Here's the cost breakdown I did and blah blah blah: http://www.dsmtuners.com/threads/gstwithpsis-galant-vr4-1837-2000.482807/page-7#post-153591020
 
Last edited:
I got around to installing my new rand/ingersol boost solenoid. For some reason I thought it was going to be more complicated than it actually was. The original solenoid wires in the harness were removed so I was really dreading to trying to find them in all the mess of wire looms. However, I found them in less than 5 minutes and had this baby installed pretty quickly. I used some double-sided 3M tape and slapped it onto the radiator fan's flat front surface. I don't know if it's necessary but I also connected the third port to my intake pipe. It Didn't seem required but whatever.

I wound up taking it for a spin and hit 20lbs in 2nd gear at about 75% throttle. Whoops, I guess I need to zero out the tables first :) I have owned the car for about 20 months and I've still never gone WOT. That 20lbs for a second is enough to keep me going on this project. :)

DSC_0691.JPG
DSC_0693.JPG
DSC_0694.JPG
DSC_0695.JPG
DSC_0696.JPG
DSC_0697.JPG
 

Attachments

  • DSC_0692.JPG
    DSC_0692.JPG
    144.8 KB · Views: 64
Well, it's still not working to be honest. I hooked up the two wires, the vacuum lines and zeroed out the boost tables and I'm still not getting boost control.
 
Well, it's still not working to be honest. I hooked up the two wires, the vacuum lines and zeroed out the boost tables and I'm still not getting boost control.

Have you verified the solenoid works by manually triggering it on/off? You should be able to hear it click.
 
Thanks I'm going to tinker with it I read the instructions doesn't look too bad. Yeah nick that's me on fb.
 
Time to get this car looking a little presentable. The wife won't drive in it if it doesn't have a hood. I've already been driving it a little with no hood/fender/bumper support and a lot of people have been curious about it and have givin me praise (as everyone should :)

I've really been putting this off as I have no idea how to do body work and I've largely lost or misplaced all the bolts and such to put everything back together. Regardless, I tackled it today with the help of my father-in-law. He doesn't do much work on cars but he's a real bright guy when it comes to handy man projects. I made him do most of the work as I downed some tequila and wandered into traffic.

The door panel was coming off completely, the side panel that loops under the door panel was coming off as well. The door was also jamming into the fender when it's opened. There was a lot of work to be done.

DSC_0698.JPG
DSC_0699.JPG
DSC_0700.JPG
DSC_0701.JPG
DSC_0703.JPG
DSC_0704.JPG
DSC_0705.JPG
DSC_0707.JPG
DSC_0708.JPG
DSC_0709.JPG
DSC_0710.JPG
DSC_0711.JPG
DSC_0712.JPG
 

Attachments

  • DSC_0706.JPG
    DSC_0706.JPG
    275.7 KB · Views: 84
I wound up buying 2 rolls of 3M 03614 and some 3M adhesion promoter. I have to say, the Factor Service Manual was not much help. It called for two different sizes of molding tape but I couldn't find the thicker version mentioned in the FSM. I wound just doubling up on the the thin tape to equal the thicker requirement.

https://www.amazon.com/gp/product/B01G2BHLG6/ref=oh_aui_detailpage_o06_s00?ie=UTF8&psc=1

https://www.amazon.com/gp/product/B002JOVUO0/ref=oh_aui_detailpage_o06_s00?ie=UTF8&psc=1

We used a wire wheel to remove any old sealant/tape then re-taped when the surfaces where clean and ready.

I ordered some new clips for the panels and they worked out great:

https://www.amazon.com/gp/product/B01M1RYKBQ/ref=oh_aui_detailpage_o05_s00?ie=UTF8&psc=1

I'm fully aware that I'm no body-shop professional. I tried my best and I may try and perfect everything in the future if I can find the exact components I need (correct sealant, correct size molding tape, second set of hands). With all that being said, it came out OK. If you really get up close you can tell it's not perfect but it's a million times better than when I bought the car. I'll be ready to perfect it int he future should I run out of projects for a length of time.

DSC_0713.JPG
DSC_0714.JPG
DSC_0715.JPG
DSC_0716.JPG
DSC_0717.JPG
DSC_0718.JPG
DSC_0719.JPG
DSC_0720.JPG
DSC_0721.JPG
 
Last edited:
They sell this thing called a eraser you can put it on like a drill to remove the old tape without hurting the paint.... unless you leave it on there for a while LOL
 
We actually used a metal wire wheel and it did nothing to paint. Seriously. It would not damage the paint for whatever reason.
 
Alright, for the first time since I bought the car it is drive-able with the whole body intact! It took me 18 months but the car is basically fully restored minus the body. Ever since I installed this DSS drivehsaft I have had constant running that I haven't been able to figure out. After messing with multiple things including removing the exhaust heat shield and shimming the one carrier bearing bracket the only thing that completely removed all the noise was removing my stupid Thermal R&D exhaust. Right now it's going to be open downpipe until I can figure something out. I'm so tired up laying under this damn car getting dust and dirt in my eyes/hair.

However, I'm super happy to have the interior and body looking good with no drivetrain noise. Now it's time to scam some inspector to get this thing inspected/registered.

DSC_0727.JPG
DSC_0728.JPG
DSC_0729.JPG
DSC_0730.JPG
DSC_0731.JPG
DSC_0732.JPG
DSC_0733.JPG
DSC_0735.JPG
DSC_0736.JPG
 
I added some 5mm wheel spacers to the back wheels. For whatever reason the rear wheels on 1gs sit further into the rear fender and it bothers me. I took some before and after pictures with the second picture having the added offset; it's subtle.

DSC_0738.JPG
DSC_0739.JPG
DSC_0743.JPG
DSC_0744.JPG
 
Support Vendors who Support the DSM Community
Boosted Fabrication ECM Tuning ExtremePSI Fuel Injector Clinic Innovation Products Jacks Transmissions JNZ Tuning Kiggly Racing Morrison Fabrications MyMitsubishiStore.com RixRacing RockAuto RTM Racing STM Tuned

Latest posts

Build Thread Updates

Vendor Updates

Latest Classifieds

Back
Top