

black97spyder
Proven Member
- 704
- 24
- Oct 13, 2012
-
independence,
Kansas
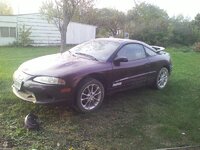
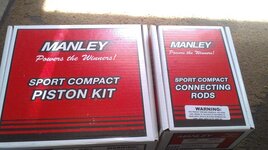
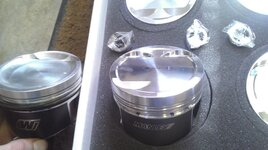
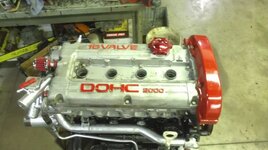
This whole build started because i thought i blew the engine in my spyder gst as it sounded like it had a knocking rod. So i hit Craigslist for an engine.I found an ad in liberal, ks for a fully built 7 bolt longblock ready to go with 5,000 miles on it. It had bc 288's, mahle 8.5:1 pistons, SCAT H beam rods, a stage 2 ported and polished head and nitrided stock crank for $1,500. His best pass on the engine was 12.3 @ 144 mph with a fwd and a PTE 6266. So I made a 6 hour one way journey to Liberal from my home town independence, ks. It was a long boring ride with lots of flat open fields  . So i bought the engine and brought it home to hopefully install in my spyder, well turns out that when I separated the engine and trans from my spyder it was a broken flexplate making a knocking rod sound so my engine wasn't bad after all.
This put me on the quest for AWD so I wouldnt absolutely decimate the tires on my fwd!!! Once again I hit up Craigslist for a couple weeks, this time looking for a GSX. I didnt end up finding a gsx, instead i found a 100% bone stock tsi AWD for 1,200 OBO in Kansas city. I contacted the owner and talked him Down to $900 cash. This made me go on another road trip with one of my friends and his car trailer to pick up my new prospect. On the way home we missed our turn, I have no clue how, so we found our way back on track and made it home an hour behind schedule.
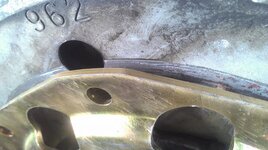
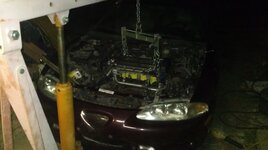
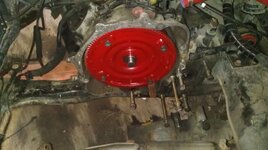
The fully built engine I bought sat outside for almost a year in 2 plastic bags to keep moisture out. And the car sat for about 3 months before i got an urge to start on it in the middle of my spyder GST project. So i got all the little things done right before I installed the engine to help me out a little bit. I called a couple of my buddies and had them help me push my car into place by my cherry picker and engine that had been sitting. I then started the task of dropping the engine into the car with the trans already in. I got everything in and bolted down. The next thing to come was connecting the flexplate and torque converter. I got the bolts started and my Kiggly flexplate and engine kept binding up somewhere so i pulled the engine back out about a week later to find the binding Problem.... Well turns out the binding was the 4 converter bolts getting caught up in the starter spacer plate so i cut out What wasn't needed and went on with getting ready to re install the engine and i realized I had no pilot bushing in the back of the crank for my automatic.
That small setback put me on hold for several more weeks until I sold a spair car body I had to help pay for the rest of the parts I need to finish. Well i got to thinking this would be the perfect time to put a stall converter in so i can take full advantage of AWD and taking off at the line like a rocket!! I then contacted IPT about a high stall converter and What i would need for my setup. IPT turned out to be a little too expensive for the amount of money I had to work with so i looked harder and came across the wide selection of converters from Sinister Speed. I talked to Mike at sinister speed about what i wanted and ended up getting a DSM sponsorship for his sinister Speed torque converter!!!! To fulfill my part, I have to run his product name on my rear quarter windows. For the first 3 events I place in, he will send me kickback for updating my online profile of my placing in the events to get the price I paid for the converter down to sponsorship pricing.
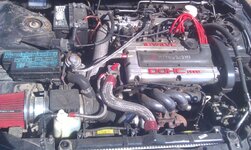
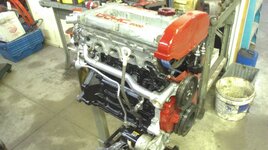
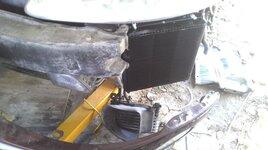
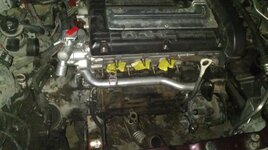
I then installed my pilot bushing from STM and proceeded to install the engine by myself this time. I then drilled a few holes in my firewall for my gauges and boost controller that is going to be inside the cabin. I got everything In and bolted up and afterwards had a few problems. My ebay o2 housing had the o2 bung facing at the wrong angle so it hit my w/p pipe and I couldn't get my exhaust mani & turbo on. My next hurdle was the oil drain line and oil feed line for my TD05H, which both had problems. The drain line I got sent was like 14" and I only needed around 5 & 1/2" so I fabricated hydraulic fitting onto my drain line after cutting It to size 3 different times. As for my feed line, I got sent a m12 banjo bolt and fitting and it was one size too big so i ordered a m10 banjo bolt and fitting to fix that problem.
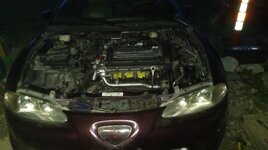
So now I am down to only having to connect my fuel line from the filter to the rail and putting fluids in and changing the tranny fluid and filter.... Until I noticed that I could see a small gap in the fitting that goes into the fuel rail and bolts to it, so I started to tighten the bolts carefully as I knew I did not want to break them off In the rail. And What did I do? I tightened the top bolt which helped close the gap a little bit and so i went to tighten up the bottom bolt and didn't even get 1/4 turn more before the head of the bolt snapped off and the rest of the bolt stayed in the rail!!!
I am at a standstill now until I get the rest of the bolt out of the fuel rail, and after that I can start my new engine for the first time in person!!!
. So i bought the engine and brought it home to hopefully install in my spyder, well turns out that when I separated the engine and trans from my spyder it was a broken flexplate making a knocking rod sound so my engine wasn't bad after all.This put me on the quest for AWD so I wouldnt absolutely decimate the tires on my fwd!!! Once again I hit up Craigslist for a couple weeks, this time looking for a GSX. I didnt end up finding a gsx, instead i found a 100% bone stock tsi AWD for 1,200 OBO in Kansas city. I contacted the owner and talked him Down to $900 cash. This made me go on another road trip with one of my friends and his car trailer to pick up my new prospect. On the way home we missed our turn, I have no clue how, so we found our way back on track and made it home an hour behind schedule.
The fully built engine I bought sat outside for almost a year in 2 plastic bags to keep moisture out. And the car sat for about 3 months before i got an urge to start on it in the middle of my spyder GST project. So i got all the little things done right before I installed the engine to help me out a little bit. I called a couple of my buddies and had them help me push my car into place by my cherry picker and engine that had been sitting. I then started the task of dropping the engine into the car with the trans already in. I got everything in and bolted down. The next thing to come was connecting the flexplate and torque converter. I got the bolts started and my Kiggly flexplate and engine kept binding up somewhere so i pulled the engine back out about a week later to find the binding Problem.... Well turns out the binding was the 4 converter bolts getting caught up in the starter spacer plate so i cut out What wasn't needed and went on with getting ready to re install the engine and i realized I had no pilot bushing in the back of the crank for my automatic.
That small setback put me on hold for several more weeks until I sold a spair car body I had to help pay for the rest of the parts I need to finish. Well i got to thinking this would be the perfect time to put a stall converter in so i can take full advantage of AWD and taking off at the line like a rocket!! I then contacted IPT about a high stall converter and What i would need for my setup. IPT turned out to be a little too expensive for the amount of money I had to work with so i looked harder and came across the wide selection of converters from Sinister Speed. I talked to Mike at sinister speed about what i wanted and ended up getting a DSM sponsorship for his sinister Speed torque converter!!!! To fulfill my part, I have to run his product name on my rear quarter windows. For the first 3 events I place in, he will send me kickback for updating my online profile of my placing in the events to get the price I paid for the converter down to sponsorship pricing.
I then installed my pilot bushing from STM and proceeded to install the engine by myself this time. I then drilled a few holes in my firewall for my gauges and boost controller that is going to be inside the cabin. I got everything In and bolted up and afterwards had a few problems. My ebay o2 housing had the o2 bung facing at the wrong angle so it hit my w/p pipe and I couldn't get my exhaust mani & turbo on. My next hurdle was the oil drain line and oil feed line for my TD05H, which both had problems. The drain line I got sent was like 14" and I only needed around 5 & 1/2" so I fabricated hydraulic fitting onto my drain line after cutting It to size 3 different times. As for my feed line, I got sent a m12 banjo bolt and fitting and it was one size too big so i ordered a m10 banjo bolt and fitting to fix that problem.
So now I am down to only having to connect my fuel line from the filter to the rail and putting fluids in and changing the tranny fluid and filter.... Until I noticed that I could see a small gap in the fitting that goes into the fuel rail and bolts to it, so I started to tighten the bolts carefully as I knew I did not want to break them off In the rail. And What did I do? I tightened the top bolt which helped close the gap a little bit and so i went to tighten up the bottom bolt and didn't even get 1/4 turn more before the head of the bolt snapped off and the rest of the bolt stayed in the rail!!!
I am at a standstill now until I get the rest of the bolt out of the fuel rail, and after that I can start my new engine for the first time in person!!!


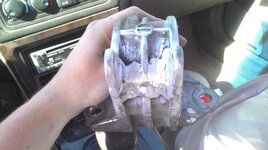
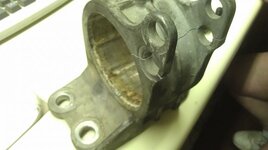
 Forgot to even mention the full emissions delete and changed the brake master cylinder while the engine was out for the simple fact it was a lot easier than what it would be with the engine in the car!!


