The Top DSM Community on the Web

For 1990-1999 Mitsubishi Eclipse, Eagle Talon, Plymouth Laser, and Galant VR-4 Owners. Log in to remove most ads.

Please Support Morrison Fabrications
Please Support ExtremePSI

1992 VR4 #71/1000

This site may earn a commission from merchant
affiliate links, including eBay, Amazon, and others.

This site may earn a commission from merchant affiliate links, including eBay, Amazon, and others.

Honestly, bro, you should try figure out what the noise is before you make a big decision like getting a different car or doing an engine swap.
Yeah I'll try to do that. Its not always making the sound BTW. Only when it idles
 
Yeah I'll try to do that. Its not always making the sound BTW. Only when it idles

I'm not a big fan of doling out advise without all the data, but one piece of info you might find handy is that, if it is indeed an engine noise, one thing that drops significantly at idle is oil pressure. Anything in the engine that requires oil pressure to operate quietly could therefore be suspect ie) hydraulic lifters, hydraulic tensioners etc...
 
This is a great build. I love to see Galant VR-4s in capable hands instead of being destroyed by hackjob owners. I'm looking forward to your future build progress. Awesome work :applause:
 
Powder Coating Adventures (part 1)

I got a bit sidetracked from the engine build here, but I when you find a deal and things line up for time and money, sometimes you have to pivot and allow yourself to ride the tangent.

Time for powder coating adventures for the wheels and valve cover...

Picked up some Enkei wheels from an EVO (in a WRX, blasphemy, no?):
IMG_20150313_191944970.jpg

Learn from this facial expression that chemical stripping of the Evo 8 wheels DOES NOT WORK!!!:
IMG_20150325_181651439.jpg

Caved and took the wheels to an industrial blast shop, luckily this powder coating adventure was a group effort so the cost was split up amongst friends:
IMG_20150428_080516339.jpg

Valve cover received the same treatement:
IMG_20150428_080521969.jpg

Got the appropriate amount of metallic flake gunmetal grey:
IMG_20150427_222613504.jpg

Dropping off all the powder coating parts at my local powder coating corner store:
IMG_20150428_080502407.jpg

Two days later:
IMG_20150430_075657063.jpg

My buddy's SSR's for his GTO came out looking Creme Fresh. The EVO wheels look pretty good too:
IMG_20150929_222950471.jpg

The valve cover looks pretty good too, but there's more work to do on that later to make sure everything is clean in the breather:
IMG_20150430_221952404.jpg
 
Last edited:
Breather System (part 1)

This part of the engine rebuild marked the beginning of sweating some of the finer details of an engine build. As luck would have it, I was designing a breather system at work at the same time I was trying to figure out what to do with crankcase gases for my 4G63, so I was able to carry some things I learned at work over to FUBAR.

Valve cover breather cleaning commenced. All you have to do to start is drill out the rivets:
IMG_20150511_214719136.jpg

In hindsight, I should have removed the breather prior to powder coating. When breather was removed, more support for the name 'FUBAR' was found; remnants of a dirt dobber nest inside the breather, I thought this complemented the moth nest in the cylinder head rather well:
IMG_20150430_230624272.jpg

After some elbow grease, I got to this point:
IMG_20151012_200147489.jpg
The dark spots are where powder coating baked onto the valve cover with the breather in place. No one will see it, and there is nothing that is going to drop out of the breather into the oil system to ruin the engine

Toying around with some ideas to re-attach the breather:
IMG_20150511_225720137.jpg
If anyone knows of a good high-temp epoxy for metals that has worked in this application, I'm all ears because I'd really rather not use fasteners here if I can avoid it.

I did some experimenting with a few different types of adhesives:
328df891-94d9-4e04-b4f1-3af8365f38e8.jpg
14a4e090-8c69-4195-bae6-651748e09657.jpg
Long story short, neither epoxy or liquid metal works worth a damn in tension. Furthermore, Epoxy is completely unsuitable for high temperature use.

In the end I decided to go with fasteners and some semi-permanent thread locker along with some RTV:
IMG_20151228_185448828.jpg
I'll probably pull the cover after a few miles to makes sure these fasteners are staying put.
 
Last edited:
Manifold Cleanup

Started in on cleaning up the air handling components:
IMG_20150511_230450886.jpg

Intake came with a black paint job I didn't really care for:
IMG_20150512_211833340.jpg

I like the raw aluminum look:
IMG_20150512_232620854.jpg

Note to all, ebay headers are terrible!!:
IMG_20150413_224953930_1.jpg
The carbon buildup is clear evidence of a severe port mismatch and, thus, severe flow losses.

I picked up (and cleaned up) a 2g manifold to replace the ebay headers and the cracked 1g manifold I had to choose from:
IMG_20150511_211912352.jpg
 
Last edited:
16G Turbo Rebuild

I was lucky enough to have a 16g that came with the spare engine. Since this will be an autox car, this turbo is pretty perfect. However, it was in desperate need of a rebuild:
IMG_20150514_022554080.jpg

Another garage hack, makeshift t-wrench for removing the compressor nut without damaging the turbine shaft:
IMG_20150514_022548622.jpg

Turbo also had a cracked exhaust housing, so I picked up a new 7cm housing:
IMG_20150516_113022628.jpg

I also picked up a new wastegate diaphram/actuator:
IMG_20150521_175103080.jpg

There's an entire thread on rebuilding these turbos, but this is what some of the guts look like:
IMG_20150514_025542659.jpg

Everything after cleaning and the wheel assembly after dynamic balancing:
IMG_20150526_182748420.jpg

A little trick for getting the compressor cover installed with a new o-ring that wasn't covered in the 16g rebuild thread:
IMG_20151229_201848768.jpg
Went in without any fuss using a couple of clamps and spacers

Finally got the turbo rebuilt and slapped on the engine:
IMG_20151229_214241444.jpg
 
Last edited:
The final engine prep required re-threading a few studs on the cylinder head on cylinders 1 and 4:
IMG_20150408_244356995.jpg

The cylinder 4 stud after the repair:
IMG_20150413_224059409_HDR.jpg
Someone had done this before me (improperly) and punched into the oil gallery, so this stud repair involved helicoil and liquid metal

Cylinder 1 thread repair required special care due to the broken stud:
IMG_20150413_224406292.jpg

I used my old 1g manifold as a 'honing plate' and an appropriately sized center drill to get started:
IMG_20150429_215358497.jpg
IMG_20150428_211056674.jpg

I finished up with a series of drill bits until the stud was completely drilled out:
IMG_20150429_223824073.jpg
The final repair used a timesert instead of a helicoil to get the threads right due to the amount of material that was removed in the repair.

The engine is now starting to get impatient:
IMG_20150530_181738555.jpg
 

Attachments

  • IMG_20150408_244356995.jpg
    IMG_20150408_244356995.jpg
    58.5 KB · Views: 69
  • IMG_20150328_213133743.jpg
    IMG_20150328_213133743.jpg
    62.9 KB · Views: 70
Last edited:
I haven't made much progress on FUBAR lately because life, but, I did want to post up a few updates...

First of all, I picked up a donor car to help push the chassis aspect over the finish line. I'm sure this is becoming common these days:
IMG_20160105_091759764_HDR.jpg

Next, the garage received a serious upgrade to help me power the tools I'm going to need to finish the job:
IMG_20160424_222714298_HDR.jpg

I returned to the engine for some unfinished business. Started by protecting for an upgraded crankcase breather system (catch can setup):
IMG_20160504_214129990.jpg

Found a McMaster check valve with a very small cracking pressure that is good for lots of boost/heat/oil etc. and integrates nicely into my NPT/AN line setup without having to resort to hose clamps:
IMG_20160504_214143918.jpg

Rebuilt the throttle body as completely as is possible for a garage job:
IMG_20160501_202606208.jpg
IMG_20160501_202554092.jpg
IMG_20160504_214111303.jpg
 
Radiator Support Replacement

This really marks the beginning of the most massive part of this project. I've learned more about bodywork than anything on this project and just about anything that can be reasonably accomplished by a DIY'er has been done on FUBAR. The first step was to replace some of the most badly damaged bodywork.

Finally started diving into the chassis. Here's a before picture:
IMG_20160531_215840638.jpg

Lots of spot weld cutting required to remove damaged sheetmetal:
IMG_20160523_194118636.jpg

Damaged area successfully removed:
IMG_20160604_201015609.jpg

Engine bay about 90% gutted including subframe, front suspension, ABS, sensors, harness, etc...:
IMG_20160605_193614413.jpg

Donor car pre-removal:
IMG_20160605_144817429_HDR.jpg

Donor car post-removal:
IMG_20160605_144845302.jpg

Interior about 50% gutted:
IMG_20160609_223526372.jpg

Next big step will be prepping engine bay for paint :)
 
Last edited:
It's awesome people are really putting in work to restore these cars. Financially, it's just not worth it, which is why I can really appreciate builds like this.

Looking great, keep the updates coming!
 
It's awesome people are really putting in work to restore these cars. Financially, it's just not worth it, which is why I can really appreciate builds like this.

Looking great, keep the updates coming!

Thanks man, you're right, I'm definitely not doing this because it makes financial sense LOL
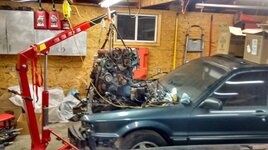
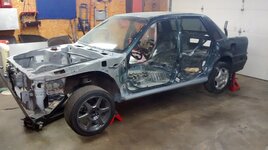
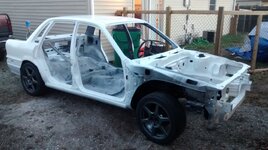
. But, the GVR4 community is a group of DIYers, so I feel at home in this crowd. I'm having fun with it, I'm learning new skills, and hopefully I'll get a running car out of it someday that I literally built from the ground up. What more could a gearhead ask for?
 
Support Vendors who Support the DSM Community
Boosted Fabrication ECM Tuning ExtremePSI Fuel Injector Clinic Innovation Products Jacks Transmissions JNZ Tuning Kiggly Racing Morrison Fabrications MyMitsubishiStore.com RixRacing RockAuto RTM Racing STM Tuned

Latest posts

Build Thread Updates

Vendor Updates

Latest Classifieds

Back
Top