The Central Hub for DSM Community and Information

For 1990-1999 Mitsubishi Eclipse, Eagle Talon, Plymouth Laser, and Galant VR-4 Owners. This is where the DSM platform history is documented and archived. Log in to help us in our mission, and to remove most ads from the browsing experience.

img_8094800x600.jpg

My fuse box relocation (project log)

This site may earn a commission from merchant affiliate links, including eBay, Amazon, and others.

Wow... Very nice progress and very clean work ! Keep it up ! Can't wait to see the motor back in.
 
Installed power steering bracket and Jay Racing spacer. I'm not entirely happy that the 3rd mounting bolt for the other p/s bracket can't be utilized with the spacer installed, so I'm still trying to figure out a solution for that.

IMG_6531.JPG


New o-ring on the dipstick tube, coat with a bit of oil, and shove into the block. New dipstick.

IMG_6530.JPG


Already had the thermostat housing all assembled. Permatex thread sealant on the sensors. Gray RTV on the 2 flanges that need it. Make sure the jiggle valve on the thermostat points straight up. Thermostat, radiator cap, and all coolant lines are new.

IMG_6524.JPG


Water pipe installed with 2 new o-rings. Coat the o-rings with water (not oil) before installing the water pipe.

IMG_6532.jpg


Per the directions on the Jay Racing alternator relocation kit I ground down the anodizing on the main piece that bolts to the block so the alternator gets a good ground. I also sanded the paint off the block at those points. A dab of dielectric grease was used to insure a good ground.

IMG_6534.jpg


Pretty simple to install, just follow the directions. I wanted a new bolt for the alternator mount, but the hardware store didn't have any really long metric ones, so I had to use a standard bolt and nut. No big deal.

IMG_6541.JPG


IMG_6542.JPG


IMG_6543.jpg


IMG_6545.jpg


IMG_6547.jpg


Note that the Jay Racing bracket acts as a spacer for the halfshaft now. I had to get a 95-96 halfshaft bracket for it to work. For a 97-99 halfshaft to work on there, there would have to be another hole tapped in the bracket between the 2 bolts.


I would show the "knock sensor installation" picture, but mine is oozing out the back :notgood: 
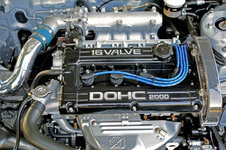
Gotta get a new one...
 
Last edited by a moderator:
Wow... Very nice progress and very clean work ! Keep it up ! Can't wait to see the motor back in.

Thanks!

Whats wrong with your trigger plate?

It was slightly bent in some places. It looked like it should clear the CPS easily but I didn't want to chance it. They're pretty cheap so I figured why not get a new one. Plus now I don't have to clean the old one :p
 
Then I hit a major halt. I went to install this water line to the block and I noticed it didn't sit far in enough. Somehow I must have backed the fitting out of the block when I removed the banjo bolt. I compared to my friends block to verify mine was too far out. No biggy, just tighten the fitting, right? No go, that thing just didn't want to budge. So I removed the fitting and cleaned the threads but it still wouldn't go in, even with my impact wrench. I finally determined the threads were damaged. No problem, I'll just tap the hole, right? It took me awhile to figure out the threads are 3/8" bspt and a whole day to figure out that 3 machine shops and 3 mechanics I know don't have that tap or know where to find it. Finally, I took another 3/8 bspt fitting I had from the oil filter housing, held it vertical, and used my angle grinder to cut 2 grooves down the threads, kind of like a tap would have. I ran that through the hole a few times and then I could get the fitting in far enough. I used some thread sealant on that too. Installed the water line with new banjo bolt and crush washers.

IMG_7533.jpg


IMG_7545.jpg


Oil cooler water line installed.

IMG_7546.jpg


I haven't finished building a throttle body for my car yet, so I threw this one together for mock-up.

IMG_7555.jpg


I'm using FFWD copper turbo and exhaust manifold gaskets. Surfaces were cleaned, gasket was sprayed with copper spray, and exhaust manifold was installed. Torque nuts evenly all around, starting in middle and working your way out.

IMG_7573.jpg


IMG_7574.jpg


I bolted my turbo on temporarily to mock-up the oil feed line. I determined I can run the line next to the block for a cleaner look and it reaches the filter housing ok. I installed the fitting in the filter housing for it with thread sealant, making sure to clock it properly for the line. NONE of the other connections on the oil feed line use thread sealant.

IMG_7580.jpg


I tightened the feed line on the turbo with it off the car, then installed the turbo. Copper spray gasket and reused oem sealing ring. Nickel anti-seize on the turbo bolts.

IMG_7584.jpg


IMG_7586.jpg


I ended up double zip-tying the feed line to the hard water line to the oil cooler in 2 places. This keeps the line from rubbing on anything or touching exhaust components.

P1070033.jpg
 
Last edited by a moderator:
this question was probably answered already, i cant seem to find it....but are you planning on keeping the performance stock?

Love this thread BTW

:thumb::thumb:
 
Put the oil pressure wire back on with a zip tie to keep it tight.

P1070005.jpg


Test fitting the heat shields. I was expecting to have to modify the lower heat shield because of the MR o2 housing but it actually fits great. I can actually remove the heat shield without removing the o2 sensor! The only downside is I only have 2 mounting bolts for it now because the stock o2 sensor had 3 more mounting points and the MR one has none. It seems pretty solid with just 2 bolts. Now I have to paint the lower heat shield VHT flat black.

P1070010.jpg


I decided to put the timing belt covers on quickly to check for any problems. The Jay Racing bracket was interfering slightly with the lower timing belt cover so I quickly trimmed that with a knife.

P1070017.jpg


That's pretty much it for now. I would have made my oil return line but the 45* and straight fittings I have don't work well together. I'm getting a low profile 45* tomorrow so hopefully that will work better and won't make the bend as tight. I'm also fabbing up a coil pack relocation bracket. This is made difficult because of the alternator back there too. 6 bolt guys are lucky - they can use the Jay Racing kit and JMFab coil pack bracket together. 7 bolt guys can't. I'm also waiting on an oil pickup gasket before I can bolt the pan back on.
 
Last edited by a moderator:
Thanks guys. The performance will be pretty much stock. Just the exhaust, intake, hard ic pipes, 1g bov...basic stuff for now. I'm all about the details. I often feel I'm too much into the details and not as focused on the big stuff. But I'm ok with a little turbo for now. My brother got me an eprom so as soon as I can afford it I'll be hopping on the Ecmlink train.
 
Please make sure you put that Crank Trigger plate on the correct way....There was a recent thread where a guy put his on backwards(the timing marks still line up) and it trashed his motor.....I would hate to see that happen after all this time you have put into this project....

-Kevin-
 
Looking good man. From the looks of it you wont be having ac anymore.. Are you also planning to remove power steering ?
 
Let me just say something about painting that lower heat shield. I painted my top on a while back with a high temp silver and it turned a NASTY yellowish color. And I have heard of people painting there's black (like you want to) and there's have turned a nasty brown color. Just a heads up. Might want to think about that before you paint it.
 
^I paint my heat shields with that cheap flat black 1200 degree paint from the auto stores. Duplicolor I think. It's actually held up quite well. No flaking, discoloration, etc.
 
Please make sure you put that Crank Trigger plate on the correct way....There was a recent thread where a guy put his on backwards(the timing marks still line up) and it trashed his motor.....I would hate to see that happen after all this time you have put into this project....

-Kevin-

Well, all you have to do to verify that you're at TDC is to put the crank mark on the line and put a screwdriver in cylinder 1. Rotate the engine and if the screwdriver immediately starts going down, then it's TDC. If it was backwards, the screw driver would more than likely be heading up upon rotation from "TDC".

Make sure you prime that engine before you throw the belt on, Eric!
 
^I paint my heat shields with that cheap flat black 1200 degree paint from the auto stores. Duplicolor I think. It's actually held up quite well. No flaking, discoloration, etc.

Well it very well could be just the silver that I used. But like I said I have seen peoples "black" heat shields turn to a brownish color. Just something to think about
 
Well it very well could be just the silver that I used. But like I said I have seen peoples "black" heat shields turn to a brownish color. Just something to think about

Yep, just stating my experience.
 
I'll be sure to put the trigger plate on the right way. That's the great part about these things - the dirt and grease on them shows which side should go which way.

Correct, I have entirely removed the a/c. Power steering is still going to stay, I just didn't put the pump on yet.

I'll be using the same black paint on my heat shield that I used on the turbo and exhaust manifold. We used this paint on my brothers heat shield we made and it still looks fine. I'm not too concerned, but thanks for the heads up. This is the stuff I'm using:
VHT SP118 - VHT Flameproof Coatings - summitracing.com
VHT SP102 - VHT Flameproof Coatings - summitracing.com

The top shield is brand new from the dealer so that won't be painted.

The plan right now is to finish the motor except timing it, do a bit of wiring with the motor on the stand, throw the motor in and finish the wiring. Once the wiring is done I'll pull the motor again and as soon as I get warm weather I can fix some rust in the engine bay and paint my brake lines on the firewall. When I'm ready to put the motor in the second time then I'll prime it, put the timing belt on and put it in the car immediately.
 
In one of your photos, you have like 5 macbook boxes. Did your family all buy one? I wish i was further along with my build and i would just give you my EVO III. Sucks to have to put on that t25.

James :laser::talon:
 
Paint you v/c this color.

Wouldn't quite match my color scheme ROFL 
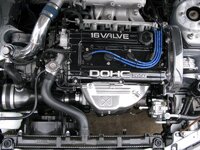
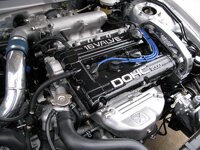
I had one powdercoated gloss black with extra clear and polished letters by TRG months ago.

In one of your photos, you have like 5 macbook boxes. Did your family all buy one? I wish i was further along with my build and i would just give you my EVO III. Sucks to have to put on that t25.

James :laser::talon:

:p Actually we have about 50 of those boxes here. My Mom is a preschool teacher so she's going to use the boxes in some kind of activity for the kids. One of the neighbors somehow got ahold of all them for her. Stupid boxes taking up all my space...
 
I can't locate a CAS bolt at the moment. And I still need to fab up the coil pack bracket, oil return line, and make the tool to tighten the crank bolt.
 
Nah, that was a spare thermo housing one.

I'm looking for this one. Washer assembled, 8 x 4_

untitled.JPG


I found one thats 8x40, lockwasher, grade 7 in my "unknown" bag, but there's another in there just like it. Anybody have more info on this bolt?
 
Last edited by a moderator:
Add Value - Be Respectful - No Trolling - No Misinformation - Participate Often!
Support Vendors who Support the DSM Community

Build Thread Updates

Latest Classifieds

Back
Top