The Central Hub for DSM Community and Information

For 1990-1999 Mitsubishi Eclipse, Eagle Talon, Plymouth Laser, and Galant VR-4 Owners. This is where the DSM platform history is documented and archived. Log in to help us in our mission, and to remove most ads from the browsing experience.

img_8094800x600.jpg

My fuse box relocation (project log)

This site may earn a commission from merchant affiliate links, including eBay, Amazon, and others.

Dude, you are out of your mind tearing up that thing like that. Keep up the good work :) You coming down for Sunday or what?
 
I don't know yet, I may. I'm busy until 11pm Saturday, then it's 1.5hr drive to Brian's, then on Sunday morning we have to be at Tony's house by 8am to leave...we'll see. Do you know what time the event is over?
 
Eric, how close do you think you are before you can start to put it back together? I've been loving this and it's really given me inspiration on my own build. I've been impressed with how much you've come along since joining this forum. I simply can't wait to see it all back together again and getting some good bling shots. At the rate you are going, your engine bay may end up being my wallpaper.

d
 
Realistically, I'm hoping to have it running by next summer. I'm a college student and I'm in the marching band, so I can only get home to work on it some weekends. Plus, my friend and I still need to finish the blast cabinet. Plus, I need to save up money to replace the front knuckles, axles, abs sensors, tie rods, and lower control arms. It sucks, but I've accepted that I won't get to drive it for awhile. :toobad:

Don't worry though, I'll keep taking pictures and hopefully within the next couple months I can throw the engine back together and maybe get some wallpaper quality pictures LOL


I guess I'll throw up a rough to-do list:

Have some more things welded
Finish blasting and powdercoating parts
Minor porting and more polishing on turbo
Reassemble turbo
Take care of minor rust on chassis and repaint spots
Paint brake / fuel lines on firewall
Cover up unused holes on firewall
Redo underlining in fender wells
Clean rust off block
Clean lifters and replace cam seals
Reassemble engine (no timing belt on) / flywheel, clutch, manifolds, turbo, etc.
Do some of the wiring with engine on stand
Mate engine with transmission and put only them back in car
More wiring (no wire loom yet, kept open to troubleshoot)
Either pull engine to finish it up and install timing belt, or just do it with engine in car
Modify downpipe/catback and install vband clamp between them
Put rest of stuff in engine bay, fill fluids, start car
Once I confirm all the wiring is good, then I'll pull it out, wire loom it, and reinstall
Save up and buy all suspension stuff, install that
Put interior and body panels back in
Drive car

And I'm hoping that I can afford to relocate the battery and get a Jay Racing alternator relocation kit for a Saturn alternator before I put the engine back in the car. This is convenient to do with the engine out of the car and while I have all the wiring apart. When I relocate the battery I will also rewire the stock fuel pump and install a kill switch. I would also like to get a few gauges (oil pressure, temp, and water temp) so I can do all the wiring now, but I doubt that will happen.
 
I don't know yet, I may. I'm busy until 11pm Saturday, then it's 1.5hr drive to Brian's, then on Sunday morning we have to be at Tony's house by 8am to leave...we'll see. Do you know what time the event is over?

Usually ends at like 4pm ish. I might drive there with you guys, ill let Brian know saturday.
 
List of stuff to do before engine can be assembled:

Stuff to weld:
Oil pan (return line fitting / oil temp sender 1/8 NPT bung)
O2 housing studs
Throttle body
Turbine crack
(Also delete intake pipe nipples)

Stuff to blast with glass beads:
Main motor mount / trans mount
Water pump (or buy new one)
CAS
Fuel rail
Thermostat housings
Power steering pump
Throttle body elbow / tb / intake manifold
Compressor housing
Oil filter housing
Transmission
Alternator case (or get Saturn alternator)

Stuff to blast then powdercoat (not all of this needs done to assemble engine):

Shift cable levers
Redo cam gears
Redo radiator mounts
Redo timing tins
Oil pan
Some random plate from engine bay
Water pump and power steering pulleys
Some stuff from interior
P/S reservoir
Suspension stuff eventually


Then finish up turbo, I have to touch up the porting on the intake manifold and finish cleaning it with B-12, clean the rust off the block, check to make sure exhaust and intake ports are as clean as they can get, tap a bunch of threads on head, block, and parts, buy oodles of SS hardware, and bug Tyler to get me the tool to put the balance shaft bearings back in. I think that's it. Then we assemble.
 
Just got done reading the whole thread Eric. The car looks like it is going to be very clean. Keep up the good work.
 
good progress! Coming along well, While my car is down for now I'll be doing the same. Im excited considering I am a wire technician for 12V so I love this stuff, I just need to find the time for my own....

Good luck, keep at it!
 
Quick update this time. I've finished up the blast cabinet and I've been blasting a bunch of stuff with extra fine glass beads, and I installed my Prothane mounts. I have a bunch of things at the welder's but he's had them for nearly a month now :toobad: We got ahold of an oven for powdercoating so we're hoping it works, but we probably won't get to trying it out for a couple of weeks.

Enjoy the pics :)
 

Attachments

Those parts won't be painted. They're all aluminum so that I'm leaving them like they are with the blasted finish. All the bolts I blasted will be powdercoated clear since they're steel, along with a couple pieces on the power steering pump.
 
I've been working on the harnesses the past couple of days. First, I made these two documents to outline my plans for the harnesses.
View attachment ECU Harness.doc
View attachment Fuse Box Harness.doc

Then, I started removing and moving connectors on the ecu harness. The process is pretty simple; pick one wire from the connector you want to remove and trace it back to where it ends. If it is a power or ground wire, it will most likely be crimped to other power and ground wires. The factory has these crimped at many places in the harness. You really have no choice but to cut the wire off from the others. I am probably going to go back and replace all the crimps with solder joints later; the wires I cut off left some sharp wires behind and I don't want them damaging other wires. Most of the power wires end up making their way to the ecu power supply, pins 12 and 25. The grounds can either go to chassis ground or the sensor ground at the ecu, pin 92. If the wire ends at a connector, do NOT cut the wire. Remove the pin from the connector.

Here is how to remove pins from the ecu connectors:
http://www.dsmtuners.com/forums/art...w-remove-replace-pins-harness-connectors.html

You'll see I added a post on there because my ecu connectors are different from other 2g's I've seen; they changed the connector style some year.

Here is how to remove wires from waterproof connectors (found in engine bay):
untitled.JPG


These pins were harder for me to remove than the ecu connectors. Patience, patience, patience. Oh, and the proper tools help too :coy: 
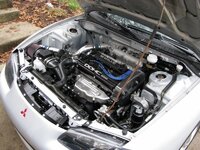
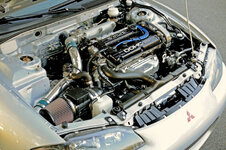
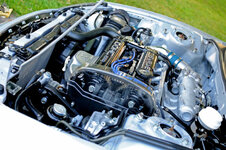
Try to deal with ONE wire at a time; you will get confused less. When pulling wires through the big rubber firewall grommets BE CAREFUL!! The pins have sharp edges and you can very easily damage other wires when pulling the pins through the grommet. If you're careful you will be fine. Probably the better way to do it is to cut the pins off, but I kinda wanted to keep everything intact "just in case".


Here are the notes I've taken along the way. Most of this probably won't make too much sense but hopefully it helps people who tackle this project. I didn't take great notes on the connectors that are being deleted. This is all for the ecu harness.

Delete:
1. Manifold Differential Pressure (MDP) sensor
3 wires - ground, power, pin
11. Auto-Cruise Control Vacuum Pump (Cruise Control Actuator)
3 wires - all end at pins
13. Fuel Pressure Solenoid (FPS) Valve - save one wire for alternator
2 wires - left red wire for new alternator connector, removed pin from fps connector, other wire ended in pin
14. Exhaust Gas Recirculation (EGR) Control Solenoid
2 wires - ecu pin 6, power
16. Brake Fluid Level Switch
2 wires - pin, ground
28. Theft Alarm Horn
2 wires - pin, ground
30. Turbocharger Waste Gate Solenoid Valve [Boost Control Solenoid (BCS)]
2 wires - ecu pin 11, power
35. EVAP Emission Purge Control Solenoid Valve
2 wires - pin, power
36. Air Conditioning (A/C) Compressor
3 wires - pin, green wire cut, pin (connector 32, top left)
52. Fuel Pump Check Connector - connect wires together, only delete plug
2 wires to 1 pin - cut off connector, wires go to power transistor and coil pack, must solder them together
Rear O2 Sensor
power, ecu pin 54, green loom (ground strap and ground in gray tape, ecu pin 75)

Move to interior:
7. Ignition Power Transistor
cut blue/black wire to coil pack, must lengthen wire and reconnect
32. Front Wiring Harness and Control Wiring Harness Combination **
33. ? **
51. Ignition Suppression Resistor (Fuel Injector Resistor Box)
53. Windshield Wiper Motor - run through hvac air intake hole
cut chassis ground wire (black), must reconnect

Move to fuse box harness:
12. Volume Airflow Sensor [Mass Airflow Sensor (MAS)] **
1. orange - ecu pin 85
2. green/yellow - cut from same color wire in harness, ecu pin 81
3. blue/yellow - ecu pin 90
4. red/white - ecu pin 19
5. red/blue - ecu pin 72
6. black - cut from grounds on harness, sensor ground, ecu pin 92
7. red - cut from ecu power source, pins 12/25

31. Back-up Light Switch **
2 wires - red and black, pins removed from big blue interior connector (I made myself a little diagram of the blue connector)
39. Heated Oxygen Sensor (Front O2 Sensor)
red - cut wire from ecu power source, pins 12/25
yellow - ecu pin 60
green loom still attahced to ecu harness
I made myself a diagram of the o2 connector


BTW, every instance of "52. Fuel Pump Check Connector" should actually be "52. Engine Speed Detection Connector", I just forgot to change them.


And, of course, a picture of the wires I've removed:
IMG_6922.jpg
 
Last edited by a moderator:
Add Value - Be Respectful - No Trolling - No Misinformation - Participate Often!
Support Vendors who Support the DSM Community

Build Thread Updates

Latest Classifieds

Back
Top