The Top DSM Community on the Web

For 1990-1999 Mitsubishi Eclipse, Eagle Talon, Plymouth Laser, and Galant VR-4 Owners. Log in to remove most ads.

Please Support Fuel Injector Clinic
Please Support STM Tuned

Street Build '97 Eclipse AWD GS-T (2006 to Present)

This site may earn a commission from merchant
affiliate links, including eBay, Amazon, and others.

This site may earn a commission from merchant affiliate links, including eBay, Amazon, and others.

Man Corey, last time I checked out your car must have been ages ago. Are you still running your stock 7 bolt? Or has the built motor gone in?


In terms of your motor build, I saw you intended on running the 100mm crank. Was this in a 4g64 block? Also, did you look into running a 156mm rod to lengthen the stroke of your revolution?

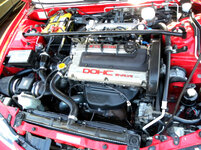
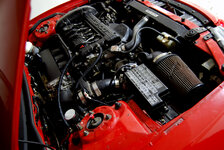
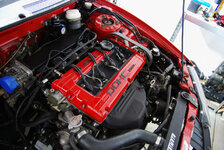
I just did this build in my evo 8.
I went with:
4g64 block
100mm OEM Crank
Custom made CP Pistons
Manley TT 156mm rods
ARP hardware
AMS Headgasket.

With this particular build I found a few things:
-The 64 block does not have oil squirters and deleting the balance shafts caused the crankcase pressure to be outstanding.
(there are a few other things but nothing immediately)

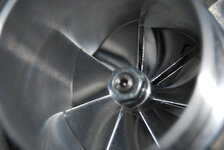
I paired this motor with a FP DBB Black, and the car is a beast. It feels amazing and is a blast to drive. Glad to see your car coming along man, especially because it's red :p
 
The stock 7-bolt is still in there holding together and making more power than it was, I still think it's the tuner... ;)

It's a 4g63 7-bolt block, 4g64 100mm crank, Manley lightweight TT 150mm rods w/ 22mm wrist pin, and Wiseco 9:1 HD stroker pistons. That picture I posted in your thread is one I took just yesterday after I saw your post, it's still on the engine stand with no front case covered in plastic. I just spent a few hundred in parts so I can complete the bottom end and I've been debating on finishing up the head for it and installing it before the summer's over. Our race season in Arizona is in the winter so the car's garaged out of the desert sun until October, might as well do something to it.

JAM did punch/plug the oil jets but I'm keeping the BS's, when they clearanced the block for the rods they also clearanced the BS's. I've got a good crankcase evac setup and a MAP sensor to log it, hopefully I see vacuum on it even with this motor.

Good info. I'm looking forward to running it, I'm just hesistant to pull the stock motor because it's been working perfectly fine for the life of the car and I've never pulled it before so it makes me nervous how long the car might be down for. I know myself, I'll have to sand/paint the bay, tuck the harness, etc. etc. etc. because I'm a "while I'm in there" DSMer and it would never drive again. LOL
 
20JUL2012 - JusMX141 Modified BEP td05 8cm2 Hotside

Years ago I got my hands on a hard to find BEP hotside designed to bolt onto a 14b/16g that was 8cm2, center volute, and has the larger 34mm wastegate flapper. The problem is the "design" was flawed because it used bolts to hold the hotside to the CHRA which, when installed, didn't allow the use of the oil return (which isn't possible) so it was a paperweight until I got in touch with Justin (JusMX141). I sent him the hotside and he modified it so that it could easily bolt to any td05 CHRA similar to the BEP hotsides would onto a Holset.

Trying to squeeze everything out of the HTA68 required a bigger hotside and I was excited to install this and get some positive results!

DSC_0101.jpg


DSC_0105.jpg


DSC_0103.jpg

 
24JUL2012 - Shipping My Car's To Arizona

After 8 long years I decided it was time to separate from the Navy but with it, meant leaving the place I had come to love, San Diego. Tough but necessary to start a career and possibly grow up a little and I'm fortunate enough to have gotten a job before I was even discharged, which is a stressful thought while you're still in... getting a new job. My EOAS (End of Active Service) is July 28th and my start date was August 8th so I needed to get my car's out to Phoenix, AZ but there was no way I was driving them through the desert 300 miles in July. I decided it was best I shipped both DSM's and my fiancee and I drive the gas guzzling Prius...

Of course it was hard to let both cars go for a few weeks without knowing where they were or what was happening to them. Before I gave the keys up to the GSX I connected in ECMLink and put the rev limiter to 3k, no joyrides! :f-u:

DSC_0113.jpg


DSC_0120.jpg


DSC_0130.jpg


I hate to see you go but, I love to watch you leave...

DSC_0135.jpg

 
That's a gorgeous car you have there. May I ask how many times you were pulled over a month in Cali whilst driving that beautiful piece of machinery?

"Before I gave the keys up to the GSX I connected in ECMLink and put the rev limiter to 3k, no joyrides! :f-u:" - I literally LOL'd.
 
That's a gorgeous car you have there. May I ask how many times you were pulled over a month in Cali whilst driving that beautiful piece of machinery?

"Before I gave the keys up to the GSX I connected in ECMLink and put the rev limiter to 3k, no joyrides! :f-u:" - I literally LOL'd.
I can honestly say, I have yet to be pulled over in the red DSM. I think a lot of it had to do with my out of state plates, military is allowed to maintain out of state residence. I also drive like I'm on my way to a nursing home unless I'm doing a tuning pull so that helps too...

Thanks for the compliments.
 
11SEP2012 - Carbon Fiber Roof Vinyl and Window Tint
Living in Southern California having window tint is more of a hassle than anything, CHP will pull you over for just about anything and having tint darker than 70% on the front windows is against the law. Since the recent move to Arizona though, the first thing I did was tint the windows 28% all around to protect my interior and keep it cool in the summer and while I was getting the windows tinted, I decided to do something with the mismatched roof and had the same shop vinyl wrap it in carbon fiber. Something that's a bit if'y since it isn't really CF but after getting the CF hood and hatch the roof line didn't look right being red so I'm glad I did it and besides, it will protect the roof paint from the AZ sun too. Maybe I should wrap the entire car? :hmm:

DSC_0217.jpg


DSC_0213.jpg


DSC_0215-1.jpg


DSC_0215.jpg
 
Carbon roof looks good ;)

Never really been a fan, specifically because it's not textured the same as carbon products. I remember asking you years ago about plastidip, then all of the sudden it exploded and everybody began to dip their cars.

Car looks good man, hopefully mine will look half as good once it's back from paint :thumb:
 
Your car looks great, even before paint. It's hard to see in the photos but my car has 17yrs of battle scars driving the streets of San Diego, trust me. I know what you mean by the texture but the stuff they used on my roof actually has CF weave texture to it, people ask me all the time how expensive it was to mold the roof in CF until I tell them it's CF. The only giveaway is the finish on it, it's not as glossy as the CF hood/hatch but other than that it's surprisingly close...
 
01OCT2012 - Storage Unit Build
We moved in with my future in-laws and I had no place to park the car so I had no option but to get a covered storage garage. I'm glad I did though, it kept the car out of the sun and if I wanted to I'd be able to install a few mods on it. The build date on our house was mid-December so I had a few months to iron out some things I had been wanting to do, so I placed an order with ExtremePSI and bought a few things off the Tuners classifieds and got to work.

Here's the list...

- Exhaust manifold gasket
- Exhaust manifold to turbo (steel) 8cm2 gasket
- OE exhaust manifold studs/copper nuts
- Intake manifold gasket

- OE throttle body to intake manifold bolts
- Mishimoto 143* thermostat
- Tial small red (5.8psi) spring
DSC_0251.jpg


I was having problems maintaining boost, it would hit 30psi and taper to 24psi by redline and a part of the reason (I was hoping) was not running enough spring in the wastegate. Tial recommends not to double more than the rated spring pressure and the spring I was using was a single green (13psi) spring. Bumping it to 19psi with the second spring should help...

DSC_0252.jpg


Before I start throwing parts under the hood I decided it was time to ceramic coat the hotside a few hotside pieces and powdercoat the intake stuff. I got my hands on a true Evo III, not RVR, intake manifold and thought I'd powder coat it too.

DSC_0255.jpg


Engine bay's looking a little dirty after the trip to Arizona on the flat bed, a lot of work ahead of me working on the car in a 100*+ heat in a storage unit.

DSC_0253.jpg
 
Oh man, I know the feeling battling roads. My friend bought my car from Chicago, and drove it back. Needless to say, it never had a clear bra or a taped front end for that drive. So paint will be necessary. I haven't driven my car enough to do much cosmetic damage ROFL.

Out of curiosity, what gaskets were you using before and were they leaking? I've been lucky over the years and not had many leak (aside from the turbo/manifold gasket), I usually buy the cometic kits that come with all the gaskets and roll with those. Especially running the SMIM i've noticed that the intake manifold gasket does not always match properly, so I usually trim or widen it as needed. Which is pretty useless on a stock port head
 
I actually don't use a gasket on the SMIM, I just clean the sealing surface off really well with a razor and use a very thin layer of black RTV. This seams to give me the best results after everything sets up and I do a quick BLT, it seems like I can never get it to seal with a gasket.

The gasket that was installed before I sent the parts off to get coated were those embossed copper ones that FFWD Connection sells and I absolutely hated them. My personal preference is just using a thin layer of black RTV on the throttle body and intake manifold (no gaskets), the 4 layer copper exhaust manifold gasket, and the SS turbo and o2 housing gaskets.
 
30OCT2012 - Fresh Coated Parts & Kiggly HLA Install
It took a few weeks to get my parts back from the local coater but, in the end, he did a good job and the price was A LOT cheaper than what it cost me in San Diego so I was happy.

PC parts.jpg


The BEP 8cm2 hotside looked nice on the HTA68, it almost pulled a tear. Hopefully I can get some more top end from this small snail...

DSC_0339.jpg


DSC_0337.jpg


DSC_0338.jpg


I installed the rest of my parts, the Evo III IM, one piece UICP, and FP exhaust manifold and it really cleaned up the bay.

DSC_0346.jpg


I got in on a group buy deal for a Kiggly HLA that I couldn't resist, no better time than ever to install it.

DSC_0350.jpg


DSC_0352.jpg

 
31OCT2012 - Bolted on HTA68 in the 8cm2 BEP hotside & Photo Shoot
I couldn't wait any longer, the car had been down long enough and I wanted to pull it out of the storage unit and go for a drive since it was finally starting to cool off outside. Everything bolted up perfectly and that BEP housing looks like a monster compared to the Mitsu 7cm2...

DSC_0358.jpg


Since I've been living with my future in-laws for almost 4 months I was anxious to swing by our new house and see how far along they were. This was the first time seeing the house with a garage door and stucco on it, I was so excited I had to back in the driveway a snap a shot of the car AND the house. Not too long and I'll have a place to wrench on my car again! Don't mind the swimming pool... LOL

DSC_0400.jpg


The car was covered in dust and dirt from the semi-truck ride out to Phoenix and sitting in a storage unit for a few months so I didn't mind taking it off road to get a cool shot in front of this mountain. Not really one of my favorites of the car but I like the background, believe it or not this is just a mile South of where my house is being built too.

DSC_0407.jpg
 
10JAN2013 - New House, New Calendar, & New Fuel Pump
I'm glad I got my car back on the road when I did, November and December were a blur especially with the holidays and getting everything taken care of with the house build. We closed on our house on 12/12/12 (kind of cool) but with everything going on with Thanksgiving, Christmas, and New Years nothing was done to the car, unfortunately.

Finally, 575 sq/ft of my own... that I have to share with a Prius. LOL

DSC_0499.jpg


I was nominated and won ROTM (Ride of the Month) on the late Mitsu:dsm:Media site and every car that gets ROTM locks in a spot for the next years calendar. Pretty exciting seeing your own hard work on display in a calendar!

DSC_0522.jpg


After seeing my car in the calendar it got me off my ass and I went out to the garage to install a Aeromotive Stealth 340lph fuel pump. I had no good reason to install it, the Walbro 255 HP was supporting my current setup just fine but I had the Aero pump in a box collecting dust and I needed an excuse to work on my DSM again.

DSC_0558.jpg


DSC_0562.jpg


I had base fuel pressure set at 43.5psi before I installed the Aero 340lph, after I installed it and checked BFP it bumped to nearly 50psi. Below is a chart comparting the Aero 340lph to a Walbro 255 HP and 255, should give me a bit more cushion than the Walbro did.

aei-340lph-chart[1].jpg
 
12FEB2013 - AFCO Scirocco Radiator Install Part I
Another one of those parts sitting around collecting dust and with my new found space to work on the car I decided it was time to tackle another project I had been putting off, installing a dual pass AFCO radiator. I had no real excuse for doing this install either, other than just wanting to clean up the bay and make room for a larger turbo in the future if I ever decided to run one.
I bought the AFCO radiator new off of Savo (my3AWDgst) already modified to bolt into a 2g frame. Before he sold it he had -20AN bungs welded to the end tanks, brackets on the side of it which bolt directly to the A/C condenser mounts, and posts welded to the bottom mounting brackets to hold it in place to the frame.


Here are a good read on the difference between a single pass and a dual pass radiator, if you're interested...

If you're interested in purchasing a AFCO radiator look at Summit Racing's page ---> AFCO 80107N

Before I get to deep into this and convince everyone who reads this they want a AFCO radiator setup too, let me stress this. DO NOT RUN 20AN fittings, go to 16AN and be done with it. The price of 20AN hose ends is absolutely outrageous and running 16AN line would have worked just fine. This is something I didn't read into until AFTER I bought Savo's radiator and realized that 20AN 45° hose-ends were $95/ea. You've been warned...
Below are pictures of the radiator when I bought it from Savo, it was in perfect shape and it even came polished. :sneaky:

DSC_0262.jpg


DSC_0263.jpg


DSC_0269.jpg


Parts look great in the living room but don't do much for the car unless they're installed and working, I put it off long enough. First I drained the coolant and removed everything from the radiator forward, I wanted as much room to work as I could get. I also removed the t-stat inlet/outlet to get -20AN bungs welded on them as well. The first thing I did was measure the distance between the two posts on the bottom of the radiator and drilled holes in the lower radiator support beam with a step drill bit (be sure to remove the wiring harness before so this or you'll have problems). Then I modified the stock rubber lower radiator bushings and pressed them into the holes so there's no metal on metal rubbing.

dsc_0044-jpg.jpg


Since I was going to run a push fan I also removed the hood latch, hood latch bracket, and the vertical bracket that the P/S cooler mounts too. They were easily removed with a spot weld drill bit. The upper radiator support bracket required some "massaging" to fit the AFCO radiator in but it's nothing too extreme and after the mock-up it shouldn't be too bad to clean up.

DSC_0565.jpg


There's a lot of room now, hopefully pushing the radiator further from the exhaust manifold will also help with coolant temps.

DSC_0567.jpg


The radiator brackets mounted perfectly to the existing A/C condenser brackets to hold it in place.

DSC_0569.jpg


DSC_0571.jpg


Calling it a day, now it's time to test fit, cut, and build the 20AN hoses that will replace the stock rubber radiator hoses.
 
Nice work corey really like the exhaust housing temped to grab the same fp turbo, myself, interesting information on the radiator comparison.
 
Thanks, Vic. There's a HTA68 in the classifieds right now if you're trying to pick one up. It spools quick and with the right combination of parts it will pull to redline.
 
20FEB2013 - AFCO Scirocco Radiator Install Part II

I dug out all the parts I had ordered from Summit over a year ago, before I moved to Arizona so I could figure out if I had everything I needed to finish the install. This was the list of parts I bought.
  • (3') -20AN Pro-Lite 350 Hose - 350320ERL
  • (2) -20AN 45° Earl's Auto-Fit Hose Ends AT304620ERL
  • (2) -20AN straight Earl's Auto-Fit Hose Ends AT300120ERL
  • (2) -20AN Vibrant Weld Bungs 11156
I took the -20AN bungs down to Precision Chassis Works, while I waited I was drooling over their cage builds. Luckily for me they're only 10 miles away, too! After I got my t-stat inlet/outlet back I bolted them down and then threaded the hose ends on to make sure orientation was right, I didn't want to cut the hose until I knew for sure it was going to work.

dsc_0047-jpg.jpg


The final mock up before I started cutting the -20AN hose I ended up with both 45 fittings on the radiator side and both straight fittings on the t-stat.

DSC_0584.jpg


I used a pair of progressive pipe cutters from Lowe's that made quick work of the Pro-Lite hose, now I just needed to find someone with a bench-vise so I could assemble them.

DSC_0607.jpg
 
10MAR2013 - Finally, Arizona License Plates

My stickers were about to expire on my Colorado plates so when I started shopping for a personalized plate in Arizona I quickly realized that I was going to have to retire CORNF3D. A little disappointed that CORNF3D was already taken but, at the same time I really couldn't have used it anyway since the Arizona Veterans plates only allow for 6 characters. Believe it or not, the plate I decided on didn't really require too much thought since it's the title of my build thread... AWD GST.

DSC_0613.jpg
 
02JUN2013 - AFCO Scirocco Radiator Install Part III
Trust me, I'm not proud of it but as quickly as I went into tackling the AFCO project the flame fizzled and life caught up with me and so did the summer heat. Part of me was wanting to get the car done since I hadn't driven it in months but another part of me knew that meant going out to the 110* garage and sweating my ass off, which kept me stuck inside with the air conditioning. In my defense, it did take me a long time to find someone with a bench-vise mounted solid enough to a bench that I could assemble the -20AN hoses. It would have been impossible with just the AN wrench I have, it required every inch of breaker bar to snug the fittings up... did I mention this could have been cheaper and easier just going with -16AN?

Fortunately after all the time waiting my double checking paid off and the new -20AN radiator hoses fit perfectly between the bungs on the radiator and t-stat housing.

DSC_0063.jpg


DSC_0064.jpg


Now that the lines fit it was time to get the front bumper bracket sorted. The brace that runs between the upper and lower radiator beams also supports the front bumper bracket. I'm not a welder and I'm the last person that should be fabricating parts so I just have to get creative with what I've got... A jig saw, drill, and hammer.
I decided I wanted to use the OE bumper support and figured I'd just drill out the spot welds that held the lower section onto it. The bottom/right piece is garbage, I only needed the top portion that the bumper bolted down to.

dsc_0056-jpg.jpg


Next it was fitting the FMIC core. Running a push fan on the AFCO meant clearance issues with the back of the intercooler but, again, I have no fab skills so I had to get creative. I had to figure out a way to move the intercooler off the frame so I measured the distance I needed to move it to clear the fan, which ended up being approximately 1", and I took a trip to my favorite car parts store... Lowe's. In the plumbing department I found thick rubber washers that are used on faucets (I think?) that I used as spacers that could absorb any vibration from the chassis, kind of like shock mounting the FMIC core. I also picked up longer SS bolts to mount the intercooler since the one's I was using were too short with the addition of the rubber spacers. To my surprise, IT WORKED! I had about 0.25" of clearance from the back of the FMIC core and the radiator fan and the rubber washers/SS bolts were solid.

dsc_0059-jpg.jpg


I really wanted to clean up the upper radiator support bracket since it was really bent to hell after I fitted the AFCO in there. I pulled out my scroll saw and used metal cutting blades to cut the upper radiator support in a nice straight line, I cut circles out around the holes that the front bumper bracket bolts to, and then I pulled everything off and spray painted it with color matching paint to make it look good again.

dsc_0046-jpg.jpg


Originally I had planned to use the OEM 10mm bolts that hold the front bumper bracket to the upper radiator support but after putting the AFCO back in I soon realized that wasn't going to happen. The OEM bolts were too long and protruded out of the back of the bolt holes so I couldn't even tighten them all the way. Lowe's doesn't carry SS allen heads so this time I went to Ace Hardware and picked up some M6 x 1 x 20mm SS allen head bolts, it added a little bling and they were short enough that they didn't protrude into the top of the radiator.

dsc_0061-jpg.jpg


DSC_0060.jpg


As excited as I am to finish, I had to call it a day. Everything was falling into place though and I was closer to having my car back on the road again.
 
12JUN2013 - AFCO Scirocco Radiator Install Part IV
I always almost finished, just a few more things that were bugging me with the install and then it would be time to fill it up with coolant. I wasn't really a fan of the way the AFCO coolant drain plug was setup, it just came with a bung on the side of one of the end tanks where most radiators have it on the bottom. So in the event you'd like to drain the coolant, which we do a lot on DSM's, it would be impossible to control and it would just run down the side of the radiator. The wheels started turning again and I came up with an idea, I'd add a 90* Q.D. fitting to the side of the radiator like a faucet so I could catch the coolant. Jiffy-tite had exactly what I needed...
  • Jiffy-Tite 22804E 90 Degree 2000 Series Elbow Plug with 1/4” NPT Male Valved
  • Jiffy-Tite 21506PJ Straight 2000 Series 6AN Hose Barb Female Valved
  • Jiffy-Tite MS2000P 2000 Series Socket Dust Cap
The 1/4" NPT 90* fitting would thread into the radiator and always be attached, I got it valved so it will hold the fluid, and I decided it was a good idea to protect the valve so I bought a dust cap for it too. The 6AN hose barbed fitting I bought was only going to be used when I drain the coolant, you just press the Q.D. together and the coolant will flush out of the barbed 6AN side of the fitting and I can attach a hose to control where it drains. Initially the cost was a bit high for just a radiator drain setup but after using it once it would be well worth the money spent then dealing with the mess if I had just used the plug.

dsc_0054-jpg.jpg


DSC_0610.jpg


Now that I've got the plug situated it was time to install that Mishimoto 143* t-stat that I bought last year. Don't mind the orientation of the t-stat in this photo, I rotated it with the weep hole on top before I bolted on the outlet.

dsc_0062-jpg.jpg


The stock coolant overflow tank had to be moved because of the location of the new upper radiator hose. I used the opportunity to clean up the bay even more and relocate it down in the stock SMIC location using a universal overflow tank from Auto Zone. It wasn't pretty but it didn't have to be, it was hidden out of the way and it was functional. I test fit the bumper to make sure there weren't any clearance issues and everything looked like it worked, the only thing that might be a little tricky is filling it but it wouldn't take much to run a hose through the hole behind the headlight and funnel it into the overflow.

DSC_0606.jpg


The install was complete all that was left was filling it with 99% distilled water and 1% Redline Water Wetter. I couldn't be happier with the results, I just wish it wouldn't have taken me so long to build the AN hoses.

DSC_0069.jpg


attachment.jpg


Old faithful on the right and money pits on the left...

DSC_0042.jpg
 
To say the least, I definitely didn't do it on a budget. There's plenty of places I could have saved some money but here's the big stuff that I have receipts for, miscellaneous stuff like the SS bolts and coolant overflow, etc probably added another $50 on top.

AFCO Radiator and push fan w/ 20AN fittings and brackets to mount it - $350
20AN hose and hose ends from Summit - $312
Jiffy-Tite Fittings for drain - $60
Mishimoto 143* t-stat - $40
TOTAL = $762
There's definitely a few places I could have saved a few bucks and probably gotten the total down to $400 had I not jumped into it head first when I bought the AFCO with 20AN bungs on it already. Here's the way to do this on a budget...

Griffin Radiator Core - $275 (It's $50 less than the AFCO core but its the same thing)
Perma-Cool 19122 12" Fan - $81
TOTAL = $356

Doing it this way is the cheapest possible, you'd just run it as a pull fan (engine bay side) so you don't have to delete the hood latch and push the intercooler out. If you want it as a push fan then you'd have to factor in the cost of hood pins or aerocatch latches to keep the hood down. You don't NEED to run AN hoses either, as you'll see later in my build thread you can actually use the STOCK upper and lower 2g radiator hoses - they work just fine.
 
Awesome build thread, I only had a chance to scan through it looking for some motivation and I must say I enjoyed it very much! Keep doing what your doing, your an inspiration to all us dsm guys!
 
Support Vendors who Support the DSM Community
Boosted Fabrication ECM Tuning ExtremePSI Fuel Injector Clinic Innovation Products Jacks Transmissions JNZ Tuning Kiggly Racing Morrison Fabrications MyMitsubishiStore.com RixRacing RockAuto RTM Racing STM Tuned

Latest posts

Build Thread Updates

Vendor Updates

Latest Classifieds

Back
Top