The Top DSM Community on the Web

For 1990-1999 Mitsubishi Eclipse, Eagle Talon, Plymouth Laser, and Galant VR-4 Owners. Log in to remove most ads.

Please Support ExtremePSI
Please Support STM Tuned

Gauge cluster LED project

This site may earn a commission from merchant
affiliate links, including eBay, Amazon, and others.

This site may earn a commission from merchant affiliate links, including eBay, Amazon, and others.

turbosax2

Moderator
4,455
549
Nov 19, 2006
Mechanicsburg, Pennsylvania
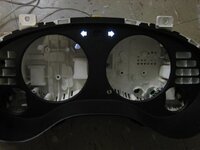
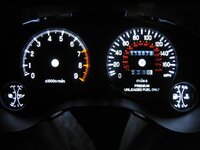
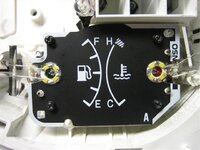
Hey everybody - this has been my recent project while I'm at school. I'm lighting up a 2g gauge cluster with white led's. I'm anti-ricer and crazy lights and all that but this looks so clean and so much better than stock so I had to do it! This idea is fully credited to azdave, electronics God!

I'm not done yet but once I finish and get time, I will be writing a detailed tech article (I got permission from azdave to do so).

Check out azdave's short writeup at this link (you have to become a member to view the forums):
http://www.hidplanet.com/forums/viewtopic.php?t=23692&sid=926893f0a46735959bb55804efc6047b

So, what do you think so far?
 

Attachments

  • IMG_3900 (Small).JPG
    IMG_3900 (Small).JPG
    31.8 KB · Views: 5,037
  • IMG_3905 (Small).JPG
    IMG_3905 (Small).JPG
    55.4 KB · Views: 5,088
  • IMG_3926 (Small).JPG
    IMG_3926 (Small).JPG
    37.5 KB · Views: 8,042
Looks GREAT! That would go really well with autometer sport comp II gauges
 
That looks soooooooo much better then any of the gauge set-ups I've ever seen. I am currently working on a custom dashboard and would like to retain my stock cluster.
Also, how much did that cost you for total materials, etc?
Any issues with heat after prolonged use of the cluster lights?
 
Thanks for all the compliments!

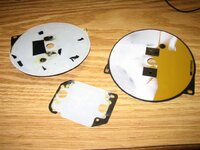
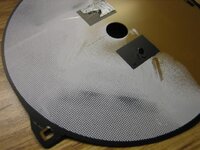
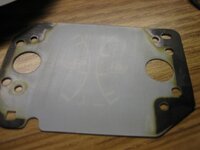
DGajre777: I used sandpaper to remove all of the factory yellow tint and black and white gradient screening that was on the back of the gauge faces. I started with 150 grit and worked my way up to 600 grit just to smooth the face out. After I installed the lights and checked to see how they looked with the gauge faces on, I noticed several tiny "pinhole" leaks of light on the black parts of the gauge face. I don't know if the leaks were there before I sanded the screening off or not. I fixed these leaks by placing small pieces of electrical tape on the backs of the faces. This didn't affect how the light shone through at all.

I think that's what you were talking about "hot spots" - if not let me know.


Blitzeclips: The materials I had to buy were string led's, 1206 smt led's, and 22 gauge wire. The rest of the materials used I already had.

String led's: http://www.oznium.com/led-flex-strips
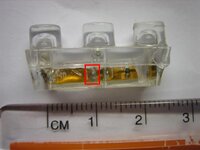
I used a total of 75 led's (6 for the boost/oil gauge, 30 for tachometer, 24 for speedometer, 9 for gas/coolant gauge, and 3 for each turn signal). I bought a 6 foot strip of lights and a 9 inch strip of lights. I bought this many because I planned on doing two clusters and I figured I would burn some lights out while figuring out how to wire everything up - I ruined about 15 lights so far. You can cut the strip of lights to whatever length you need and the cut portions can be rewired to use too. The LEDs are wired in groups of 3, so you should cut every 3 LEDs.

1206 smt led's: Search ebay for "white 1206 smt led" - any of the results should work fine.
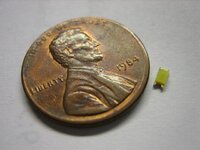
These lights are as big as the year that is stamped on a penny - tiny little buggers! And they are a PITA to wire up! This is the part that I'm working on now, still trying to figure out the best way to wire them.

Wire: A roll of 22-24 gauge wire

Prices to do 1 cluster:
38" flexible led strip - $38.49 + $3.95 shipping = $42.44
1206 smt led's - $15 - $20 shipped from ebay
Wire - $4
Total - about $65

I also suggest buying another gauge cluster so you can leave yours in the car while you mess around with the other one - this does take A LOT OF TIME AND PATIENCE! Then you can swap the odometers on the clusters or whatever you need to do so it reads the right mileage (but I won't get into that here).

I can't say anything about issues with heat because I have only had the lights on for about a minute at a time yet. I'm just using a 12v lantern battery for testing purposes since I'm not near the car, so I don't want to wear out the battery too much. However, azdave has been using them for awhile and he didn't mention any problems with them, plus the website the led's were bought from says they put out little heat. I'm not worried about it at all.

Like I said, this has been a long process figuring out how to do this and I still have the hardest part ahead of me. My free time is pretty limited with school so progress is slow. Once I get the first cluster done, hopefully the next one will go a lot faster. Blitzeclips, I definitely will be doing a detailed writeup on this. I won't say I'm totally against doing this for other people but I still have to finish the first one and following ones would still probably take me a few weeks. I'll let you know once I have made more progress.
 

Attachments

  • IMG_3939 (Small).JPG
    IMG_3939 (Small).JPG
    38.8 KB · Views: 4,598
  • IMG_3940 (Small).JPG
    IMG_3940 (Small).JPG
    47.1 KB · Views: 15,982
  • IMG_3943 (Small).JPG
    IMG_3943 (Small).JPG
    54 KB · Views: 16,333
  • IMG_3944 (Small).JPG
    IMG_3944 (Small).JPG
    27.6 KB · Views: 16,262
turbosax2,
Thanks for doing the write up. Looking good! ...thought I would post a few of my pics and then let you carry on with the details.

Blitzeclips,
Heat won't be an issue unless you really over do it on LED count. I've been running about 100 LEDs in my conversion and another 16 LEDs on the needles. I rarely run them at anything but the lowest brightness setting and they still look amazing. You could run less LEDs at the risk of having "hotspots" in the dial faces. I used lots of LEDS to realy make the light very smooth across the whole cluster. The stock brighness control has handled the LEDS just fine and our cars come with PWM brightness control which is perfect for dimming LEDs correctly.


I have also converted the A/C, heater, fan control unit and all of the dash switches. It takes a lot of time but can be done and the end result is white lit gauges that you can see even in the daytime.

I used a different style LED strip (no longer found on ebay:confused: ) but the process is the same.


Final backlit LED cluster with illuminated needles.
You must be logged in to view this image or video.


Arranging LEDs (Dry run, not glued in yet)
You must be logged in to view this image or video.


Testing light distribution.
You must be logged in to view this image or video.


More tests. Whole cluster conversion pulls under 1A at full brightness.
You must be logged in to view this image or video.


Fnal LED arrangement in cluster.
You must be logged in to view this image or video.


Testing UV LEDs to light needles. (looked bad so I switched to white LEDs)
You must be logged in to view this image or video.


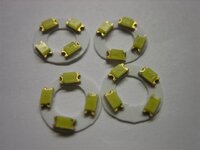
SMT LEDS used to light each needle.
You must be logged in to view this image or video.
 
azdave, would you happen to have any pics of the HVAC and dash switches LED conversion? I'd be interested to see what that looks like at night and possibly how you have the LED's configured behind the controls.

I've got some final pics on the home computer. I'll find a few this weekend if I have a chance and add them here. The process was much the same as the gauge cluster other than the royal pain it was to get the assembly out of there. I think I have about 35 LEDs in that housing.

One note on the HVAC panel is that the light bulb is tinted in that housing so it is much easier to change the color. You don't have to scrape all the yellow and black tint off of the overlays like with the main instument cluster.
 
WoW!! I did something similar once, but not nearly as in depth. I just replaced all of the stock bulbs with blue LED's and wired them to my parking light positive wire. I couldn't really tell you how the gauges themselves turned out, as I was only doing it to change the color of the needle and had already installed reverse EL gauges. The needles turned out GREAT though!!

Good work on the job though, I thought my 9 or 10 LEDs that I did was a PITA, but your guys' work looks fantastic.

I'm curious... any chance this could be done with say... Autometer Carbon Fiber gauges??
 
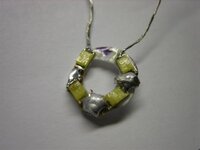
Well I got a bunch of work done and finished all the rings for the needles. I tested the whole cluster with the needles on and the needles don't appear orange anymore, they're more like a "salmon" color. I don't like it. I wasn't planning on changing the needles color but I'm going to now. I'm trying out a few different idea to see what works best. I'll be making the needles an orange-red color.

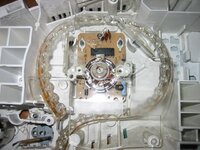
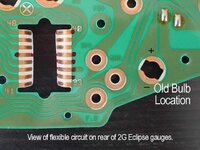
I finally got a chance to test out the cluster on the car when I went home this weekend. To my amazement, only the turn signals worked. When I was wiring the lights up, I used a picture that azdave posted (see below) to determine the polarity for the lights. I guess the non-turbo's gauges are backwards from the turbo's gauges because my polarities were backwards. Since I had this picture to go off of, I didn't bother to check for myself. Once I found out the lights weren't working I did check and found out I had the positive and negative wires switched. So now I have to switch all of the wires for the gauges. Oh well......getting close to done though!

95CarbonEclipse:
Sorry, I don't know if this could be done with Autometer Carbon Fiber Gauges. I'm not familiar with them so I would have to see the gauge to tell you.

azdave:
I would also like to see the pictures of the dash lighting if you get a chance.

P.S. - I took the cruise control / mirror control / fog light switch cluster out of the car so I'll be working on wiring led's into that too. The HVAC will be next. I will include these in the writeup when I get to it. And I bought more lights so I'll be ready to work on more gauge clusters once I get all the problems solved on this one!

I can't upload pictures right now, I guess because of the server upgrade, so I'll post them later.
 
Finally can upload some pictures!
 

Attachments

  • 1.JPG
    1.JPG
    46.5 KB · Views: 4,420
  • IMG_3965 (Small).JPG
    IMG_3965 (Small).JPG
    26.7 KB · Views: 15,668
  • IMG_3966 (Small).JPG
    IMG_3966 (Small).JPG
    22.7 KB · Views: 15,537
  • IMG_3999 (Small).JPG
    IMG_3999 (Small).JPG
    54.8 KB · Views: 4,403
  • IMG_4003 (Small).JPG
    IMG_4003 (Small).JPG
    34.9 KB · Views: 4,360
  • IMG_4008 (Small).JPG
    IMG_4008 (Small).JPG
    46.4 KB · Views: 4,445
very nice. i like it. im thinking this might be an easier way to change the lights in my cluster to light up blue at night. question though.

can 1 strip of LEDs fill up the whole gauge cluters or would i have to buy seperate pieces for certain parts? what lenghts do you guys recommend? also where would i solder the led strip to?

Thanks! If you buy a 38" strip of lights, that will be enough to light up the whole cluster. However, you can't just shove one strip in the cluster and make it fit. The strip will be cut up into 5 separate sections. When you cut a length of lights off, you will have to rewire the cutoff portion so you can still use it. It's cheaper to buy a 38" long section and rewire the lights yourself, but if you don't mind spending the extra money you can just buy 5 strips and cut off the parts you don't need. Then you don't have to worry about rewiring the cutoff portions.

The lengths used are 6 for the boost/oil gauge, 30 for tachometer, 21 + 3 for speedometer (two separate strips), 9 for gas/coolant gauge, and 3 for each turn signal.

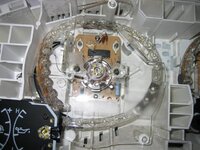
The light strips get soldered to the back of the cluster in the spots where the stock lights twisted into (see the first picture of post 15).

thanks a lot. another question: how hard is it to rewire the cutoff sections? can i manage with just twisting the wires together and covering it with electrical tape?
 
thanks a lot. another question: how hard is it to rewire the cutoff sections? can i manage with just twisting the wires together and covering it with electrical tape?

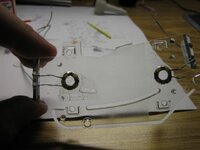
They must be soldered. See that tiny terminal on the led in the picture? Ya, that's what you're trying to attach a piece of 22 gauge wire to. It can be a little tricky.

If that scares you, this project may not be for you. It does require a little experience with soldering.
 

Attachments

  • IMG_4081 (Small).JPG
    IMG_4081 (Small).JPG
    30.6 KB · Views: 4,320
hm i have done soldering before in my electronics class 3 years ago as well as in 7th grade at a summer camp. that opening seems really small though. but i'm determined to get my gauges to blue. thanks a lot for the help. i'll post up sometime next month when i'm done ROFL
 
hm i have done soldering before in my electronics class 3 years ago as well as in 7th grade at a summer camp. that opening seems really small though. but i'm determined to get my gauges to blue. thanks a lot for the help. i'll post up sometime next month when i'm done ROFL

Haha, I've been working on this cluster on and off for almost three weeks now so don't feel bad if it does take you that long!
 
Wow...........if you can more of these I'll be the first one to buy them of you!!!!

Like I told Blitzeclips, I might be willing to make these for people but I have to finish the first one and make sure there are no problems. I wouldn't want to make these for others and have connections start failing or anything stupid like that.

I just finished fixing my "little" mistake of wiring all the lights up backwards :( so now I just have to figure out how to change the color of the needles. I'm going home this weekend so I'll be able to test the cluster out on the car again to make sure everything works.
 
azdave, would you happen to have any pics of the HVAC and dash switches LED conversion? I'd be interested to see what that looks like at night and possibly how you have the LED's configured behind the controls.

Here are a few other shots of the interior LED conversion. The LED strips inside the HVAC controls is nearly the same as the main cluster except that there are on 40 or so in there.

Nice and bright.
You must be logged in to view this image or video.


Replacing all the needles accurately took a few tweaks to get exact. I used GPS to check MPH, OBD2 to confirm RPM, etc.
You must be logged in to view this image or video.


Single white LED hidden in the door panel lights up the window and lock switches at full brightness wheneven the car is running. The LED then dims with the dash control when the headlight are turned on.
You must be logged in to view this image or video.


HVAC. Lots of work required to remove this assembly before opening it up.
You must be logged in to view this image or video.


Four SMT LEDs under the needle hub gives a nice "solar eclipse" graphic to the gauges. :)
You must be logged in to view this image or video.


CC and fog switches are a bit of a challenge to light up brightly but here they are.
You must be logged in to view this image or video.
 
Great pictures!

Right now I'm trying to figure out how to change the color of the needles. I've tried a few different things but I'm not satisfied with the results. Do you have any advice for me?
 
Support Vendors who Support the DSM Community
Boosted Fabrication ECM Tuning ExtremePSI Fuel Injector Clinic Innovation Products Jacks Transmissions JNZ Tuning Kiggly Racing Morrison Fabrications MyMitsubishiStore.com RixRacing RockAuto RTM Racing STM Tuned

Latest posts

Build Thread Updates

Vendor Updates

Latest Classifieds

Back
Top