SlowChild3
15+ Year Contributor
- 545
- 9
- Aug 19, 2005
-
Dayton,
Ohio
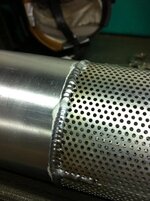
^^^ Looks great. Was that cap welded in a positioner?
Ya we turn everything.
For 1990-1999 Mitsubishi Eclipse, Eagle Talon, Plymouth Laser, and Galant VR-4 Owners. Log in to remove most ads.

This site may earn a commission from merchant
affiliate links, including eBay, Amazon, and others.
This site may earn a commission from merchant affiliate links, including eBay, Amazon, and others.
")
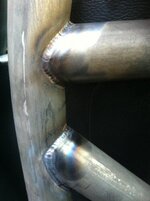
 . I've got a new DD/toy 90 GST that needed an engine so, upon reassembly, I've removed the balance shafts. And without further ado; my first aluminum job with the TIG.