This is a popular mod thats an old throw back to the muscle car days. There are many reasons to relocate the battery in your DSM. Moving the battery to the passenger side rear can help offset the weight of the driver for you road race guys. The main reason I chose to move the battery was to free up some space in the engine bay. The increased battery box size also allowd me to switch to an Optima Red Top battery. This increase in battery capacity allows me to crank that sucker at 20 degrees all day long.
Here is the list of the parts that I used for the install: (All parts were purchased from Jegs)
Optima Red Top Battery Group 34 753-9002-002 $179.99
Jegs Sealed Aluminum Battery Box Kit 555-10240 $115.99
Jegs Master Cutoff Switch 555-10305 $16.99
0 Gauge Wire Sourced from previous project.
Washer and 1" Pipe For Switch Nut
First lets talk about safety:
You are about to put a heavy battery containing acid in the passenger conpartment with you. THIS THING NEEDS TO BE FULLY SECURED! Rigging up a mounting system to hold the battery in place is not the thing to do. A kit such as the one from Jegs when properly installed will keep the battery secure in the event of a crash. Also most all wet cell batteries with vent hydrogen gas when they are charging. Even dry cell sealed batteries such as the Optima will vent a very slight amount of the gas. Hydrogen gas is extremely explosive. You must use a sealed battery box with a vent tube to the outside of the passenger compartment. Sealed batteries offer more safety and no maintanence. I would highly recommend a sealed battery for this type of installation.
Now lets talk tech:
Both NHRA and IHRA have strict requirements for relocating and securing batteries in the passenger compartment. Unless seperated by a fire wall the battery must be enclosed in a sealed box with a vent to the outside of the compartment. The battery must also be secured with at least two 3/8" bolts. Any battery that is relocated outside of the engine bay must also be equiped with a cutoff switch that when activated will cut off power to the entire car. The switch must be easily accessible in plain view and labeled as to the OFF position. Don't screw with the tech guys on these rules. They are very picky when it comes to relocating batteries and installation of a cutoff switch is a must.
NOW FOR THE INSTALL:
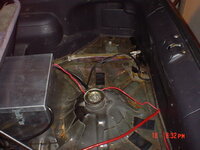
Start by selecting your location for the battery box. Depending on where you locate it you might have to drop the gas tank to drill and mount the box to the floor. On my car, I chose the area right behind the rear seat. Through careful measurement I deduced that I could drill my three holes without dropping the tank. The two holes straddle the rear crossmember.
First take the box and put your battery of chose in the box with the hold down bracket on the top of the battery. Next put a little paint or silicon on the end of the threaded rod from the kit and use it to pass through the bracket and make your hole locations on the bottom of the box. Next drill two 3/8" holes in the bottom of the box. Now place the box in the choosen location. Make and drill your two mount holes in the floor and also your vent tube hole.
To mount the box place a nut and washer on one end of the threaded rod and push it up through the bottom of the floor. Next slide the box down over the rods and secure the box with another washer and nut. I recommend you use the largest washers you can find to give the rod a larger area to grip on the thin floor metal. Place the battery in the box and install the remaining nuts to hold the battery to the box. You can now cut off the excess threaded rod. You can now assemble the vent fitting on the box and run the tube through the hole in the floor.
Next for the cutoff switch. Make sure when you order the switch you get one that will handle at least a 90amp continuous current. In the pictures you can see where I choose to mount mine where the lock for the hatch used to be. You will need to remove the interior plastic panels and also the outside center tail light panel. I removed the hatch lock and using a dremel tool ground the clearence needed for the switch. I coated all the metal area surrounding the swtich with a rubber compound to eliminate any chances of arcing. The nut to mount the switch presented a problem because the threads weren't long enough to go through the rear panel and get a nut on. I took a piece of pipe and threaded the inside for the threads on the switch (3/4"-18 NC thread). I cut the pipe to about a 1/2" length and welded it to a fender washer. This provided the custom nut that reaching in the panel to hold the switch in place. When painted it also made for an extremely clean look.
Now you can run a wire from the battery negative to the chassis for a ground. Next run a wire from the battery positive to the cutoff switch. The positive wire from the switch to the engine bay is next. I chose to run mine under the carpet. The wire passes through the firewall via the steering column seal. Connect it to the orginal positive terminal and completely wrap it in electrical tape.
NOTE FOR SECURITY SYSTEMS AND BATTERY CONSTANT DEVICES: The cutoff switch in this manner will allow anyone to cut off cempletely to your car making the security system turn off amungst other things. Several times I had idiot people walk over to my car and turn the cutoff switch off. I then had to reset my radio and my ECU had to relearn everything. In order to solve this problem I added another wire to the install. I ran a 10 gauge wire from the battery positive terminal to the engine side of the cutoff switch. I placed a 30 amp fuse on this wire so that it wouldn't be overloaded. I also placed a toggle switch in this wire so that when I was at the track I could disable this wire and remain within the rules. This wire will allow power to the car even with the cutoff switch off up to the fuse limit. Now at the track I switch the toggle off and all other times it remains on.
Here is the list of the parts that I used for the install: (All parts were purchased from Jegs)
Optima Red Top Battery Group 34 753-9002-002 $179.99
Jegs Sealed Aluminum Battery Box Kit 555-10240 $115.99
Jegs Master Cutoff Switch 555-10305 $16.99
0 Gauge Wire Sourced from previous project.
Washer and 1" Pipe For Switch Nut
First lets talk about safety:
You are about to put a heavy battery containing acid in the passenger conpartment with you. THIS THING NEEDS TO BE FULLY SECURED! Rigging up a mounting system to hold the battery in place is not the thing to do. A kit such as the one from Jegs when properly installed will keep the battery secure in the event of a crash. Also most all wet cell batteries with vent hydrogen gas when they are charging. Even dry cell sealed batteries such as the Optima will vent a very slight amount of the gas. Hydrogen gas is extremely explosive. You must use a sealed battery box with a vent tube to the outside of the passenger compartment. Sealed batteries offer more safety and no maintanence. I would highly recommend a sealed battery for this type of installation.
Now lets talk tech:
Both NHRA and IHRA have strict requirements for relocating and securing batteries in the passenger compartment. Unless seperated by a fire wall the battery must be enclosed in a sealed box with a vent to the outside of the compartment. The battery must also be secured with at least two 3/8" bolts. Any battery that is relocated outside of the engine bay must also be equiped with a cutoff switch that when activated will cut off power to the entire car. The switch must be easily accessible in plain view and labeled as to the OFF position. Don't screw with the tech guys on these rules. They are very picky when it comes to relocating batteries and installation of a cutoff switch is a must.
NOW FOR THE INSTALL:
Start by selecting your location for the battery box. Depending on where you locate it you might have to drop the gas tank to drill and mount the box to the floor. On my car, I chose the area right behind the rear seat. Through careful measurement I deduced that I could drill my three holes without dropping the tank. The two holes straddle the rear crossmember.
First take the box and put your battery of chose in the box with the hold down bracket on the top of the battery. Next put a little paint or silicon on the end of the threaded rod from the kit and use it to pass through the bracket and make your hole locations on the bottom of the box. Next drill two 3/8" holes in the bottom of the box. Now place the box in the choosen location. Make and drill your two mount holes in the floor and also your vent tube hole.
To mount the box place a nut and washer on one end of the threaded rod and push it up through the bottom of the floor. Next slide the box down over the rods and secure the box with another washer and nut. I recommend you use the largest washers you can find to give the rod a larger area to grip on the thin floor metal. Place the battery in the box and install the remaining nuts to hold the battery to the box. You can now cut off the excess threaded rod. You can now assemble the vent fitting on the box and run the tube through the hole in the floor.
Next for the cutoff switch. Make sure when you order the switch you get one that will handle at least a 90amp continuous current. In the pictures you can see where I choose to mount mine where the lock for the hatch used to be. You will need to remove the interior plastic panels and also the outside center tail light panel. I removed the hatch lock and using a dremel tool ground the clearence needed for the switch. I coated all the metal area surrounding the swtich with a rubber compound to eliminate any chances of arcing. The nut to mount the switch presented a problem because the threads weren't long enough to go through the rear panel and get a nut on. I took a piece of pipe and threaded the inside for the threads on the switch (3/4"-18 NC thread). I cut the pipe to about a 1/2" length and welded it to a fender washer. This provided the custom nut that reaching in the panel to hold the switch in place. When painted it also made for an extremely clean look.
Now you can run a wire from the battery negative to the chassis for a ground. Next run a wire from the battery positive to the cutoff switch. The positive wire from the switch to the engine bay is next. I chose to run mine under the carpet. The wire passes through the firewall via the steering column seal. Connect it to the orginal positive terminal and completely wrap it in electrical tape.
NOTE FOR SECURITY SYSTEMS AND BATTERY CONSTANT DEVICES: The cutoff switch in this manner will allow anyone to cut off cempletely to your car making the security system turn off amungst other things. Several times I had idiot people walk over to my car and turn the cutoff switch off. I then had to reset my radio and my ECU had to relearn everything. In order to solve this problem I added another wire to the install. I ran a 10 gauge wire from the battery positive terminal to the engine side of the cutoff switch. I placed a 30 amp fuse on this wire so that it wouldn't be overloaded. I also placed a toggle switch in this wire so that when I was at the track I could disable this wire and remain within the rules. This wire will allow power to the car even with the cutoff switch off up to the fuse limit. Now at the track I switch the toggle off and all other times it remains on.