

So now youve got your headliner finished but those sun visors just look out of place, dont they? Well youre in luck, because heres another one off.
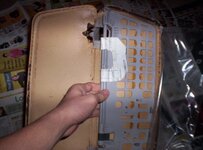
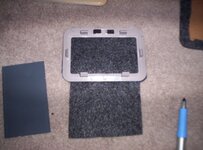
Split your visor at the seams with your razor. Open it up and it should look like this.
A close up of the plastic sheet and the frame of your visor.
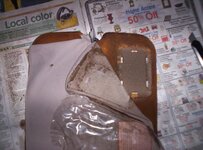
Start peeling back the old material like you did on the headliner.
Close up of the deteriorating foam.
Carefully peel the backing off of the frame. Its only cardboard, so be gentle.
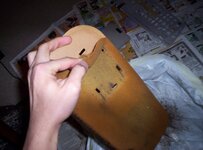
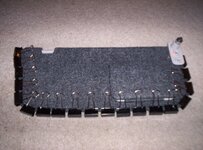
The frame.
Peel the foam off of the cardboard.
If you have the floppy visor syndrome, this is why. My driver side visor is shot. Good thing I dont use it =)
Once the cardboard is free and clean, trace it on to your material of choice.
Cut off excessive, leaving about an inch around the cardboard. Then remove the cardboard and spray the back down with adhesive, and place on material. Dont forget to turn it over and smooth out any wrinkles.
Fold over the edges and glue down.
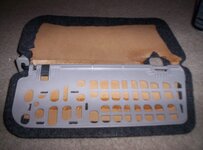
Spray down one side of the frame with adhesive as well as its relative side of the visor. Align the frame and place on the cardboard. Place some heavy items on the frame to ensure that the frame sticks.
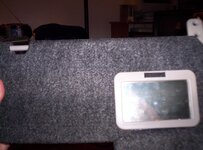
By now, you ought to be pretty good with covering pieces with material, so have it with the sun visor mirror cover. Heres a comparison between a bare sun visor mirror cover and my one off cover. The stock cover has a nice little piece of plastic that gives a nice feel to the cover, so I left that in place and glued my material over it. (Now if youre leaving the mirrors off, then skip all this and go straight to closing up your visor.)
Now I obviously ditched the stock material, so I had to fashion my own strip of material to connect the cover to the visor. All it consists of is a strip of material that covers the cardboard back of the cover and is glued to the back of the mirror. This step is going to vary because it all depends on the type of material and width of your strip of material, but here are pictures showing the steps I took to make it.
Cut out a rough strip of material. I made mine the width of the mirror. Make sure its long enough to reach behind the mirror and still have some slack.
Glue down the strip to the cover.
Now glue it to the back of the mirror.
All done. Ill put a small Velcro strip on the material to match the mirror, but for now it works just fine.
Cut slits in the visor cover where the mirror should go, and snap it into place.
Spray adhesive over the remaining open surfaces of the inside of the visor and close it. Use your binder clips to hold the edges shut. Leave them like this for 24 hours to ensure they glue has set.
Now install and enjoy!
Split your visor at the seams with your razor. Open it up and it should look like this.
You must be logged in to view this image or video.
A close up of the plastic sheet and the frame of your visor.
You must be logged in to view this image or video.
Start peeling back the old material like you did on the headliner.
You must be logged in to view this image or video.
Close up of the deteriorating foam.
You must be logged in to view this image or video.
Carefully peel the backing off of the frame. Its only cardboard, so be gentle.
You must be logged in to view this image or video.
The frame.
You must be logged in to view this image or video.
Peel the foam off of the cardboard.
You must be logged in to view this image or video.
If you have the floppy visor syndrome, this is why. My driver side visor is shot. Good thing I dont use it =)
You must be logged in to view this image or video.
Once the cardboard is free and clean, trace it on to your material of choice.
You must be logged in to view this image or video.
Cut off excessive, leaving about an inch around the cardboard. Then remove the cardboard and spray the back down with adhesive, and place on material. Dont forget to turn it over and smooth out any wrinkles.
You must be logged in to view this image or video.
Fold over the edges and glue down.
You must be logged in to view this image or video.
Spray down one side of the frame with adhesive as well as its relative side of the visor. Align the frame and place on the cardboard. Place some heavy items on the frame to ensure that the frame sticks.
You must be logged in to view this image or video.
By now, you ought to be pretty good with covering pieces with material, so have it with the sun visor mirror cover. Heres a comparison between a bare sun visor mirror cover and my one off cover. The stock cover has a nice little piece of plastic that gives a nice feel to the cover, so I left that in place and glued my material over it. (Now if youre leaving the mirrors off, then skip all this and go straight to closing up your visor.)
You must be logged in to view this image or video.
Now I obviously ditched the stock material, so I had to fashion my own strip of material to connect the cover to the visor. All it consists of is a strip of material that covers the cardboard back of the cover and is glued to the back of the mirror. This step is going to vary because it all depends on the type of material and width of your strip of material, but here are pictures showing the steps I took to make it.
Cut out a rough strip of material. I made mine the width of the mirror. Make sure its long enough to reach behind the mirror and still have some slack.
You must be logged in to view this image or video.
Glue down the strip to the cover.
You must be logged in to view this image or video.
Now glue it to the back of the mirror.
You must be logged in to view this image or video.
All done. Ill put a small Velcro strip on the material to match the mirror, but for now it works just fine.
You must be logged in to view this image or video.
Cut slits in the visor cover where the mirror should go, and snap it into place.
You must be logged in to view this image or video.
Spray adhesive over the remaining open surfaces of the inside of the visor and close it. Use your binder clips to hold the edges shut. Leave them like this for 24 hours to ensure they glue has set.
You must be logged in to view this image or video.
Now install and enjoy!
You must be logged in to view this image or video.
Attachments
-
 102_2871.jpg36 KB · Views: 4,114
 -
 102_2873.jpg46.6 KB · Views: 4,078
 -
 102_2875.jpg30.7 KB · Views: 4,052
 -
 102_2878.jpg34.8 KB · Views: 4,049
 -
 102_2883.jpg32.7 KB · Views: 4,010
 -
 102_2886.jpg33 KB · Views: 3,987
 -
 102_2890.jpg36.6 KB · Views: 3,985
 -
 102_2893.jpg38.9 KB · Views: 3,965
 -
 102_2895.jpg38.6 KB · Views: 3,958
 -
 102_2900.jpg45 KB · Views: 3,926
