marineeagle28
10+ Year Contributor
- 94
- 1
- Aug 30, 2009
-
Jacksonville,
Florida
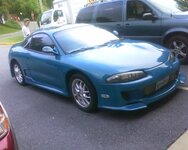
Well I picked my 95 GSX up in August of 2009. She had a few issues like boost leaks, the LOOK at ME paint job, ricer body kit and side mirrors I could not see out of.

Within a week of purchase, I took her up to Mach V since i lived only 20 minutes away. Quick once over discovered that my radiator was leaking from the top plastic end tank, It had some hairline cracks that were spiderwebbing out. SO, I scheduled some shop time for basic maintenance, install of new mishimoto radiator, and compression and leakdown testing. Day before i had shop time scheduled, Naomi stalls out on me, in DC rush hour traffic, on a 4 lane bridge. Timing marks were still correct, she still had fuel, but no spark. Not something I could diagnose at the time, so I towed her to Mach V.
Turns out Naomi had shredded the balance shaft belt, which ate the crank position sensor, so there was my no spark issue.
Well after the shop changed all her fluids, installed her new radiator, new kevlar timing and balance shaft belts, new shifter bushings, new boost gauge she was back on the road.
Then a few weeks later, coming home from skyline drive, The DSM dropped a valve, and grenaded the lower end.... FANTASTIC!
So it took six months, but i rebuilt the motor while block was still in the chassis. PAIN IN THE REAR, will NEVER do it that way again. But she was running fantastically. All the way until she turned over 320 miles, and a rod SHEARED doing 55 in 5th gear, had been cruising for 2 minutes. The rods were shotpeened and magnafluxed when I had new pistons pressed onto them.
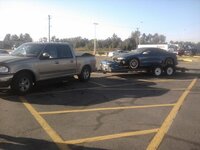
So, She sat in Vienna, Va for about 18 months.. Until I moved back home to Jacksonville, Fl and towed her behind me.
DECONSTRUCTION!!! Ahhh I have been waiting 18 long months for this. However, The interior developed some kind of FUNKY smell.
So, I start taking apart the interior, starting in the trunk. In the spare well I find a pool of water, almost enough to cover my windshield reservoir. Cleaned that out, and removed the reservoir, as NONE of my squirters work. Diagnosed it to be that the motors/pumps are done, all of the wiring is okay, checked with multimeter.
By tyberius1895 at 2011-10-26
By tyberius1895 at 2011-10-26
By tyberius1895 at 2011-10-26
Detailed the interior, and the smell STILL remained... So I start taking out the back seat, Seats, and trim panels. I find a few nests from I presume mice. I clean those out. I take out the disgusting looking carpet. Turns out a previous owner cut the connectors when removing the factory amp... @$$hat
I wash the floor down real good. 2 days later.. Smell remains. So I am thinking F*&^ it, there is a rats nest of wiring under the dash, and I cant find the smell, so why don't I make it easier on myself, and take the dash out, give her a THOROUGH scrub down, and fix the cluster%^&* of wiring job that I had inherited. And this is where we are now.
Here are some Pics.
Now what i would LIKE to do, is deaden the hell out of the car. I know I am adding weight, something not normally done by our community, but it is MY car, and I like quiet interiors (road noise wise) that are capable of DAMN good audio. I plan on 45 square feet of assorted peel and stick mats, a gallon of second skin spectrum sludge, 60 square feet of closed cell foam, and 36 square feet of mass loaded vinyl... Overkill? damn right, but i dream of the ride being quieter than a new mercedes minus the sound of my motor and turbo spool.
Also I am going to work on cleaning up all wiring, and perhaps making a harness for future gauge installs.
stay tuned for more updates.

Within a week of purchase, I took her up to Mach V since i lived only 20 minutes away. Quick once over discovered that my radiator was leaking from the top plastic end tank, It had some hairline cracks that were spiderwebbing out. SO, I scheduled some shop time for basic maintenance, install of new mishimoto radiator, and compression and leakdown testing. Day before i had shop time scheduled, Naomi stalls out on me, in DC rush hour traffic, on a 4 lane bridge. Timing marks were still correct, she still had fuel, but no spark. Not something I could diagnose at the time, so I towed her to Mach V.
Turns out Naomi had shredded the balance shaft belt, which ate the crank position sensor, so there was my no spark issue.
Well after the shop changed all her fluids, installed her new radiator, new kevlar timing and balance shaft belts, new shifter bushings, new boost gauge she was back on the road.
Then a few weeks later, coming home from skyline drive, The DSM dropped a valve, and grenaded the lower end.... FANTASTIC!
So it took six months, but i rebuilt the motor while block was still in the chassis. PAIN IN THE REAR, will NEVER do it that way again. But she was running fantastically. All the way until she turned over 320 miles, and a rod SHEARED doing 55 in 5th gear, had been cruising for 2 minutes. The rods were shotpeened and magnafluxed when I had new pistons pressed onto them.
So, She sat in Vienna, Va for about 18 months.. Until I moved back home to Jacksonville, Fl and towed her behind me.

DECONSTRUCTION!!! Ahhh I have been waiting 18 long months for this. However, The interior developed some kind of FUNKY smell.
So, I start taking apart the interior, starting in the trunk. In the spare well I find a pool of water, almost enough to cover my windshield reservoir. Cleaned that out, and removed the reservoir, as NONE of my squirters work. Diagnosed it to be that the motors/pumps are done, all of the wiring is okay, checked with multimeter.

By tyberius1895 at 2011-10-26

By tyberius1895 at 2011-10-26

By tyberius1895 at 2011-10-26
Detailed the interior, and the smell STILL remained... So I start taking out the back seat, Seats, and trim panels. I find a few nests from I presume mice. I clean those out. I take out the disgusting looking carpet. Turns out a previous owner cut the connectors when removing the factory amp... @$$hat
I wash the floor down real good. 2 days later.. Smell remains. So I am thinking F*&^ it, there is a rats nest of wiring under the dash, and I cant find the smell, so why don't I make it easier on myself, and take the dash out, give her a THOROUGH scrub down, and fix the cluster%^&* of wiring job that I had inherited. And this is where we are now.
Here are some Pics.


Now what i would LIKE to do, is deaden the hell out of the car. I know I am adding weight, something not normally done by our community, but it is MY car, and I like quiet interiors (road noise wise) that are capable of DAMN good audio. I plan on 45 square feet of assorted peel and stick mats, a gallon of second skin spectrum sludge, 60 square feet of closed cell foam, and 36 square feet of mass loaded vinyl... Overkill? damn right, but i dream of the ride being quieter than a new mercedes minus the sound of my motor and turbo spool.
Also I am going to work on cleaning up all wiring, and perhaps making a harness for future gauge installs.
stay tuned for more updates.