The Top DSM Community on the Web

For 1990-1999 Mitsubishi Eclipse, Eagle Talon, Plymouth Laser, and Galant VR-4 Owners. Log in to remove most ads.

Please Support RTM Racing
Please Support ExtremePSI

Street Build ITFLYS - 1Gina2G

This site may earn a commission from merchant
affiliate links, including eBay, Amazon, and others.

This site may earn a commission from merchant affiliate links, including eBay, Amazon, and others.

Is there anything that stops someone from adjusting the regulator at will?
Nope. I can say tho- I moved the regulator from one rail to the next, and it didn’t need to be adjusted. Base fuel pressure was right where I left it.

I created a cap for it to keep the dial covered from a plastic chair leg foot. Found those at Outdoor Supply Hardware (OSH)
 
I was able to get a spare 1G head rebuilt. I'm looking at a head swap soon. Is there a technique for setting cam timing with after market cam gears that can be done without the head mounted?
 
This is the solution I came up with to address the oil leak in cyl1
IMG_6785.jpeg IMG_6788.jpeg
IMG_6789.jpeg IMG_6787.jpeg

IMG_6786.jpeg

Evo beehive springs in a 1G head - built with spacers:
IMG_6777.jpeg
 
Last edited:
any idea what size the orifice is on it? Wondering if it's able to regulate a larger pump, 525/535?
In the install pdf they have a paragraph about the return orifice. It says "The DMR-RA is equipped with a removable flow orifice. Radium Engineering has optimized the size, shape, and material of this orifice for all single and multi-pump applications. The orifice will NOT need to be changed for different fuel pump setups."
I would think they'd still show a spec for maximum flowrate but I don't see one.
I actually read that afterwards. I ended up ordering both the rail and regulator a few days ago. We'll see how it goes.
 
Taking things apart - finding cyl1 is still the source of the oil, and one valve has definitely gotten worse.
IMG_6835.jpeg


hard to get enough light in there to see, soot and oil have the power of a black hole to suck up light
IMG_6840.jpeg


I used arp bolts to hang the turbine housing on the E3 manifold, and they came out no issue, felt loose actually. I think I’ll check those after a heat cycle next time.
Turbine blades look healthy
IMG_6836.jpeg


Working on clearing all the stuff in the way of lifting the head
IMG_6842.jpeg
 
You need a black and red painted Cyclone IM to go with your setup. :p


But, sucks you gotta do this. However that valve cover looks incredible.
Cyclone or E3, IM would be interesting - As long as the runners match up to a 1G head I'd consider it. I was thinking that a clean aluminum 1G IM would give a stock-ish vibe and go well, as everything else is black on black on black.
 
Cyclone or E3, IM would be interesting - As long as the runners match up to a 1G head I'd consider it. I was thinking that a clean aluminum 1G IM would give a stock-ish vibe and go well, as everything else is black on black on black.
you'd have to do the Cyclone, the E3 is 2g style ports.
 
If anyone should ever have a Cyclone IM, it's you. Ideal for your setup and it would be set up properly with experimentation until optimal result. Sounds fun actually and I would love to see that happen. It also looks OEM for visuals/inspections and goes along with everything else in your engine bay. It just seems perfect.
 
Some progress💪
IMG_6847.jpeg

Fuel rail and injectors as one, and then very sequential moves to clear the engine harness
IMG_6851.jpeg

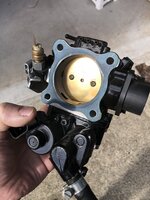
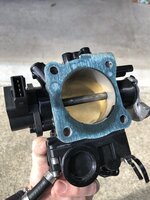
The throttle body looks great, a little oil stain on the gasket on the manifold side
73351438926__3DF1BC94-09FC-469B-8899-06E3B58ED253.jpeg 73351440322__4C0F04BA-2729-429A-98E3-078B2A06689D.jpeg
Err , yeah gotta fix these up
RenderedImage.jpeg 73351973710__CB714628-3614-49B9-9033-FEB5EF452606.jpeg
Front wheel and inside shield off to access the crank pulley. and a jack under the pan to move things up and down a bit to get the motor mount off
IMG_6854.jpeg

IMG_6855.jpeg

AC, PS and Alt belts, and pullies off, so the covers can come all the way off
IMG_6853.jpeg

IMG_6856.jpeg

By days end the grenade pin was in, and the timing belt was off. There is oil residue in the intake - interested to see what is in the intake runner on cyl1
 
Last edited:
Sitting in its happy spot, cleared the way to lift the head today
IMG_6918.jpeg


CAMs, lifters and rockers out - less weight to lift
IMG_6922.jpeg

I forgot I was running the projected tips. Looks like far right, cyl 1 is darkest, probably the oil.
IMG_6921.jpeg

1st look - Mitsubishi MLS gasket
IMG_6924.jpeg

Looks better than I was expecting
IMG_6926.jpeg

IMG_6925.jpeg

oh hey - there it is - wide band
IMG_6927.jpeg
 
More progress:
I got to work with paper towels, PB blaster, Brakleen, and some elbo grease with a plastic blade and a brass wire brush.
73438858947__1775A47B-875D-48C7-BEFD-922CC9640B50.jpeg 73439186834__F1F943F3-3C99-43EE-A10E-75363D04BF9B.jpeg
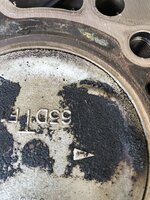
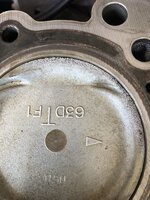
Looking closely, this is the only cylinder that got pissed off at some point. The edge of the crown on the intake side is pitted. I think this might have happened a long time ago, probably when I was running this motor with an AEM stand alone ECU in a 1G chassis for Open Track Challenge. This was a long time before this 2G restoration project.

IMG_6935.jpeg


See this mess? I wondered why the TB idler pulley puked up a bunch a grease, and when I grabbed the pulley with my hand it wiggled in a way its not supposed to wiggle. I’ll be replacing that. It pays to touch everything you can, when you can.
73439125309__EF0C99B2-CEEC-4A8E-B714-BAA582E257D7.jpeg
 
Dunno if others have had this issue, but I ordered an OEM mitsu part to replace it.
The issue of throwing grease out, yeah I remember a thread like that.
Here
Gee that was a while ago already, 2018.
He said his had less than 3,000 miles on it. How many miles are on yours?
 
The issue of throwing grease out, yeah I remember a thread like that.
Here
Gee that was a while ago already, 2018.
He said his had less than 3,000 miles on it. How many miles are on yours?
It went on the block, March 2022, and driven less than 2000 miles, no track days, only street driving and 7500rpm redlines. I think the bearings are not good enough for a 4G63
 
It went on the block, March 2022, and driven less than 2000 miles, no track days, only street driving and 7500rpm redlines. I think the bearings are not good enough for a 4G63

Damn. That sucks, but is good to know.
 
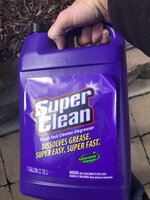
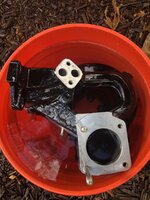
Cleanup the spare Intake manifold. This stuff is pretty good. Not too harsh, but it dried out the skin on my hands pretty quickly.
73482894037__631AA650-0E9B-4F51-A95E-783070E81537.jpeg 73482891213__EA2B9232-844A-479B-AA82-8AD0EFD08FC1.jpeg
I did a little touch up on some sketchy powder coating. I don’t want to put too much time into this one. Normally I’d give it to Rich to do the PC the right way, but I just can’t justify it on this part.
73484504827__D3A5E713-7AAD-49BF-B172-DA2BEAB7D252.jpeg

I ran a brush down all the head stud taps, and got the correct assembly grease for ARP stud torque specs.
73482717090__DC4ECCF3-1FB7-4E44-A649-B30EFF859B68.jpeg

73473249676__E0036DC3-E596-480D-9093-B8F132E71516.jpeg
 
Support Vendors who Support the DSM Community
Boosted Fabrication ECM Tuning ExtremePSI Fuel Injector Clinic Innovation Products Jacks Transmissions JNZ Tuning Kiggly Racing Morrison Fabrications MyMitsubishiStore.com RixRacing RockAuto RTM Racing STM Tuned

Latest posts

Build Thread Updates

Vendor Updates

Latest Classifieds

Back
Top