As we all know, fuel filters are a common problem among DSMs. Rust welded to the stock fuel line, it gets a bit frustrating. STM has put together a kit for us all. Their kit currently comes with 3 "S6" fittings, 1 "F456" fitting, 1 fuel rail inlet fitting, 14' -6AN stainless braided line, 2 Alan Head stainless bolts and washers for the rail fitting, one -6 FuelLab Filter, 10 zipties, 10 screws, eight 5/8" support clamps.
Since their kit is to go to the rail, I had to have it modified slightly since I bought an IE fuel feed kit with a gauge. That kit comes with Trick Flow 40 micron filter, filter adapter, 45* and 90* fittings, rail adapter, -6 stainless steel braided fuel line. I had STM send me just the line, 8 brackets, 8 screws, 2 S6 fittings, and 10 zipties. In the end I only used 5 of the brackets, none of the screws and maybe 3 zipties.
Ok let's get started. To access the fuel filter, you will need to remove battery, tray, support and everything else till you reach the transfer case. It's located as a big black canister on the firewall. Follow the line and it should reach the fuel rail.
Next, open your fuse box, and pull the 20A fuse for the motor. This will cause your motor to crank but not start. Crank it for 10 seconds to completely depressurize the fuel system.
If you have every rewired your fuel pump, then this is easy. Pull the seat up, unscrew the 4 screws holding the access panel. The line closest to you is the outlet for the fuel. It traces down to a hard line and runs below the car to where your fuel filter is. We have to loosen the fittings at the pump assembly. Spray where the threads are with PB blaster. Be generous. Knock on the fitting slightly to help the blaster get in and work its magic. Take a 19mm and 14mm flare wrench and turn the 19 mm wrench away from you while holding onto the 14mm wrench. This part is crucial. If you break the assembly, you're in trouble. Do not press down on it. Use the 14mm wrench to keep the line from bending, twisting or breaking. If you see it start to bend, readjust yourself. If it's still stubborn, spray more blaster on. And for the clueless, please do not use a torch. Once you have the fitting loosened, fuel will spill out, so grab a towel to soak it up. The hard part is done. Jack the car up enough so you can easily get under it and take a look as to where the line is to familiarize yourself .
From the IE kit I have, I used that fuel filter adapter along with two copper washers and screwed it onto the assembly line. It's basically a straight female to AN flare male adapter. You can get it at Earl's fittings. Screw it on and tighten it. Take one end of your 14' braided line and put on an S6 fitting. Lay the line underneath the car to get a better idea of the setup. Follow the fuel line. You should see brackets that hold all 5 lines together and only a single bolt holding it on. The bolts are 12 mm. I opted to modify the brackets that came with the kit to accept the size of the bolt. Take a dremel with a grinder at the end, 5 brackets, and a single 12mm bolt. Grind away at the inside till the 12mm bolt will fit in. Put three of the brackets on the braided line along where the brackets should be holding the stock fuel line up.
This next step is optional. I decided to rip out my old fuel line for space and a cleaner look. If you cannot get the fuel filter off the line, you'll need to resort to break it off. This is not salvagable. At the fuel rail, unbolt the fitting. It's two 10mm bolts holding it on. Prepare for fuel spillage. Take a vise grip and clamp it on the bottom of the filter and go to town. Bend, twist, and do whatever is necessary to snap it off. You cannot use any power tools as it risks sparks and a very nice explosion. Hacksaw may work if you go slow. Better to just snap it off. After that's done, get underneath and break the line where it goes into the engine bay. From here on out, there is no strategy to gettin the rest out. Tug, pull, bend, twist till you get the rest out.
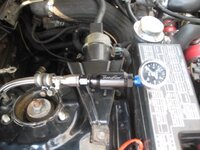
Screw the end to the fuel pump and bolt the line up to the chassis. Slip the other end of the SS line through the slot between the control arm where the lines go into the engine bay. Once it's through, grab it from the engine bay and pull it through till there's very little slack. You want some for the vibrations and flex. Put the IE kit together. Fuel filter > gauge adapter fitting with gauge (remember to wrap it in Teflon as it's an NPT fitting)> 45* fitting. Position it where you want it in the engine bay and eyeball where to cut the line. After you marked the cut off by wrapping it with duct tape, unloosen the brackets underneath as well as fitting on the fuel pump. This is so you can get slack up to cut it and put the fitting on.
Set the dremel to medium speed with a cutting wheel. Work slow and it should not fray. Clean out the dust particles from the cut. Just use like a Q-tip and brush the inside. Put the S6 fitting on. Depending on where you're positioning the line, you might be able to salvage the bracket off the stock fuel filter and use it to hold the SS line in place. I also have cruise control so it will be a tight fit as the battery will be touching the gauge. If yu do not have cruise control, lucky you, but I think the bracket is still salvagable.
Reconnect the line to the fuel pump, rebolt the the line to the chassis. Pull till there's little slack again. It should be right where you want it. Take the rail adapter, screw the 90* fitting on and bolt it to the rail using the provided bolts. Position it so it's easy access to the 45* line.
Take the rest of the SS line and measure off the cut. Once it's cut, clean both ends, and put the fittings on. tighten them in place. Work backwards from here on out. Tighten the fitting at the rail, to the fuel filter, to the fuel pump assembly. Once you confirm everything is tight, put the 20A fuse back in. Unplug the coil pack and crank her up for 5 seconds. Verify fuel pressure and look over your work. Use your nose as it's the best for detecting leaking gas. Tighten anything loose and repeat the process, making sure there is no leaks. Once you are 100% sure there is none, plug the coil pack back in and start her up. Verify fuel pressure, adjust as necessary to 43.5psi and clean up. Screw the access panel to the fuel pump back on, bolt the battery supports back in, etc etc. Go for a test drive and feel the low end torque.

Since their kit is to go to the rail, I had to have it modified slightly since I bought an IE fuel feed kit with a gauge. That kit comes with Trick Flow 40 micron filter, filter adapter, 45* and 90* fittings, rail adapter, -6 stainless steel braided fuel line. I had STM send me just the line, 8 brackets, 8 screws, 2 S6 fittings, and 10 zipties. In the end I only used 5 of the brackets, none of the screws and maybe 3 zipties.
Ok let's get started. To access the fuel filter, you will need to remove battery, tray, support and everything else till you reach the transfer case. It's located as a big black canister on the firewall. Follow the line and it should reach the fuel rail.
Next, open your fuse box, and pull the 20A fuse for the motor. This will cause your motor to crank but not start. Crank it for 10 seconds to completely depressurize the fuel system.
If you have every rewired your fuel pump, then this is easy. Pull the seat up, unscrew the 4 screws holding the access panel. The line closest to you is the outlet for the fuel. It traces down to a hard line and runs below the car to where your fuel filter is. We have to loosen the fittings at the pump assembly. Spray where the threads are with PB blaster. Be generous. Knock on the fitting slightly to help the blaster get in and work its magic. Take a 19mm and 14mm flare wrench and turn the 19 mm wrench away from you while holding onto the 14mm wrench. This part is crucial. If you break the assembly, you're in trouble. Do not press down on it. Use the 14mm wrench to keep the line from bending, twisting or breaking. If you see it start to bend, readjust yourself. If it's still stubborn, spray more blaster on. And for the clueless, please do not use a torch. Once you have the fitting loosened, fuel will spill out, so grab a towel to soak it up. The hard part is done. Jack the car up enough so you can easily get under it and take a look as to where the line is to familiarize yourself .
From the IE kit I have, I used that fuel filter adapter along with two copper washers and screwed it onto the assembly line. It's basically a straight female to AN flare male adapter. You can get it at Earl's fittings. Screw it on and tighten it. Take one end of your 14' braided line and put on an S6 fitting. Lay the line underneath the car to get a better idea of the setup. Follow the fuel line. You should see brackets that hold all 5 lines together and only a single bolt holding it on. The bolts are 12 mm. I opted to modify the brackets that came with the kit to accept the size of the bolt. Take a dremel with a grinder at the end, 5 brackets, and a single 12mm bolt. Grind away at the inside till the 12mm bolt will fit in. Put three of the brackets on the braided line along where the brackets should be holding the stock fuel line up.
This next step is optional. I decided to rip out my old fuel line for space and a cleaner look. If you cannot get the fuel filter off the line, you'll need to resort to break it off. This is not salvagable. At the fuel rail, unbolt the fitting. It's two 10mm bolts holding it on. Prepare for fuel spillage. Take a vise grip and clamp it on the bottom of the filter and go to town. Bend, twist, and do whatever is necessary to snap it off. You cannot use any power tools as it risks sparks and a very nice explosion. Hacksaw may work if you go slow. Better to just snap it off. After that's done, get underneath and break the line where it goes into the engine bay. From here on out, there is no strategy to gettin the rest out. Tug, pull, bend, twist till you get the rest out.
Screw the end to the fuel pump and bolt the line up to the chassis. Slip the other end of the SS line through the slot between the control arm where the lines go into the engine bay. Once it's through, grab it from the engine bay and pull it through till there's very little slack. You want some for the vibrations and flex. Put the IE kit together. Fuel filter > gauge adapter fitting with gauge (remember to wrap it in Teflon as it's an NPT fitting)> 45* fitting. Position it where you want it in the engine bay and eyeball where to cut the line. After you marked the cut off by wrapping it with duct tape, unloosen the brackets underneath as well as fitting on the fuel pump. This is so you can get slack up to cut it and put the fitting on.
Set the dremel to medium speed with a cutting wheel. Work slow and it should not fray. Clean out the dust particles from the cut. Just use like a Q-tip and brush the inside. Put the S6 fitting on. Depending on where you're positioning the line, you might be able to salvage the bracket off the stock fuel filter and use it to hold the SS line in place. I also have cruise control so it will be a tight fit as the battery will be touching the gauge. If yu do not have cruise control, lucky you, but I think the bracket is still salvagable.
Reconnect the line to the fuel pump, rebolt the the line to the chassis. Pull till there's little slack again. It should be right where you want it. Take the rail adapter, screw the 90* fitting on and bolt it to the rail using the provided bolts. Position it so it's easy access to the 45* line.
Take the rest of the SS line and measure off the cut. Once it's cut, clean both ends, and put the fittings on. tighten them in place. Work backwards from here on out. Tighten the fitting at the rail, to the fuel filter, to the fuel pump assembly. Once you confirm everything is tight, put the 20A fuse back in. Unplug the coil pack and crank her up for 5 seconds. Verify fuel pressure and look over your work. Use your nose as it's the best for detecting leaking gas. Tighten anything loose and repeat the process, making sure there is no leaks. Once you are 100% sure there is none, plug the coil pack back in and start her up. Verify fuel pressure, adjust as necessary to 43.5psi and clean up. Screw the access panel to the fuel pump back on, bolt the battery supports back in, etc etc. Go for a test drive and feel the low end torque.