I would like to start by apoligizing for the lack of pictures. I planned to take pictures the entire way then I got started and remember that I left my camera at work. So all of the pictures are of after the job has been completed, but hopefully they will still help
Ok, I removed my A/C for the following reasons;
1. I didnt use it, it doesnt get that hot in Indiana
2. It robs a little horsepower, but not much
3. It made some more room in the engine bay, and we all know how valuable engine bay room is on a dsm!
4. It dropped around 40lbs., and yes I weighed everything in a box when I was finished.
Step 1.
Have your A/C system drained by a proffesional, it only cost me $15.00 and it was safe and environmental friendly.
Even after the system has been drained you should release any pressure that builds up on your way home by removeing the little green cap on the a/c line thats on the driver side of the engine. It has a little H on it and once you remove it you will see what looks like a valve like you would see in a valve stem for a tire. It works just like one, use a screwdrive to depress the valve and make sure you stand back so you dont get sprayed in the face or breath any fumes!!
Step 2.
Drain your radiator fluid out completely as you will have to remove the radiator to remove the condesor core.
Step 3.
Jack the car up, using proper methods and support with something sturdy like jackstands.
Step 4.
Disconect all hoses and electrical connectors that go to your radiator and remove it. You may still have some coolant in there so be ready with some towels.
Step 5.
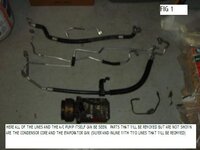
Trace down all A/C lines and unbolt them, and all coresponding parts (they all come out) Most or all of the connections either take a 10mm or 12 mm socket. (SEE FIG 1)
Step 6.
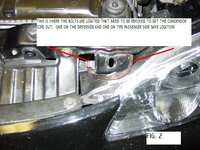
Remove the two bolts that hold the condesor core in place. They are located on top of the core support right above the inside corner of each headlight. Once you remove those bolts you should be able to pull the core out. (SEE FIG 2)
REMOVING THE PUMP!!
Step 1.
This is the most fun and difficult part of this job. You will need to remove your brake fluid resevour (drain the brake fluid first). Disconnect varoius electrical plugs and vacuum lines (you will see which ones are going to be in the way).
Step 2.
Cut or remove your A/C belt, it is a dedicated belt and is not needed once these components are removed. You will also want to remove the tensioner pulley bracket after the belt is cut.
Step 3.
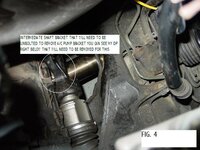
Once you have everything out of the way you can begin to unbolt the pump itself. It is held on to the engine with a big bracket. You will first need to remove the 4 bolts that hold the pump to the bracket. Once the pump was loose I also removed the bracket that held the pump to the engine block (optional but makes removing pump easier)
(SEE FIG 4)
Step 4.
If you decide to remove the bracket you will need to unbolt your downpipe so you can gain access to the two bolts that hold your intermediate driveshaft in place (one of them is also used to hold this bracket in place). Once the bracket is removed washers will need to be used to take up the space that the bracket used to on this bolt. Once you unbolt that you can remove the other 3 bolts that hold the bracket to the engine bay and pull that big heavy duty bracket out of the way.
Step 5.
Put your jack under your oil pan with a block of wood in between the jack plate and the oil pan. Jack it up to it, so it is touching the pan, but do not attempt to lift the engine yet. Now remove the driver side motor mount. There are 3 bolts that hold it to the engine and one that attaches it to the car itself. Once you have those removed you can slowly and very very carefully jack up the engine to allow you more clearance between the fender well and the intake manifold to pull that big heavy pump out. Some oil may leak out of the pump during this proceedure but that is normal. (SEE FIG 3)
Step 6.
Put everything back together that you took off in order to complete this job. Dont forget to fill the brake fluid resevour and bleed your brakes. Also fill your radiator back up with coolant.
Check and double check everything for safety. Also I am not liable for anything you dammage or if you injure yourself during this task. This article is meant as a guide and your proceedure may vary. It is based on my experience while performing this task.
On a lighter not if you have any questions feel free to pm me.
Ok, I removed my A/C for the following reasons;
1. I didnt use it, it doesnt get that hot in Indiana
2. It robs a little horsepower, but not much
3. It made some more room in the engine bay, and we all know how valuable engine bay room is on a dsm!
4. It dropped around 40lbs., and yes I weighed everything in a box when I was finished.
Step 1.
Have your A/C system drained by a proffesional, it only cost me $15.00 and it was safe and environmental friendly.
Even after the system has been drained you should release any pressure that builds up on your way home by removeing the little green cap on the a/c line thats on the driver side of the engine. It has a little H on it and once you remove it you will see what looks like a valve like you would see in a valve stem for a tire. It works just like one, use a screwdrive to depress the valve and make sure you stand back so you dont get sprayed in the face or breath any fumes!!
Step 2.
Drain your radiator fluid out completely as you will have to remove the radiator to remove the condesor core.
Step 3.
Jack the car up, using proper methods and support with something sturdy like jackstands.
Step 4.
Disconect all hoses and electrical connectors that go to your radiator and remove it. You may still have some coolant in there so be ready with some towels.
Step 5.
Trace down all A/C lines and unbolt them, and all coresponding parts (they all come out) Most or all of the connections either take a 10mm or 12 mm socket. (SEE FIG 1)
Step 6.
Remove the two bolts that hold the condesor core in place. They are located on top of the core support right above the inside corner of each headlight. Once you remove those bolts you should be able to pull the core out. (SEE FIG 2)
REMOVING THE PUMP!!
Step 1.
This is the most fun and difficult part of this job. You will need to remove your brake fluid resevour (drain the brake fluid first). Disconnect varoius electrical plugs and vacuum lines (you will see which ones are going to be in the way).
Step 2.
Cut or remove your A/C belt, it is a dedicated belt and is not needed once these components are removed. You will also want to remove the tensioner pulley bracket after the belt is cut.
Step 3.
Once you have everything out of the way you can begin to unbolt the pump itself. It is held on to the engine with a big bracket. You will first need to remove the 4 bolts that hold the pump to the bracket. Once the pump was loose I also removed the bracket that held the pump to the engine block (optional but makes removing pump easier)
(SEE FIG 4)
Step 4.
If you decide to remove the bracket you will need to unbolt your downpipe so you can gain access to the two bolts that hold your intermediate driveshaft in place (one of them is also used to hold this bracket in place). Once the bracket is removed washers will need to be used to take up the space that the bracket used to on this bolt. Once you unbolt that you can remove the other 3 bolts that hold the bracket to the engine bay and pull that big heavy duty bracket out of the way.
Step 5.
Put your jack under your oil pan with a block of wood in between the jack plate and the oil pan. Jack it up to it, so it is touching the pan, but do not attempt to lift the engine yet. Now remove the driver side motor mount. There are 3 bolts that hold it to the engine and one that attaches it to the car itself. Once you have those removed you can slowly and very very carefully jack up the engine to allow you more clearance between the fender well and the intake manifold to pull that big heavy pump out. Some oil may leak out of the pump during this proceedure but that is normal. (SEE FIG 3)
Step 6.
Put everything back together that you took off in order to complete this job. Dont forget to fill the brake fluid resevour and bleed your brakes. Also fill your radiator back up with coolant.
Check and double check everything for safety. Also I am not liable for anything you dammage or if you injure yourself during this task. This article is meant as a guide and your proceedure may vary. It is based on my experience while performing this task.
On a lighter not if you have any questions feel free to pm me.