The Top DSM Community on the Web

For 1990-1999 Mitsubishi Eclipse, Eagle Talon, Plymouth Laser, and Galant VR-4 Owners. Log in to remove most ads.

Please Support Morrison Fabrications
Please Support Morrison Fabrication

2G How to enable 2G gauge cluster fog light indicator

This site may earn a commission from merchant
affiliate links, including eBay, Amazon, and others.

This site may earn a commission from merchant affiliate links, including eBay, Amazon, and others.

How to enable 2G Gauge Cluster fog light indicator.
---------------------------------------------------
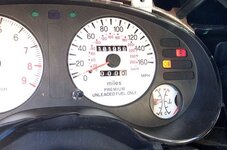
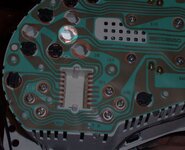
In the gauge cluster, there are several indicator lights that were never wired
during production. One that interested me inparticular was the fog light indicator.
This write-up is aimed at providing instructions on how to enable the use of this
indicator light when the factory fog lights are turned on.
 

Attachments

  • Finished.jpg
    Finished.jpg
    53.2 KB · Views: 6,352
Parts Needed
------------
(1) Gauge Cluster Bulb
(2) Molex connector pins from fog light switch harness
(1) Molex connector pin from gauge cluster harness
(1) Length of 18 AWG wire (roughly 2')

**Notes**
Easiest way to obtain the Molex connector pins is to cut them out of a trashed
DSM. Make sure to leave enough wire length on them for something to work with.
Bulbs can also be easily acquired this way.

Tools Needed
------------
+ Screw Drivers
+ X-acto Razor Blade
+ Wire Cutters/Stripers
 

Attachments

  • MolexConnectors.jpg
    MolexConnectors.jpg
    32.3 KB · Views: 6,016
  • Bulb.jpg
    Bulb.jpg
    3.8 KB · Views: 6,210
Modifying the Cluster
---------------------
1) By following the ouline in the plastic housing underneath the circuit board,
carefully cut out a hole for the bulb to be inserted into as indicated by
the yellow circle.

2) Gently remove the protective coating on the copper traces as indicated by
scouring the surface in a criss-cross pattern with the blade, then simply scrape
the protective coating off.

3) Put a gauge cluster bulb in the new hole.
 

Attachments

  • Unmodified.jpg
    Unmodified.jpg
    76.4 KB · Views: 4,790
  • Modified.jpg
    Modified.jpg
    49.1 KB · Views: 4,756
Creating the Harness
--------------------
1) Solder the Molex connector pin from the gauge cluster harness on one end of the
length of wire.

2) Solder one of the Molex connector pins from the fog light switch harness on the other
end of the length of wire.


Installing the Harness
----------------------
1) Behind the gauge cluster, there are three molex connectors with 8 pins on either side.
Plug one end of the harness into pin #20 of the molex connector in the middle.

2) Route the harness over to the fog light switch and plug the other end into pin #6.

3) Plug the second fog light connector into pin #2 and splice the other end into pin #1
(This is the power for the indicator light)

Circuit Diagram
---------------
For those of you who can read diagrams, here's a quick sketch that sums this all up.
 

Attachments

  • MolexPinOut.jpg
    MolexPinOut.jpg
    48.2 KB · Views: 4,658
  • Schematic.jpg
    Schematic.jpg
    8.9 KB · Views: 4,391
Support Vendors who Support the DSM Community
Boosted Fabrication ECM Tuning ExtremePSI Fuel Injector Clinic Innovation Products Jacks Transmissions JNZ Tuning Kiggly Racing Morrison Fabrications MyMitsubishiStore.com RixRacing RockAuto RTM Racing STM Tuned

Latest posts

Build Thread Updates

Vendor Updates

Latest Classifieds

Back
Top