The Top DSM Community on the Web

For 1990-1999 Mitsubishi Eclipse, Eagle Talon, Plymouth Laser, and Galant VR-4 Owners. Log in to remove most ads.

Please Support Rix Racing
Please Support Fuel Injector Clinic

Head Istalled-Have some questions***PIC

This site may earn a commission from merchant
affiliate links, including eBay, Amazon, and others.

This site may earn a commission from merchant affiliate links, including eBay, Amazon, and others.

GSXlaunch

15+ Year Contributor
392
0
Sep 3, 2003
TexasUS
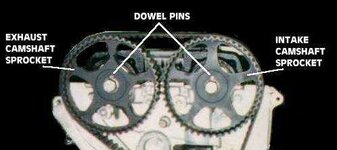
I just installed the head on my 91GSX this morning. I am pretty sure everything was at tdc and everything was lined up. How can it be that all the lobes on both cams are exactly in the same position? It just seems weird to me. I am thinking the way the valves are located in the head the intake and exhaust vavles will still open at different times. Is this right or did I do something wrong. Here is the pic...

http://f2.pg.photos.yahoo.com/ph/leche1103/vwp?.dir=/1991+GSX&.dnm=cam+lobes.jpg&.view=t

Secondly, assuming everthing is okay thus far, can I manualy turn the crank a few times before starting her up to make sure no valves will hit??? or is there an easier way to ensure I will not bend any valves? I used arp head studs and torqued them down to 85lbs....thanks for the help in advance.

TT
 
do me a favor and take a picture of the cam gears, I recently rebuilt my head. and put on the timing and such. but to make sure I didn't lose another head, I drove the car onto a trailer towed it to Mitsubishi and had them properly reset the belt to make sure the tension was still good.

My advice is you to do the same. But if the lobes are all facing the same direction then the timing of the cams are off.
 
Roast Beef is VERY incorrect - you have to use the dowel pins as references also - for some insane freaking reason Mitsu "engineers" put 2 notches on each cam gear so it's possible to have opposite notches & a 180 degree out cam .... On my spare head - when I line up the dowels upward & 2 notches opposite I get the same scenario you have in your pic... What is that hose so damn close to your cam gears? is that a 90 thing/ - M Power steering return hose was there & I relocated it on top of the fender well - That hose looks like it would be a royal PITA, even worse than the P/S hose - that's a VERY CLEAN head - Good Luck.

from:

http://www.vfaq.com/mods/timingbelt-1G.html
 

Attachments

  • fig02.jpg
    fig02.jpg
    14.5 KB · Views: 1,010
no thats a 1g thing as far as I know, I have owned 4 1g's and the PS line always goes in that direction. I own 2 right now. The PS line bolts to the top of the engine mount on the Camshaft side. But as you can see, the engine mount is not there so the hose is left to dangle and fall wherever it may. But you are right about the cam postion. Dowel pins up, notches facing each other.... That means the cam shaft is timed for Cyl. #1 at TDC.
 
I don't now how I missed that - my 3 AM posts are not too hot - BTW I relocated my P/S RETURN line up there next to the AC hose to get it out of the way during Timing belt evolutions.
 
Thanks BUCK for mentioning the Dowel Pins, would have been rather bad to see this guy destroy some valves. :thumb:
 
I disagree. Maybe I just got lucky or something when I did it but I have done it both with the dowel pins at 12 o'clock and dowel pins at 6 o'clock and it worked fine both ways....

on the other hand the pic BUCK shows is from the vfaq correct? and it shows the pins in the 12 o'clock position and I would have to go with the vfaq over anything else.
 
RB, EVERYTHING I've read says to put them at 12'o'clock.
 
"#1 is at TDC when the dowels are down IF #1 is at TDC when the Dowels are up."

huh?

Okay, I just took these pics (after I installed the t-belt)....the dowels are at 12:00 and crankshaft and oil sprocket are lined up as well.

http://f2.pg.photos.yahoo.com/ph/leche1103/vwp?.dir=/1991+GSX&.dnm=whatisthis+003.jpg&.view=t

I did notice that the lobes are a not all pointing the same way anymore. If you notice here...

http://f2.pg.photos.yahoo.com/ph/leche1103/vwp?.dir=/1991+GSX&.dnm=whatisthis+004.jpg&.view=t

...the first set of lobes behind the cam gears are kinda turning towards eachother. I really need to know if this is right as I am getting ready to put the t-cover back on and start this baby up. I mean, everything looks good to me. Any and all input is welcome and appreciated, thanks.

TT
 
I was just confirming that RB had a valid point - I didn't know that until now - Nothing about that changes the procedure.

The picture of your cams look fine - beware that after you set the tension correctly the Exhaust cam may roll to an out of time position - meaning you'll have to de-tension & remove the belt - then bias the Exhaust cam one tooth OUT of time - then let the tensioning process roll it back INTO time.

You noted your Oil gear is in time (I take it you still have balance shafts - if not it doesn't matter WHERE the Oil Pump Shaft is)

- I take it the Crank is at #1 TDC too of course...

I would reccommend setting the tension - checking the marks - rotating the crank a few times - then checking it again TOMORROW if possible - I did that & noted a definite initial stretch & consequent tension change of the belt over that first 24 Hour period - I reset it again & it hasn't changed since.
 
Thanks. If by saying the crank is at #1, means that the timing mark on the crank is lined up, then yes it is at tdc as well. I also had the problem with the exhaust cam moving once the belt was tensioned. I just bumped the exhaust cam one notch clockwise then tensioned the belt again and the result was what you see in the pic. It took me about three tries. So everything is good to go then...good. I do have another question. Can we measure the t-belt deflection...if so, what is the value or range it should be in? I have waited too long, spent too much, and worked too hard to screw this up now. I dont even have one launch on this bad boy yet. I just bought it and started tearing it apart since it was smoking pretty badly. Once again, thanks for the help.
 
I dont know guys...the belt still doesnt feel tight enough to me. I took this pick of the hyd tensioner rod as it meets the t-belt tensioner. Does it look like the rod is high enough? I can stick the pin through the hole in the tensioner body and through the rod hole (as shown in the pic) but not all the way through. It only goes in the rod hole at an angle. Hell, I dont know how tight the belt should feel. Should it have some play to it.. between the intake cam gear and the idler pulley or between the exhaust cam gear and tesnioner pulley?

http://f2.pg.photos.yahoo.com/ph/leche1103/vwp?.dir=/1991+GSX&.dnm=Tensioner.jpg&.view=t

I am sorry for all the questions but I just want to make sure that everything go as smoothly as possible once I staret it up. Thanks
 
Well, the hydrolic tension is designed that if the belt is too tight the the tensioner will go back down, loosening the belt, if its to loose, it will extend out, tighten the belt. After all, it is called an automatic tensioner.

However, the belt can be WAY to tight/lose and the Automatic tensioner has its limits. If this is the case, you have to adjust the tension on the pulley itself which is NO fun, but usually the case.
 
I did not realize it was an "automatic" tensioner so that is my fault. As for adjusting the tension on the pulley, I did that. I put the belt on with the two holes to the left of the bolt. Then pushed them up using an allen wrench and my breaker bar and tightened the bolt...basically if you look at the tensioner pulley in this pic off the vfaq page, my tensioner is in about the same position as this one is...

http://www.vfaq.com/proj-pics/Tbelt/Tbelt5.jpg

The tension on the belt is most likely ok. I think I am just paranoid. Oh well, everything seems good...I turned the engine over at the crank about 5-6 times, until everything came back to tdc. It felt smooth. With that, I am gonna put everything back together and go for it. I need to quit being a wuss. All I need now is my SS turbo oil feed line to come in and she'll be ready to go. Thanks for all the help.
 
Its a good idea to be "paranoid" about this timing belt. Its not fun to have to rebuild the head, just cause you thought it was ok. What I did was started the engine with all the accessories off. I revved it up a couple times, and watched the belt at idle. After that I turned off the engine and set the marks to #1 TDC. It looked good to me, but I stuck it on a trailer and took it to mitsu anyway. They said that it needed to be reset, so I gave them the cash to do it. wasn't expensive at all. cause thats all they did. After they set it again, I stuck it on a trailer and drove it back to they shop, where I through the accessories back on.

On another note:
After I did my engine swap. I was sure that I set the timing right, but 2 hard runs (someone may have taken it for a joy ride after that [totally different issue]) and the timing jumped 5 teeth. I found that the hydrolic tension was bad. And I had to rebuild the head again.
 
Awesome...now I'm back to shitting my pants. When you did the engine swap did you toss in a new hyd tensioner only to find it was bad? I am jusrt wondering...I did put in a new hyd tensioner from Conicelli. So what did they charge you for setting the tension on the belt? I live about a mile away from a mitsu dealership. Although I dont have a trailer I could get the car started and ease it to their shop...
 
One other question for you. When you said you left the accesories off, did that include the t-belt cover...just trying to figure out what I can do with out for the 1 mile drive to the dealership. Thanks
 
- I would NOT take it to the Dealer - you can handle this & will probably do a far better job

To check the tension the plastic shrouds need to be off - the shroud behind the tire needs to be off if the Water Pump Pulley is on, then you'll be fishing a drill bit from underneath & catching pure hell to do it but it can be done - The Water pump pulley must be off to check it from above IMO.

Recheck the Tension (I use the drill bit method) - reset if necessary.

I then back off the de-tensioning tool but leave it in place in case it needs re-setting after the initial light off of the motor as per below.

Install the Water Pump Pulley & Crank Pulley - you can leave the PITA P/S Pulley off for this evolution.

Install the Water pump belt & Alternator to tension it with.

I leave the P/S Pump off for all this. Plug supply lines at reservoir & hose to pump.

Install the Motor mount & radiator any other thing you need to fire off the engine.

Fire it off - Immediately check timing even though you don't have a cover to check it too - just look at the shroud & estimate it - you don't need to ground out the timing connector at this point - you just want to know that it's close enough for the ECU to get it close - it will be.

Do your leak checks & stuff - personally I leave the thermostat out for this initial light off - it will still get right up to operating temps unless you live in ND or something....

Then tear the motor mount &Water pump Pulley & crank Pulley back off - recheck the T/Belt tension ONE LAST TIME & install that PITA cover.

IF EVERYONE WERE AS PRUDENT AS YOU THERE WOULD BE 50% LESS POSTS ON THESE BOARDS! My sincere compliments on your due diligence...

And BTW - is you stainless line from the existing oil tap on the head? IMO that is far better than the mod that brings oil across all that turbo heat all the way from the Oil Housing - I just don't like that long stainless line picking up all that heat as it crosses the engine bay - Just my opinion. I shot some Lithium grease in the bearing to help the Turbo until the oil pressure got there when I swapped out my stock line for a new stock line...
 
Thanks Buck. I must say (I can see the frowns already) I dont have the tensioning tool you mention. I was going to order it but after some searching around here I found most people do this with out any special tools. So any how, just to make sure I got this correct: (everything is still off..t-belt cover, ps pump, water pump pulley...all I have now is the t-belt on and everything at tdc)

1. Check the width between hyd tensioner body and t-belt tensioner...(cant remember the size of the drill bit...I will find it later)

2. Once #1 checks out, I install the water pump pulley, along with the belt from wp-alt-crank.

3. Install radiator (filled with water only)

4. Install motor mount

5. Crank it on and look for timing to be in the ball park...

Assuming it does idle decent...should I rev it to make sure the belt does not slip?

As for the SS oil line from RRE...unfortunately the stock head oil feed location stripped out. The shop where I had the 5 angle v-job done mistakingly capped it off. When I pulled the cap off it brought all the threads out with it. I have heard conflicting inputs on which route is best. Thanks again.
 
I had the same prob as you with the hole where the oil line bolts up to the head getting stripped out. I took it to my mechanic and they heli coiled it and it worked fine.

Sounds like you are about ready to fire this thing up.....let us know how it goes man! :thumb:
 
Support Vendors who Support the DSM Community
Boosted Fabrication ECM Tuning ExtremePSI Fuel Injector Clinic Innovation Products Jacks Transmissions JNZ Tuning Kiggly Racing Morrison Fabrications MyMitsubishiStore.com RixRacing RockAuto RTM Racing STM Tuned

Latest posts

Build Thread Updates

Vendor Updates

Latest Classifieds

Back
Top