The Top DSM Community on the Web

For 1990-1999 Mitsubishi Eclipse, Eagle Talon, Plymouth Laser, and Galant VR-4 Owners. Log in to remove most ads.

Please Support Fuel Injector Clinic
Please Support ExtremePSI

GReddy EGT Gauge/Probe Install

This site may earn a commission from merchant
affiliate links, including eBay, Amazon, and others.

This site may earn a commission from merchant affiliate links, including eBay, Amazon, and others.

We all know an EGT gauge is necessary when you start changing boost levels and fuel trims. It's one of the cheapest forms of insurance we've got. This little gauge allows us to measure the temperature of the exhaust gases leaving the engine via the exhaust manifold.

Installation is pretty straight forward. You need to tap the exhaust manifold, screw in the probe, run the wiring inside the car, and wire up your gauge. I took some pics of the process below:


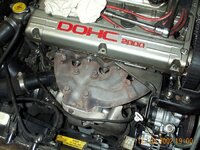
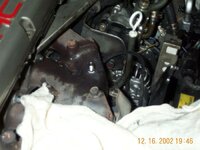
Here's a shot of the exhaust manifold before we got started. We removed the heat shield and got marked our number 1 runner.
 

Attachments

  • dcp_0217.jpg
    dcp_0217.jpg
    88.2 KB · Views: 19,909
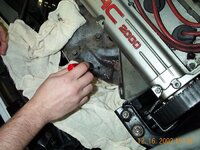
Next, we used a center punch and lightly tapped the manifold to make a small indention. This way, the drill wouldn't slide all over when we started drilling.

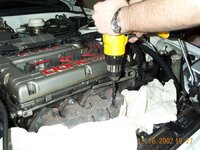
We started out with a smaller bit in order to make it easier. Then once we got the pilot hole done, we jumped up to the larger bit. As we drilled, we sprayed the drill bit with WD40 in order to lubricate it a bit. This will help the bit from dulling up prematurely.
 

Attachments

  • dcp_0218.jpg
    dcp_0218.jpg
    76.9 KB · Views: 19,433
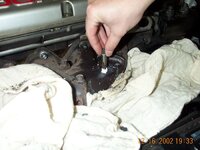
It's time to tap the threads. We picked up a 1/4" tap at the local hardware store. We dipped it in some white grease and slowly turned it into the new hole in the exhaust manifold using the tap handle. We'd turn it a couple times, then back it out and dip it in the grease again to keep it lubricated. We ended up going down about just over half way on the tap's threads.
 

Attachments

  • dcp_0224.jpg
    dcp_0224.jpg
    60.4 KB · Views: 18,858
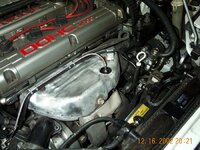
Next, we'll drill a hole in the heatshield. Once the hole was drilled, you can use a dremel and widen it up. We eyeballed the spot on the heatshield, but it wasn't easy. Make sure you triple-check it. Here's the finished product under the hood:
 

Attachments

  • dcp_0234.jpg
    dcp_0234.jpg
    86.1 KB · Views: 18,718
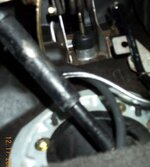
Now, on to the fun part... we ran the wire through the firewall at the steering column. It helps to use a wire hanger. You'll likely have some extra wire to coil up under the dash. Not a very good photo, but you can see the steel-braided EGT wire coming through the firewall with the clutch master cylinder rod just above it.
 

Attachments

  • dcp_0241.jpg
    dcp_0241.jpg
    35.3 KB · Views: 21,610
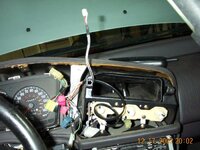
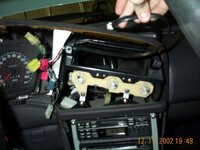
We're mounting our gauge in the center vent, so we ran the wire up behind the dash following the heater duct. We took apart the console and removed the center vents. Using a hanger (once again), we pulled the wire up through the dash - it wasn't as bad as we thought it would be.
 

Attachments

  • dcp_0244.jpg
    dcp_0244.jpg
    68.2 KB · Views: 18,271
The last step is to tap the power supply. Now, it's been a while since I did this install, so I don't remember what the wiring colors were, but I know I used the Chiltons manual and the Greddy instructions to get it right. You should be able to as well. I know, I know, I should have soldered my connections instead of the tacky connectors.... when I finally get my Defi's, I'll do it the right way.

Also, I had to do some filing work and a little bit of cutting with a utility knife to make room for the gauges. Greddy gauges are deeper than mechanical Autometers, so it took me a little longer to make them fit. However, since it was such a tight fit, I actually didn't have to use any glue to keep the center vent pod on. Just pressed the guages in, and they stay.
 

Attachments

  • dcp_0243.jpg
    dcp_0243.jpg
    53.9 KB · Views: 18,145
Well, that's it. Now have fun putting everything back together. Before you do, turn on the car and make sure you tapped into all the correct wires. Make sure the headlight switch turns on the light to the gauge, etc. Let the car warm up, and watch the needle move. :)

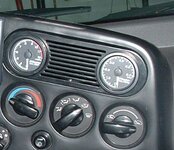
Here's our finished shot - EGT gauge on the left, fuel pressure on the right.

You can <a href=http://www.dsmtuners.com/forums/showthread.php?s=&threadid=88379>discuss this article here</a>.
 

Attachments

  • dscf0005-finished.jpg
    dscf0005-finished.jpg
    32.9 KB · Views: 21,135
Support Vendors who Support the DSM Community
Boosted Fabrication ECM Tuning ExtremePSI Fuel Injector Clinic Innovation Products Jacks Transmissions JNZ Tuning Kiggly Racing Morrison Fabrications MyMitsubishiStore.com RixRacing RockAuto RTM Racing STM Tuned

Latest posts

Build Thread Updates

Vendor Updates

Latest Classifieds

Back
Top