The Top DSM Community on the Web

For 1990-1999 Mitsubishi Eclipse, Eagle Talon, Plymouth Laser, and Galant VR-4 Owners. Log in to remove most ads.

Please Support JNZ Tuning
Please Support ExtremePSI

Greddy Coolant "Breather" Tank

This site may earn a commission from merchant
affiliate links, including eBay, Amazon, and others.

This site may earn a commission from merchant affiliate links, including eBay, Amazon, and others.

TSiAWD666

Supporting Vendor
2,648
899
Aug 15, 2003
Herndon, Virginia
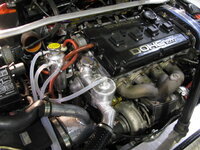
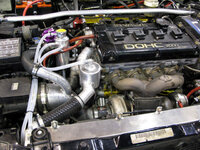
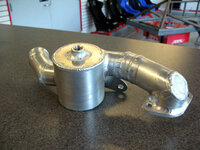
Hey folks, in building my car for time trialing I'd learned about the benefit/necessity of a coolant surge/breather/header tank and recently purchased the Greddy Breather Tank to see if it would be sufficient. It's a new tech and new product to me and this tech isn't a commonly discussed modification on our boards so I thought I'd share what you get with it. Below is a picture of the unit and the parts it comes with.

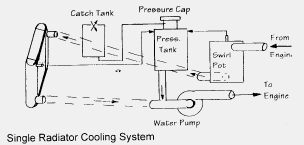
Function is mainly to facilitate removing air bubbles from your coolant, and also provide a location to accomodate coolant surge. This tank becomes your highest point in the system, swirls coolant around to promote removing air, and air bleeds into it and it has the radiator cap which will open and bleed air to your overflow tank.

I have no personal experience with these problems. I learned about this while working with Ron Davis Radiators, a well known radiator company that produces units for consumer cars to full on road racing, rally, and nascar, as they're producing a custom radiator for me. The fellow I worked with insisted it's a must have on a race car and educated me a bit on the tech (which I won't waste time with here). Also, I spoke with Drew (gixxerdrew) and he basically said "yeah, I'm working on designing one of those..." which to me means I better get one :) In my research I found these in some form or another are found stock on many cars, though it seems mostly european cars.

I chose this product because it had the ports in the right locations (inducing swirl in the coolant), came with a dummy radiator cap for a DSM, and worked with other DSM-compatible radiator caps. Also I had thought the size was big enough.

Unit I received is about 10" tall from bottom to top, though the coolant storage cylinder is only about 8". I'd guess it holds maybe... .5-.75 liters at best. I'm not sure if this is enough volume for coolant surge, but it looks like it will work well for air removal. Box comes with the tank, a dummy cap, clear coolant hose (not pictured, I left it in the box, oops), hose clamps, and universal mounting hardware and brackets, along with a few thread-in fittings for use with tapping into your cooling system. Almost everything you'd need. Most with stock cooling systems will need some way to tap into the return/outlet of the radiator which can be accomblished with an inline hose adapter in which you can thread in a tap (Greddy sells one of course). I don't have one as my new radiator has a port in the endtank.

Anyway, just thought I'd share info on the product :)
 

Attachments

  • Greddy Breather Tank.jpg
    Greddy Breather Tank.jpg
    60.2 KB · Views: 1,531
looks like it will work. Since my catch can moves away now with the dry sump I am going to put a coolant tank in its place... I just got the big one from summit with the integrated GM style cap
 
Any word yet on the real world effectiveness of a breather tank on a DSM/4G63? I know it's pretty useful on RB motors as their radiator caps are pretty low but was wondering about what difference it will make on a DSM.
 
I know Collier was running one of these in his race car. I might have to go out and get one. So the idea then, would be to position the cap of this can up higher than the radiator cap on the water neck (which might be tough), and have it route to the stock overflow, which is positioned lower? Can someone draw me a diagram? I'm about to change out my radiator hoses for -16 AN hose, so I might need an extra fitting or two.
 
I won't be doing before and after numbers in a race environment because I don't have time to drive it before and after. Car is just being built up without testing every little thing at the moment. In just over a week it's going in with new i/c and radiator ducting, different fmic, completely different bumper cover, and a new custom radiator, so I won't be able to personally provide any efficacy measurement.

You would mount this higher the the rest of the cooling system, which would mean higher than the stock gooseneck (which is the prior highest point). The pressure cap outlet could go to an overflow tank, but it could just go to the ground as well. You don't have to mount the hole thing that high you know... just the top of it. I don't see this as much of a challenge. I'm going to mount it on a bracket on my i/c piping I think.

Here's a basic diagram for you. Ignore the dedicated swirl pot. The feed line that would be from the swirl pot to the breather tank would instead be the gooseneck outlet formerly used for the stock overflow tank. A dummy cap would go on the stock gooseneck, and the pressurized cap on the breather tank. This tank looks to be designed to induce swirl (note the inlets near the top offset towards the edge of the tank), and so I'm guessing/hoping it will effectively help remove air from the coolant improving efficiency. However it's my understanding that coolant isn't generally cycled through this line in normal operation but rather only during expansion, so I'm thinking a separate swirl tank might be warranted.

I had originally planned to have a dedicated swirl pot inline with the main 1.5" ID radiator inlet line, but I wasn't able to source one in time for the fab shop taking my car in just over a week, so I'm leaving that for later.

Ludachris, folks at multiple custom radiator places insisted I maintaint the stock diameter or close to it for the radiator lines, so as not to introduce additional resistance into the system. -16AN is not close to 1.5". Even -20AN is just a bit short I believe. That's why my custom radiator has just 1.5" inlets and I'm going to be using Superflex silicone hose as opposed to braided stuff. However, Drew does use -20AN and real world results do trump theory :)

edit - separate swirl pot, almost identical to that diagram, is on its way :)
 

Attachments

  • coolant breather tank.gif
    coolant breather tank.gif
    6.1 KB · Views: 7,650
I've been running a similar system for well, since I've had this car. The surge tank with it's own radiator cap, is mounted as the highest point. I've capped off the original cap/fill orifice (post thermostat, formerly the highest point in the system) routed that to the surge tank, it then routes back into the top tank of the radiator. I see in the diagram, the surge outlet goes into the cool side of the radiator. Mine doesn't bypass the hot side like that, seems less than optimal, no?

The overflow from that, feeds into an old brake fluid bottle (catch tank) ziptied to something convenient.

Works flawlessly.

I have no current pic's of the setup, unfortunately.
 
Another option would be to use a header tank from some of the newer vehicles - VAG products - audi, vw, or Ford Windstar, etc. For example Ford Windstar header tank has a 16psi cap. Some vehicles also have a liquid level sensor just like a stock dsm and that could help detect the coolant loss before the engine overheats. I'm not up to date on nasa/scca rules any more but if the tech inspectors allow "stock" header tanks on above mentioned cars they may accept them on a dsm as well. Only time when I would worry about tanks bursting is if they are fairly old or if the radiator (tank?) cap gets replaced with a higher pressure "racing" cap.

Good luck.
 
I've been running a similar system for well, since I've had this car. The surge tank with it's own radiator cap, is mounted as the highest point. I've capped off the original cap/fill orifice (post thermostat, formerly the highest point in the system) routed that to the surge tank, it then routes back into the top tank of the radiator. I see in the diagram, the surge outlet goes into the cool side of the radiator. Mine doesn't bypass the hot side like that, seems less than optimal, no?

The overflow from that, feeds into an old brake fluid bottle (catch tank) ziptied to something convenient.

Works flawlessly.

I have no current pic's of the setup, unfortunately.

I believe the reason the "inlet" to the surge tank is on the hot side of the radiator (the high pressure side) and the "outlet" of the surge tank on the cold side (low pressure) is to create a pressure differential across the tank itself so that the fluid inside is cycled through the system. That's how they can be an inlet and outlet after all, otherwise they're just lines connected with stagnant fluid I'd think. Sure some coolant will go through the surge tank and bypass the radiator but this gets the de-aerated fluid back into the system which is what the unit's for, right? At least that's my basic understanding so far... been reading a lot about designing cooling systems lately :)
 
I won't be doing before and after numbers in a race environment because I don't have time to drive it before and after. Car is just being built up without testing every little thing at the moment. In just over a week it's going in with new i/c and radiator ducting, different fmic, completely different bumper cover, and a new custom radiator, so I won't be able to personally provide any efficacy measurement.

You would mount this higher the the rest of the cooling system, which would mean higher than the stock gooseneck (which is the prior highest point). The pressure cap outlet could go to an overflow tank, but it could just go to the ground as well. You don't have to mount the hole thing that high you know... just the top of it. I don't see this as much of a challenge. I'm going to mount it on a bracket on my i/c piping I think.

Here's a basic diagram for you. Ignore the dedicated swirl pot. The feed line that would be from the swirl pot to the breather tank would instead be the gooseneck outlet formerly used for the stock overflow tank. A dummy cap would go on the stock gooseneck, and the pressurized cap on the breather tank. This tank looks to be designed to induce swirl (note the inlets near the top offset towards the edge of the tank), and so I'm guessing/hoping it will effectively help remove air from the coolant improving efficiency. However it's my understanding that coolant isn't generally cycled through this line in normal operation but rather only during expansion, so I'm thinking a separate swirl tank might be warranted.

I had originally planned to have a dedicated swirl pot inline with the main 1.5" ID radiator inlet line, but I wasn't able to source one in time for the fab shop taking my car in just over a week, so I'm leaving that for later.

Ludachris, folks at multiple custom radiator places insisted I maintaint the stock diameter or close to it for the radiator lines, so as not to introduce additional resistance into the system. -16AN is not close to 1.5". Even -20AN is just a bit short I believe. That's why my custom radiator has just 1.5" inlets and I'm going to be using Superflex silicone hose as opposed to braided stuff. However, Drew does use -20AN and real world results do trump theory :)

edit - separate swirl pot, almost identical to that diagram, is on its way :)

So you're trying to do what the Varis Evo 6 has? I hope you can see it's swirl pot, best pic I could find. Looks like they did some welding on the radiator to make it work. Kudos to Flash to post the first real-life pic. :)
You must be logged in to view this image or video.
 
Yes, I'll be doing what I see in that pic almost exactly :) Thanks for the pic, as it's the first one I've seen on a 4g63, albeit reversed for us heh.
 
I believe the reason the "inlet" to the surge tank is on the hot side of the radiator (the high pressure side) and the "outlet" of the surge tank on the cold side (low pressure) is to create a pressure differential across the tank itself so that the fluid inside is cycled through the system. That's how they can be an inlet and outlet after all, otherwise they're just lines connected with stagnant fluid I'd think. Sure some coolant will go through the surge tank and bypass the radiator but this gets the de-aerated fluid back into the system which is what the unit's for, right? At least that's my basic understanding so far... been reading a lot about designing cooling systems lately :)

I suppose this is true, I'm sure my routing is very low velocity, it really is nothing more than a small diameter alternate to the upper radiator hose. More research needed on my part for sure.

I've got to guess that there is another outlet on the bottom of the surge tank, in the pic that Flash (thank you Flash) posted that goes to the lower radiator tank? I suppose even though the bypassed volume should be very low, it seems a little strange for the coolant to bypass the radiator in this way. I also realize that the coolant will indeed circulate fully, eventually and I may just be over-analyzing this.
 
Last edited:
Work's progressing on my car. Here's pictures of the integrated swirl pot and surge tank installed, and one of the final swirl pot by itself.

Swirl pot was fabricated by Ron Davis Radiators. Just has 1.5" inlets and outlets, and 1/4" NPT to 5/16" fitting on the top. My fabricator took that swirl pot and rather than welding to the stock gooseneck made a new one, integrating the swirl pot into it. Radiator line from it is Superflex silicon hose, 38mm ID (1.5"), that as you can see I ended up not not really needing :) I thought we'd need flexible hose to route from my radiator inlet to the swirl pot, but the fabricator added a bend to the outlet of the pot and so only a simple straight line would have sufficed. Doh, cost me a shit load of money haha. The extra mounting bracket added for support is bolted through with the same bolt used for the thermostat housing.

The Greddy surge/breather tank is mounted off a bracket that mounts with the other bolt on the thermostat housing.
 

Attachments

  • swirl pot and surge tank installed.jpg
    swirl pot and surge tank installed.jpg
    82.7 KB · Views: 2,303
  • swirl pot.jpg
    swirl pot.jpg
    58.1 KB · Views: 2,172
That. Is. Cool. Pun intended. I see you have some of the gold heat barrier on the intake and a few other things, I like that idea.

Are you using a thermostat?
 
The idea of reflective material on the intake manifold and the crossover water pipe I "borrowed" from gixxerdrew. I have DEI Reflect-a-gold, but Drew is using a superior material that is silver (i'd have to go dig up where you can buy it, let me know if you want the info. It's not terribly expensive). He also insulates his intercooler piping as well, at least partially. I'll probably be adding some to the intercooler piping as well as the swirl pot after I get my car back.

I am using a thermostat now, but that's just because I haven't investigated impact of removing it. I think that's something that requires a bit of analysis and not always ideal for a race car. When the car is put together with the "improved" (arguable) cooling system I've assembled and on the track I'll have to see how steady my cooling temps are and go from there. I read an Formula SAE report that analyzed removal compared to an unmodified thermostat as well as one with a few extra holes drilled for flow. The report concluded from their data there was improvement when using the drilled and removed thermostat, but they found minimal difference between the two as far as cooling capacity yet when running sans the thermostat entirely they tripled the time it takes to get to desired operating temperature. So best choice seemed in their case was to just run the thermostat with some holes. Might be the case here, might not, so I'll leave it alone for now.
 
Here's the info on the silver stuff, to save you the hassle of looking it up :thumb: I put some on my water pipe just as you have, as well as on the bottom of the oil pan where the downpipe passes by it to try and keep the exhaust heat away.
http://www.dsmtuners.com/forums/bol...d-dei-reflect-gold-wrapped.html#post152510271


Damn, that looks pretty cool! Would you be willing to share what that piece cost you? If you don't want to, that's fine. And if you don't want to post it publicly, feel free to PM me.
 
So, the silver it is. I was thinking that the swirl tank could use a heat barrier if some sort, being it is in radiant "view" of the turbo, manifold, etc. I also figured you'd be on that and hadn't gotten to it or mentioned it yet. Turns out you had that down. Very nice.

Is your intake also isolated i.e. phenolic or some other spacer? >edit> I just noticed the white spacer in the other thread so this question is answered. <edit<


Thanks everyone for the info on the silver stuff too.

I've had the aluminium/fiberglass cloth on my waterpipe for some time now. It's melting.
 
Last edited:
Yeah, this intake manifold is using Magnus' heat barrier gasket. I had someone else's, forget whose, on my stock intake manifold, and it looks identical in shape and dimensions to theirs, just $15 cheaper. I can't verify chemical makeup though beyond saying they are the same color(white).

Yours melted off too eh? I had something like you describe from DEI in their turbo wrap kit on an older turbo and yeah, the silver-colored material flaked off over time.

Regarding the price of the swirl pot... the original design has the inlets/outlets opposite of mine, and actually might be better if you're going to use it with a radiator that like stock has its inlet in the center of an upper end tank. Here is what that looks like:
Swirl Pot - AWR Racing Store

AWR actually just calls up Ron Davis Radiators every time someone orders one and refers to their CAD design already on file, and RDR just fabs it up. You might save a few bucks by ordering it directly from Ron Davis. Just call RDR and ask for Bill, and tell him you want one of the swirl pots they make for Anthony Woodford Racing. I know Bill knows about it because he worked with AWR on the original design, and when I contacted AWR for the one-off they sent me to Bill. Very weird coincidence for me since I'd already been talking with Bill for a week about my custom radiator design :)

My one-off just moves the inlet/outlet to opposite ends (top/bottom) of the tank. Reason was I wanted the center of the cylinder to be offset so when coming out of the gooseneck it would avoid hitting my intake's bov return pipe. My inlet of my radiator as you see is at the top of the side end-tank, since I have a side-to-side dual-pass design.

If you want one oriented like mine, you just need to mention my name, John Freund, and Bill should be able to pull it up.

My one-off cost me around $145 before shipping because they had to redo the CAD work, which while I might argue should not have cost $50 in labor for sliding the inlets/outlets around but... that's what they charged me :) In the end it made the unit kinda stupidly expensive but I wanted what I wanted... I would suspect since I ate the CAD cost in my purchase it should be the exact price or less than what you see on AWR's site, perhaps around $85?

You'll also need a fitting for the 1/4" NPT port up top. Don't use brass as you probably know. Bill@RDR may give you one for free if you ask nicely and if they have it. They didn't have the one I needed for the Greddy surge tank (90-deg 1/4" npt to 5/16") so I had to order it from... crap I forget! XPR Racing? Not sure, Ron Davis (the owner) recommended someone and I called up and placed the order immediately. Sigh, sorry :) Wasn't cheap though... like $24!
 
I just realized my fabricator's last minute decision to not use my gooseneck (with which I was going to use a dummy radiator cap) and instead fab his own sans cap made my cooling system a bi*** to fill....

Ugh :) I may talk with him about that...
 
Got the filling problem fixed. Had a neck added where the stock one is and put on the dummy cap.
 

Attachments

  • breather tank, swirl pot, and fill neck.jpg
    breather tank, swirl pot, and fill neck.jpg
    68.2 KB · Views: 3,269
Support Vendors who Support the DSM Community
Boosted Fabrication ECM Tuning ExtremePSI Fuel Injector Clinic Innovation Products Jacks Transmissions JNZ Tuning Kiggly Racing Morrison Fabrications MyMitsubishiStore.com RixRacing RockAuto RTM Racing STM Tuned

Latest posts

Build Thread Updates

Vendor Updates

Latest Classifieds

Back
Top