The Top DSM Community on the Web

For 1990-1999 Mitsubishi Eclipse, Eagle Talon, Plymouth Laser, and Galant VR-4 Owners. Log in to remove most ads.

Please Support Fuel Injector Clinic
Please Support Morrison Fabrication

First time DSM owner

This site may earn a commission from merchant
affiliate links, including eBay, Amazon, and others.

This site may earn a commission from merchant affiliate links, including eBay, Amazon, and others.

Tim_MacDougall

Probationary Member
6
1
Feb 18, 2020
Surrey, BC_Canada
Hey yall, I'm Tim
I just got my first DSM which is a 1994 EVO 2 its mainly stock besides the coil overs and other small patience stuff. Here I thought doing the transfer case which is locked would be easy to swap with a replacement, little did I learn that there is a surprising lack of information on what exactly is compatible if anything. Regardless can't wait till I fix the issue and finally take the car out for a spin.

Happy cruising everyone
-Tim
 
I would bet that @twicks69 could repair your EVO 2 transfer case. I tagged him so maybe he can chime in.
Not sure of what, if any, DSM box will transfer over though.

Welcome to the group Tim, try to make a profile for the car so we can all know what is stock and what is modded, it's a big help.
Marty
 
Tim, I am Tim Zimmer, owner of TMZ Performance, welcome to the forum!

Pull your transfer case off and let's see what we are working with. It could be a failed transfer case, or it could be a failed transmission center differential or rear differential, or more than one of the above.

Was the car driven with this locked transfer case scenario? If so, you will likely have other gremlins that need fixing.

After you have the transfer case removed from the vehicle, grab a large metal pan or tray to use as a work surface for disassembly.
Disassembly Tools:
Cordless impact (or air impact)
6" extension with 12mm deep socket. (Or a flex-head 12mm socket and extension) -- tail housing bolts x 6
3" extension with 14mm flex-head socket -- mid housing bolts x 5
14mm socket -- side cover bolts x 5
Dead blow hammer
2x smaller prybars

The tools above are to get the transfer case torn down to inspect, it is not including the special tools like bearing splitters, bearing race removal tools, end shaft nut crowfoot socket, vise, soft jaws, seal removers, seal installers, bearing race installers, etc.

1. Remove the bolts from the tail housing, mid housing and side cover.
2. Using a dead-blow hammer, hit the input sleeve side to separate the side cover from the front housing to then gently pry the side cover off. It is an o-ring seal on the side cover.
3. Remove the input sleeve and drive gear and inspect condition of input sleeve splines, drive gear and inner / outer tapered roller bearings. Typically the inner tapered roller bearing wears out first and then kills the gears.
4. Remove the tail housing with a nice solid whack from the dead blow to rattle the housing loose enough to gently pry off. It is an RTV seal between the mid housing and tail housing, and has two dowels locating it on the mid housing. There is a black plastic oil guide on the inside of the tail housing that is removable. Look at condition of slip yoke output sleeve bushing.
5. Remove the mid housing from the front housing; another good few whacks should loosen it up to use two pry bars and gently pry apart. Again, another O-ring seal between the front housing and mid housing. The mid housing spacer plate is fragile, don't beat the crap out of that shim, and if you do, straighten it back out.
6. You can degrease all the components and inspect both the drive gear and the driven gear still installed in the mid housing. If you have the tools to remove the shaft nut, then use a 3/16" straight blade chisel or flathead screwdriver and a hammer and open up the stakes on the shaft nut. Mitsubishi typically assembled these with the shaft nut finger tight instead of properly torquing them to 100 ft/lbs and staking them because they were too lazy to use the proper pinion preload shim. You can install some soft jaws in a vise and clamp the output shaft splined portion in the jaws, then using a 50mm crowfoot socket or 2" crowfoot socket, you can remove the end shaft nut. Then, you can press the driven pinion gear out of the mid housing using a 12-ton or larger hydraulic press. Then remove the outer tapered roller bearing and pinion spacer shim and pinion spacer sleeve, then use an OTC 1123 or larger bearing splitter and the press, remove the inner pinion tapered roller bearing. Clean and inspect all components.
7. Remove the input seal from the front housing -- remove from the INSIDE of the housing hitting OUT or inspect first to see what housing you have. Early 1990-1991 cast aluminum as well as early cast iron front housing models had a cast lip retaining the input seal into the front housing so if you hit it inward, you would break of that lip. All other years there was no lip and the input seal can go either direction for removal, so you can use a seal remover or hammer and socket or similar tool to remove. The tail housing output seal is a bit more finicky to simply pry out without damaging something or having enough leverage to get on it properly. I use a slide hammer with a Miller 9664 race / seal removal tool. This same tool can be used to remove the tapered roller bearing races from all 4 locations. You can also use a Miller 9585 removal tool for the inner tapered roller bearing race in the front housing (or the other tool from the outside of the housing knocking it inwards after you have removed the input seal).

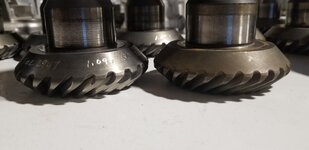
As for further information, the Evo 1 and Evo 2 transmissions use a 1.090 ratio transfer case, whereas the Evo 3 uses a 1.074 ratio transfer case. This is because the front differential ring gear tooth count was changed from 64 teeth on the Evo 1 and 2 to 63 teeth on the Evo 3 (while still using the matching JDM 15-tooth final drive output pinion gear inside the transmission). All Evo 1/2/3 rear differentials are the same ratio but they ARE different from the DSM rear diff ratios. So, getting off the rambling, and back to the topic, it is actually easier to find a 1.090 ratio 24/22 tooth 23-spline transfer case to fit your application because it is also the same exactly as a 1991-1996 DSM 5 speed transfer case. 23-spline input sleeve (1990.7-1999 -- earlier versions were 22-spline input sleeve with a 1.090 ratio gearset), cast iron front housing (1990.7-1999 -- earlier version was the cast aluminum front housing and side cover), either version mid housing (with 4 fins and no bolt holes on the side of it -- earlier 1990-1991.5 ones; or with 2 bolt holes on the side of it (1991.6-1999 style). The tail housings were all same visually.

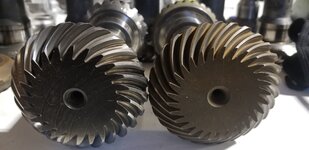
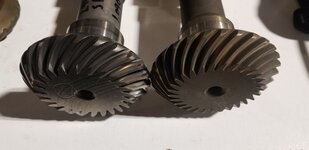
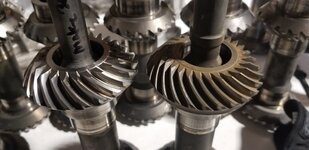
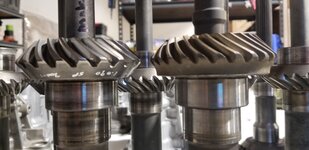
So, for visual identification, you can see that there are several variations, but there are not any really easy identifiers to tell you the difference from a 1.090 ratio tcase vs. a 1.074 ratio tcase without spinning them and counting the revolutions, or simply the fastest method is to remove the side cover bolts, pop off the side cover and look at the gear tooth profiles. It is extremely easy to identify from the tooth profiles. The 1.090 ratio is a coarser tooth, the 1.074 ratio is a much finer tooth. I will attach a couple pictures to help with identification.

On a side note, the automatic transfer cases do have a different front housing and mid housing, but the same tail housing as the 5 speed. The gearset is also the same as the 5 speed with DSM versions of 1990-1996 1.090 ratio vs. the 1997-1999 DSM 1.074 ratio, so if you can only find auto tcases and no 5 speed tcases, or maybe a 1990 tcase with the cast aluminum front housing, you can at least get the gearset out of it, and change over the input sleeve (the auto input sleeve is shorter than the 5 speed input sleeve, as well as the 22 spline vs. the 23 spline input sleeve difference from early 1989-1990.7 cars vs. the 1991-1999 style 23-spline input sleeve).
 
Last edited:
1.090 ratio 1989-1996 DSM / Evo 1-2 gearset on left
1.074 ratio 1997-1999 DSM / Evo 3 gearset on right
 

Attachments

  • 20200219_140556.jpg
    20200219_140556.jpg
    732 KB · Views: 79
  • 20200219_140602.jpg
    20200219_140602.jpg
    548.4 KB · Views: 87
  • 20200219_140532.jpg
    20200219_140532.jpg
    695.9 KB · Views: 74
  • 20200219_140541.jpg
    20200219_140541.jpg
    703 KB · Views: 92
  • 20200219_140546.jpg
    20200219_140546.jpg
    581.8 KB · Views: 84
See @Tim_MacDougall , you chose the right forum to join!
We welcome you and hope we can get a peak at your car!
Marty
 
Thanks all, It been a crazy week and I meant to send this sooner but I haven't had the time. I just wanted to say thanks to @twicks69 for all the information I was able to source another transfer case as mine was toast it seemed, the previous owner had not disclosed the fact that it ran with very little fluid for a while. Not being able to buy straight OEM parts is new as I need the synchros replaced for second gear and the transmission stripped and rebuilt but that's part of the life. I just wanted to say thanks for your advice, it was of much help.
As well as thanks to the rest of you for the welcomes :)
Regards
-Tim
 
Love the ONE PICTURE of the car ROFL
Show us more of this true JDM car :thumb:
 
Support Vendors who Support the DSM Community
Boosted Fabrication ECM Tuning ExtremePSI Fuel Injector Clinic Innovation Products Jacks Transmissions JNZ Tuning Kiggly Racing Morrison Fabrications MyMitsubishiStore.com RixRacing RockAuto RTM Racing STM Tuned

Latest posts

Build Thread Updates

Vendor Updates

Latest Classifieds

Back
Top