The Top DSM Community on the Web

For 1990-1999 Mitsubishi Eclipse, Eagle Talon, Plymouth Laser, and Galant VR-4 Owners. Log in to remove most ads.

Please Support Kiggly Racing
Please Support ExtremePSI

1G ets race fmic install

This site may earn a commission from merchant
affiliate links, including eBay, Amazon, and others.

This site may earn a commission from merchant affiliate links, including eBay, Amazon, and others.

BoostedTT91

15+ Year Contributor
285
7
Aug 2, 2004
Elysburg, Pennsylvania
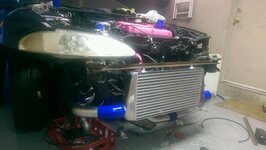
Can someone share some pics of how you mounted your ets race intercooler to your 1g. I figured this would be a bolt on intercooler out of the box which it obviously isn't. Trying to figure out the best way to go about mounting it would be so I wanted to see how some of you mounted it. Any pics would be great
 
I have a 2g so idk if this will help or not but i used a 1" angle and welded it to crash-bar mounts andbilted it straight to intercooler..( measure twice cut one ) hope this helps
 

Attachments

  • PART_1403486673918_IMAG0107.jpg
    PART_1403486673918_IMAG0107.jpg
    215.1 KB · Views: 944
That looks like you could use the PR bracket but either way, its hidden so Form>Function and whatever works, works.
 
I used aluminum bar (like straps) to hang it (race version) from the radiator support. IIRC, I removed the hood latch support, and flipped the 2 side bolts around (put longer ones and bolted the "straps" to the back of the support. then treated the new bolts like studs to replace the hood latch brace thing. (big black triangle looking thing.)

No pics till later.

If you have the street version... You need to make brackets to mount it to the bumper or the attachment point for the front bumper. A member did it on here, I think it was AgentOrange.
 
Last edited:
I'm not talking about trimming the bumper. I'm talking about mounting the core to the car. They include flat bars which I'm guessing need bent and welded on the intercooler. I wanted to see some pictures of how people mounted the race core to the car.

Also would paint thinner work to get their logo off without harming anything? I ordered it with no logo and of course they sent it with their logo on it
 
The flat bars are usually attached to the top of the intercooler at the provided tabs with holes that are prewelded on the intercooler. The other end of the flat bars are then attached to the support bar on either side where the hood latch mounts. There are some pics here where you can see what I'm talking about. http://www.extremeturbosystems.com/instructions/1g.pdf

As far as getting the logo off with paint thinner, that may work, but I would think it would be hard to get it all off of the fins. I would rather leave it alone than have it half on there looking faded out.
 
I used the 2 straps provided and through bolted both ends. One end to the tabs on top of the core and the other to the core support where there were already holes.[DOUBLEPOST=1407439793][/DOUBLEPOST]
I used the 2 straps provided and through bolted both ends. One end to the tabs on top of the core and the other to the core support where there were already holes.
You must be logged in to view this image or video.
 

Attachments

  • ETS FMIC.jpg
    ETS FMIC.jpg
    48.9 KB · Views: 425
Last edited:
I don't feel like disassembling my car to show you. I literally did the same thing, just bought longer M6 screws, and unbolted the AC radiator form the top so I could tilt it back and put the bolts that this guy above me used in backwards to act like studs. My "straps" are completely hidden this way. The pipes keep it in alignment at the bottom, but I made some brackets to keep it pushed out to keep it perfect.

It would really help to know which fmic you bought though. Mounting the FMIC is the easy part. Getting all those damned pipes leak free at 40psi is the hard part. And especially if its a PR kit, the pipes are a hair less than perfect, and everything is a tight squeeze. Cutting the D shaped holes can also be annoying as hell without the right tools.
 
I used the 2 straps provided and through bolted both ends. One end to the tabs on top of the core and the other to the core support where there were already holes.[DOUBLEPOST=1407439793][/DOUBLEPOST]
You must be logged in to view this image or video.


Very clean install, and love your custom tubular front bumper support!:hellyeah:
 
Thanks that's what I was looking for

You can see I just bent the ends slightly to bolt up flush.
You must be logged in to view this image or video.


Very clean install, and love your custom tubular front bumper support!:hellyeah:

Thanks man. This was actually just a temporary bar, I just used a cheap Harbor Freight bender so its slightly kinked, but it works for now. I finally finished this several year project/build and enjoying it more than expected so I will be making it nicer this winter!
 

Attachments

  • ETS FMIC 2.jpg
    ETS FMIC 2.jpg
    91.4 KB · Views: 334
Old post i know. But just wondering about securing the bottom of the intercooler. I have just purchased the ETS race intercooler with 3" core. I noticed nothing to support it at the bottom.

thanks
 
How is it flimsy?
I found that some people construct a little shelf under the intercooler, welded to the lower support.

I almost wish I did more research before buying this.. now that I found out Bushure will make them if you contact him supposedly
 
How is it flimsy?
I found that some people construct a little shelf under the intercooler, welded to the lower support.

I almost wish I did more research before buying this.. now that I found out Bushure will make them if you contact him supposedly
It's flimsy because the bottom is just swinging in the wind. There is no real support front to back on the intercooler other than the intercooler piping. My VRSF FMIC was way sturdier, which I'm surprised because I have always thought of ETS as a top of the line option.
 
It depends on which 1G you have..if it is a 1GB then the two straps line up directly to the factory holes in the rad support. If it is a 1GA then they have to come in on an angle to meet the factory holes in the upper support.

ultimately for the price you pay for the ETS race intercooler they could've made more effort in constructing supports for mounting it in the two different 1Gs. I only say this because they offer the intercooler for 1Gs. However i will just make it work either way.
 
I just went through the same thing. Here is the official write up for an ETS Race FMIC, WELDING AND BRACKETS FAB IS NECESSARY.

Step 1. Remove the Front bumper, lights, etc.

Step 2. Remove the OEM support bar that connects the hood latch assembly and the bottom core support.

Step 3. Fabricate a new support other wise the top of the core support will be real flimsy.
You must be logged in to view this image or video.


Step 4: Make sure you buy the JMF Fab bumper support it is worth every penny and you will need it.
You must be logged in to view this image or video.


Step 5. Install the JMF brace first before the FMIC. Once installed grab the bumper and dry fit it. Keep moving the brace around until the fitment for the (1ga -clear lights) or (1gb - head lights) and bumper have a good equal gap between the left and right side. I had to enlarge the provided holds in the brace quite a bit to bring down for the 1ga setup.
You must be logged in to view this image or video.


You must be logged in to view this image or video.


Step 6: Now that the bumper is on we can install the FMIC. Basically you want to support the core where you will want it. Because we know the bumper brace is parallel with the bumper if we make the core parallel with the bumper brace it will also be parallel and straight.
You must be logged in to view this image or video.

Step 7- You will take the provided metal strap ETS provides you with and bend them 90* (always heat up aluminum with a torch first to keep it elastic, otherwise it will want to crack) and then cut them to length and drill a hole for where it will mount to the old crash beam stud. Just get the brackets perpendicular and mark them so you will know the position when you go to weld. I mark the existing holes and tabs so if you ever take the bumper back off you will know its location.
You must be logged in to view this image or video.

Step 8- That will take care of the left and right mounts, I like to have a 3rd so I use the empty hole in front of the hood latch assembly. Again make a small 90* bracket and pre mark it for welding, I waited to drill the hole till after welding that way it would be center best as possible.
You must be logged in to view this image or video.


Step 9 - If you want you can extend the inlet and outlet tubes which I always prefer. You don't have to do this but I like to be able to get to FMIC couplers and clamps from within the engine compartment. I had an old FMIC that had the longer pipes so I was able to calculate the angles/lengths and cut them to fit by hand and weld them on. I was upgrading from a VSFR to this so all my IC piping was fine, I was able to match this and didn't have to touch either lower or up IC pipes. This step is more case by case.
You must be logged in to view this image or video.

Step 10- Go get all your stuff welded and positioned and installed.

Step - 11 Again this is extra but I love the OEM fog lights, you will just need to grind the OE holes until you get the lights to fit in there with core.
You must be logged in to view this image or video.


Once fitted this a great time to brighten them up, wet sand with 1500 and then use polishing compound to make them shine again.
You must be logged in to view this image or video.


AND>........BLAMMO
You must be logged in to view this image or video.

You must be logged in to view this image or video.

I quickly polished the end tanks on mine.
You must be logged in to view this image or video.

Step 12 - Trimming the bumper. Mine was already done, if yours has not been done you may or may not have to depending on the core size you bought and the OE bumper you are using. If you do have to trim it, I would just start with a 1/2", draw an even line and use razor knife with a brand new blade and cut it. Don't worry it won't be perfectly flat or smooth, that is what you DA sander is for, just throw on a 80 grit piece of paper and go back and forth evenly till the cut is smooth. Make what ever other trimming in the corners you made need to do to get the bumper on and flush. Ideally you want the bumper slightly touching the core to help air flow across the core. And last but not least is creating more of a hole in the OE bumper for air flow, again this is personal preference. I made my own design and used the razor knife and sanding method again.

Step 12 - Paint that nasty old bumper, I am inline in que with the painter.

You must be logged in to view this image or video.


Results - HUGE difference as I knew it would . At 36psi mid way through third IATs were in the high 117-119, it now is in the mid 90s.

Happy Boosting!

I don' t know that I would say that's the official install, you didn't use the provided straps that bolt up to the upper core support like ETS says to do. I think I'm going to just take the remaining strap material and weld that to the bottom and tie it back to the lower core support. Not saying what you did is bad, but more of a custom install then a out of the box standard install.
 
If I did it, IT IS THE OFFICIAL WRITE UP, and for the record a 1ga can not use that stupid straps setup because of the body stuff for the clear corners besides the straps are by far the lamest and stupidest way to mount a FMIC.
 
If I did it, IT IS THE OFFICIAL WRITE UP, and for the record a 1ga can not use that stupid straps setup because of the body stuff for the clear corners besides the straps are by far the lamest and stupidest way to mount a FMIC.

Ok OFFICAIL 1GA WRITE UP I'll give you that, I haven't had a 1ga for 15 years. I don't care for the straps either, my VRSF mounted the way yours is now.
 
Support Vendors who Support the DSM Community
Boosted Fabrication ECM Tuning ExtremePSI Fuel Injector Clinic Innovation Products Jacks Transmissions JNZ Tuning Kiggly Racing Morrison Fabrications MyMitsubishiStore.com RixRacing RockAuto RTM Racing STM Tuned

Latest posts

Build Thread Updates

Vendor Updates

Latest Classifieds

Back
Top