

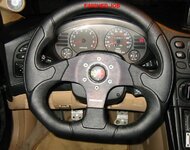
Replacing the stock 2g steering wheel with a reasonably sized aftermarket wheel and hub is surprising easy but one is kind of left on his own to figure out how to make the horn work, and keeping the cruise control switch takes a little creativity.
The horn system works by grounding the horn contact to complete a circuit and activate the horn. Most replacement wheels come with a horn button and a circular metal contact on the back. You will need to rig up your own spring contact to maintain continuous pressure on the circular contact. Whatever you use should be springy enough to maintain its shape for a long period of time. I used a piece of a hack saw blade. I thought later that I could also have used a piece of one of those little stainless steel rulers. Im not sure if corrosion will be a factor.
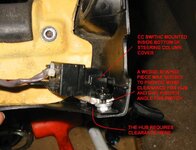
I placed the cruise control switch on the steering column near the original location. It was necessary to clear some space for it. After removing the clock spring I was able to cut away some of the white plastic to make room for the switch. I used a small sharp hand saw designed for cutting PVC pipe. The plastic is very easy to cut and remove. A hole was drilled through the side of the clam-shell steering column cover and enlarged to make room for easy movement of the switch lever.
Only basic tools are needed to get the wheel and column cover off; screw driver, socket set. The top and bottom of the steering column cover are held by screws from the underneath. Dont miss the one on the left side near the back. It goes way up in there.
Ron Tew
The horn system works by grounding the horn contact to complete a circuit and activate the horn. Most replacement wheels come with a horn button and a circular metal contact on the back. You will need to rig up your own spring contact to maintain continuous pressure on the circular contact. Whatever you use should be springy enough to maintain its shape for a long period of time. I used a piece of a hack saw blade. I thought later that I could also have used a piece of one of those little stainless steel rulers. Im not sure if corrosion will be a factor.
You must be logged in to view this image or video.
I placed the cruise control switch on the steering column near the original location. It was necessary to clear some space for it. After removing the clock spring I was able to cut away some of the white plastic to make room for the switch. I used a small sharp hand saw designed for cutting PVC pipe. The plastic is very easy to cut and remove. A hole was drilled through the side of the clam-shell steering column cover and enlarged to make room for easy movement of the switch lever.
Only basic tools are needed to get the wheel and column cover off; screw driver, socket set. The top and bottom of the steering column cover are held by screws from the underneath. Dont miss the one on the left side near the back. It goes way up in there.
You must be logged in to view this image or video.
You must be logged in to view this image or video.
You must be logged in to view this image or video.
You must be logged in to view this image or video.
Ron Tew
Attachments
Last edited by a moderator:
