Many Spyder owners have had some or all of these problems. Fortunately most are easy and inexpensive to fix.
Top does retract properly / top does not fit in well without help.
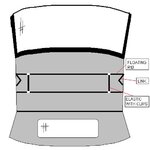
One very common problem with the 2g Eclipse Spyder roof system, and one that will effect all cars at some point, is the elastic straps connecting the floating rib to the 2nd rib. The elastic gets all stretched out. The elastic straps are connected by plastic clips that snap over the top of the ribs. They keep tension on the floating rib so that it folds properly as the roof retracts. They are easily removed by opening the roof partway and accessing them between the roof and the headliner. I replaced the fabric elastic with the heaviest stuff I could find at a fabric store. Just cut the stitching to remove the old stuff and use a double layer of the new elastic if it isn't as heavy as the old (mine wasn't). Just stitch it back on with a needle and heavy thread using the existing holes in the plastic clips. Be sure to test the length first to make sure it will stretch far enough to clip onto the ribs and still have tension for proper retraction. Others have gotten new elastic from the dealer. When you are done, clip them back in place.
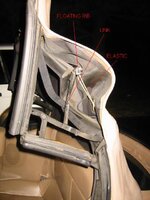
The improper folding of the roof during retraction causes a couple of other problems. The worst of these is bent links that connect the floating rib to the side frame. You can access these by pealing back the headliner from the front. It's held by a couple of screws at the corners and a strip of heavy Velcro. A sign that these are bent is that your headliner does not seem to fit properly and rattling of the links against the side frame. The links are pretty easy to straighten (too easy actually). Some have found that the links were broken and had to be replaced. I hear they are not cheap from the dealer.
Another problem resulting from the bent links is that there are staples attaching fabric webbing to the top side of the ribs to support the roof. As the floating rib gets more and more bent and out of position, the staples pull out. The bad thing about this is that they tend to stay there half pulled out and can start poking holes in the roof fabric. Remove all the staples as soon as you can. After replacing the elastic and straightening the links you can re-staple the webbing. This can be done with the roof in partially retracted position. Mark the webbing in fully up and latched position, retract the roof partway, line up the webbing over the rib, and fire in some staples. Be sure they go in all the way.
Top does retract properly / top does not fit in well without help.
One very common problem with the 2g Eclipse Spyder roof system, and one that will effect all cars at some point, is the elastic straps connecting the floating rib to the 2nd rib. The elastic gets all stretched out. The elastic straps are connected by plastic clips that snap over the top of the ribs. They keep tension on the floating rib so that it folds properly as the roof retracts. They are easily removed by opening the roof partway and accessing them between the roof and the headliner. I replaced the fabric elastic with the heaviest stuff I could find at a fabric store. Just cut the stitching to remove the old stuff and use a double layer of the new elastic if it isn't as heavy as the old (mine wasn't). Just stitch it back on with a needle and heavy thread using the existing holes in the plastic clips. Be sure to test the length first to make sure it will stretch far enough to clip onto the ribs and still have tension for proper retraction. Others have gotten new elastic from the dealer. When you are done, clip them back in place.
The improper folding of the roof during retraction causes a couple of other problems. The worst of these is bent links that connect the floating rib to the side frame. You can access these by pealing back the headliner from the front. It's held by a couple of screws at the corners and a strip of heavy Velcro. A sign that these are bent is that your headliner does not seem to fit properly and rattling of the links against the side frame. The links are pretty easy to straighten (too easy actually). Some have found that the links were broken and had to be replaced. I hear they are not cheap from the dealer.
Another problem resulting from the bent links is that there are staples attaching fabric webbing to the top side of the ribs to support the roof. As the floating rib gets more and more bent and out of position, the staples pull out. The bad thing about this is that they tend to stay there half pulled out and can start poking holes in the roof fabric. Remove all the staples as soon as you can. After replacing the elastic and straightening the links you can re-staple the webbing. This can be done with the roof in partially retracted position. Mark the webbing in fully up and latched position, retract the roof partway, line up the webbing over the rib, and fire in some staples. Be sure they go in all the way.
Attachments
Last edited by a moderator: