** Disclaimer **
Not all of this information is mine. I need to make sure everyone knows that Morphius's posts about this clutch pedal fix were a huge help to me when I did it. I also have to thank Taboo from DSM Talk for his post. It was most helpful.
**Disclaimer**
That said... this article pertains to those individuals who have excess play in their clutch pedal. (Example: You can lift up the clutch pedal with your toe.)
Time Required:
3 Hours. (less if you know exactly what you are doing.)
Tools Required:
Phillips Screwdriver
10 mm Socket
12 mm Socket
Socket Extentions
One mig welder and the skills to use it.
Safety Goggles! (vision > all)
An extra pair of hands is always handy too.
Parts Required:
None!
Step one:
Remove the driver's side kick panel and disconnect the hood release lever after opening the hood.
Remove the screws holding the lower heating duct work. Set everything aside.
Step Two:
Unhook the relevant (brake switch, safety clutch switch, and cruise) wiring harnesses. Tuck them as best as possible so that they are out of the way. Don't forget to remove the brake pedal return spring.
Step Three:
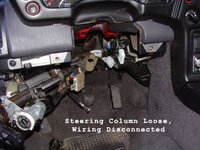
Take apart the plastic steering column cover. Lay it aside. Use your 12mm socket and extensions to unbolt the steering column. Use common sense here and unbolt the bottom bracket first. There is a hard to get at bolt at the back that you will probably need a few extensions to reach.
Once the steering column is free, set it aside. You will have to move it around as you work. Note that the seat was not removed to do this. I'm sure you could if you wanted to, but I'm just not that ambitious.
Step Four:
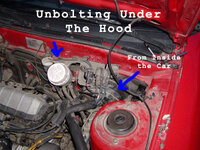
In the engine bay, unbolt the break fulid resivoir and the master cylinder. (There are 5 bolts holding the master cylinder to the brake booster bracket that you will have to remove from inside the car.) You'll need to pop them both off their studs so you have some play in the pedals to remove the pushrods.
Step Five:
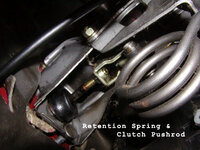
Climb under the dash and disconnect the pushrods for the brake and clutch pedal. Don't lose those pins! You can now pull the master cylinder back a bit, bending the lines slightly, far enough to free the entire pedal assembly.
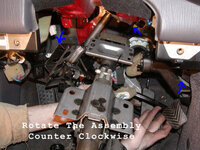
Step Six:
This is the hardest part. You have to get the whole assembly out of the car. I laid the steering column in the middle of the floor, dropped the assembly down as far as I could, and then turned the pedal assembly counter clockwise to get it out. I reversed the process to get it back in.
Step Seven:
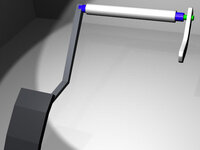
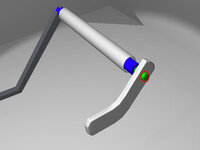
You'll notice that the bracket at the end of the assembly is worn. It used to be a square hole. the idea here is to weld the shaft to the bracket thus eliminating any play. Move the assembly back and forth and you will see exactly what I'm talking about. There probably won't be much play on the short piece, but it does take much to give you a lot of play at the pedal.
Grab your welder and put a bead all the way around the threaded part of the shaft. The shaft is now attached to the bracket thus eliminating any chance of free play every again.
Step Eight:
Put everything back together and go boost around some.
I will be posting pictures as soon as I get them.
--Symple
Not all of this information is mine. I need to make sure everyone knows that Morphius's posts about this clutch pedal fix were a huge help to me when I did it. I also have to thank Taboo from DSM Talk for his post. It was most helpful.
**Disclaimer**
That said... this article pertains to those individuals who have excess play in their clutch pedal. (Example: You can lift up the clutch pedal with your toe.)
Time Required:
3 Hours. (less if you know exactly what you are doing.)
Tools Required:
Phillips Screwdriver
10 mm Socket
12 mm Socket
Socket Extentions
One mig welder and the skills to use it.
Safety Goggles! (vision > all)
An extra pair of hands is always handy too.
Parts Required:
None!
Step one:
Remove the driver's side kick panel and disconnect the hood release lever after opening the hood.
Remove the screws holding the lower heating duct work. Set everything aside.
Step Two:
Unhook the relevant (brake switch, safety clutch switch, and cruise) wiring harnesses. Tuck them as best as possible so that they are out of the way. Don't forget to remove the brake pedal return spring.
Step Three:
Take apart the plastic steering column cover. Lay it aside. Use your 12mm socket and extensions to unbolt the steering column. Use common sense here and unbolt the bottom bracket first. There is a hard to get at bolt at the back that you will probably need a few extensions to reach.
Once the steering column is free, set it aside. You will have to move it around as you work. Note that the seat was not removed to do this. I'm sure you could if you wanted to, but I'm just not that ambitious.
Step Four:
In the engine bay, unbolt the break fulid resivoir and the master cylinder. (There are 5 bolts holding the master cylinder to the brake booster bracket that you will have to remove from inside the car.) You'll need to pop them both off their studs so you have some play in the pedals to remove the pushrods.
Step Five:
Climb under the dash and disconnect the pushrods for the brake and clutch pedal. Don't lose those pins! You can now pull the master cylinder back a bit, bending the lines slightly, far enough to free the entire pedal assembly.
Step Six:
This is the hardest part. You have to get the whole assembly out of the car. I laid the steering column in the middle of the floor, dropped the assembly down as far as I could, and then turned the pedal assembly counter clockwise to get it out. I reversed the process to get it back in.
Step Seven:
You'll notice that the bracket at the end of the assembly is worn. It used to be a square hole. the idea here is to weld the shaft to the bracket thus eliminating any play. Move the assembly back and forth and you will see exactly what I'm talking about. There probably won't be much play on the short piece, but it does take much to give you a lot of play at the pedal.
Grab your welder and put a bead all the way around the threaded part of the shaft. The shaft is now attached to the bracket thus eliminating any chance of free play every again.
Step Eight:
Put everything back together and go boost around some.
I will be posting pictures as soon as I get them.
--Symple