

I bought some Glowshift gauges (since they have a variety of colors to change to) for my 98 Dsm and want my dash gauges to match or at least look pretty decent without a lot of money involved. Was going to buy some gauges from Speedhut.com but thats about $90 (about the price of a new Walbro fuel pump) that I just dont want to spend right now cause Im trying to go fast. Not just look it. But I dont want to look ghetto either and have the orange looking letters and needles with nice aftermarket gauges on the pillar. Looked at the following thread (http://www.dsmtuners.com/forums/articles-exterior-interior/274519-how-light-gauge-cluster-leds.html) and took a lot of what he used for this. But much cheaper, and would be less work for you guys that dont want to worry about leds and soldering and all that crap. This is about as simple as it gets and looks much better in my opinion than the stock apperance. I had a spare cluster laying around so did a little experimenting to see whatd work best, without the worry of messing it all up since Id have a spare handy.
Heres what youll need:
Fabric paint. I bought mine at a place called Hobby Lobby for 99 cents per bottle. I basically got the same kind of stuff the other guy bought .Shiny. You may or may not need it for the gauge faces but you WILL need it if you mess with the needles at all.
Paint brushes.
Sandpaper. I used 100 grit and a bowl full of water and wet sanded it.
Glue stick, or something to get the faces to stick back on after you peel them off. A dab of silicone will even do the trick if youre hard up for something and will peel off easy later if need be. Just dont use much.
Phillips head screwdriver.
Okay, for starters, youll need to get the cluster out. Duh!!! If you're not sure on some of this stuff, refer to the above link. After that, youll need to get the clear cover off and then the black cover.. Let me say that calibrating the gauges is a pain in the ass once you take the needles off so heres my solution versus the other guys method (not to knock his method, I just took a different approach). I learned it the hard way. Im stating this now so you dont screw it up and will make your life a little easier in this project for later. After taking off the clear cover, throw the cluster back in the car. Dont have to bolt it down, just press it in there. Start it up and put tape beside the tach needle, boost, etc. so you have a reference point to put the needles back on later. This wont work for the speedo, so dont even bother. Keep in mind to do this at operating temperature cause of the water temp needle and get the car back to temp when putting it back on. After you do this, shut the car off and pull the cluster back out and keep in mind to be careful not to mess up the tape while youre working on the faces while sanding and painting. When you have to put the needles back on later, throw the cluster back in without the clear cover OR the black cover on and start up the car. While the car is running, put the needles back on, lined up with the tape. Otherwise, the little do-dads that the needles rest on will turn very easily when the car is off and its a nightmare to line back up properly. I figured this out and they will also turn very easily if you touch them accidentally.
Theres only 2 gauges youll need to take out. The boost/oil pressure and the speedometer. The tach and fuel/temp gauge can stay in the cluster. Okay, do the little fork method and yank the needles off the speedo and tach. If you wanna make them look better, sand the orange off the back of the needles and then paint a stripe down the back. The other guy used orange and then white on the sides. Decided to use red on mine but not white on the sides.
Okay, onto the gauges. Were assuming you at least have the tach and speedo needles off at this point. Pull the gauge face off for the tach.
Once the speedo is out, you can unscrew the 4 bolts for the fuel/temp gauge and the face will come right off. Keep track of all your bolts of course. Especially the boost/oil gauge and how it goes together.
Next, just sand the back of the gauges.
Anyway, I sanded that off and tried painting it blue instead. Could see streaks with the blue paint as well so tried some clear wrapping paper stuff to put behind the faces and tried cutting it to shape with an exacto knife but it looked like a baby blue, even using multiple layers to try and darken the color. So I tried painting one red, one white, and one blue again so that I could compare all of them at the same time. The red turned out pink, the blue was still a baby blue and could see streaks, and the white was perfect and no streaks so I went with white. No matter how thick or how bad the streaks were on the back. Anyway, lets say youre done with painting all the faces. Throw the 2 side gauges back in but leave out the speedo and leave off the tach face. Put the cluster back in without the covers and fire it up to operating temp. Put the needles back on where they need to be. Turn it off, pull the cluster once again and put the tach face back on and bolt back in the speedo. You can throw the black cover back on now. Throw it back in the car and fire it back up again and put the tach needle back on. For the speedo needle, you can't just put it at 0. It'll be off. What I did was start the car and put the needle back on, maybe a centimeter or so below the stopper then pulled the tip of the needle over the stopper and let it rest at 0. Think it needs some slack taken out of it. Now it seems pretty close to the speed it should be. Might be right on, but haven't had anyone to drive beside me yet to compare my speed. After this, shut it off and pull the cluster again. Throw the clear cover back on after you're sure all the gauges are calibrated properly, throw the whole thing back in, and youre done. Enjoy. Hope this helps. And remember, its not my fault if you have no mechanical skills and fubar your gauges or your car.
The picture I took here is of the boost/oil, tach, and speedo gauges all done but with the fuel/water gauge left as stock. The needles on that gauge is untouched as well. Hope this helps for anyone that wants to improve the look of their gauges for cheap and not a lot of work involved.
Dunno why it posted the lamp one at the end, but sure ya'll can figure out the order of the pics.
Heres what youll need:
Fabric paint. I bought mine at a place called Hobby Lobby for 99 cents per bottle. I basically got the same kind of stuff the other guy bought .Shiny. You may or may not need it for the gauge faces but you WILL need it if you mess with the needles at all.
You must be logged in to view this image or video.
Paint brushes.
Sandpaper. I used 100 grit and a bowl full of water and wet sanded it.
Glue stick, or something to get the faces to stick back on after you peel them off. A dab of silicone will even do the trick if youre hard up for something and will peel off easy later if need be. Just dont use much.
Phillips head screwdriver.
Okay, for starters, youll need to get the cluster out. Duh!!! If you're not sure on some of this stuff, refer to the above link. After that, youll need to get the clear cover off and then the black cover.. Let me say that calibrating the gauges is a pain in the ass once you take the needles off so heres my solution versus the other guys method (not to knock his method, I just took a different approach). I learned it the hard way. Im stating this now so you dont screw it up and will make your life a little easier in this project for later. After taking off the clear cover, throw the cluster back in the car. Dont have to bolt it down, just press it in there. Start it up and put tape beside the tach needle, boost, etc. so you have a reference point to put the needles back on later. This wont work for the speedo, so dont even bother. Keep in mind to do this at operating temperature cause of the water temp needle and get the car back to temp when putting it back on. After you do this, shut the car off and pull the cluster back out and keep in mind to be careful not to mess up the tape while youre working on the faces while sanding and painting. When you have to put the needles back on later, throw the cluster back in without the clear cover OR the black cover on and start up the car. While the car is running, put the needles back on, lined up with the tape. Otherwise, the little do-dads that the needles rest on will turn very easily when the car is off and its a nightmare to line back up properly. I figured this out and they will also turn very easily if you touch them accidentally.
Theres only 2 gauges youll need to take out. The boost/oil pressure and the speedometer. The tach and fuel/temp gauge can stay in the cluster. Okay, do the little fork method and yank the needles off the speedo and tach. If you wanna make them look better, sand the orange off the back of the needles and then paint a stripe down the back. The other guy used orange and then white on the sides. Decided to use red on mine but not white on the sides.
You must be logged in to view this image or video.
You must be logged in to view this image or video.
I tried it with and without the white on the sides to see whatd look better and it seemed to glow brighter using paint only on the back versus the sides as well. I tried going the cheap route at 1st and used a red sharpie before I bought the paint. I bought the paint when I realized the needles wouldnt light up if you use a sharpie. And this is the reason you need the paint.Okay, onto the gauges. Were assuming you at least have the tach and speedo needles off at this point. Pull the gauge face off for the tach.
You must be logged in to view this image or video.
Then unbolt the boost/oil pressure gauge keeping track of what order the 5 bolts will be going back in. Then unbolt the speedo as well. The speedo covers the bolts for the fuel/temp gauge so thats the reason is has to come out.
You must be logged in to view this image or video.
Once the speedo is out, you can unscrew the 4 bolts for the fuel/temp gauge and the face will come right off. Keep track of all your bolts of course. Especially the boost/oil gauge and how it goes together.
Next, just sand the back of the gauges.
You must be logged in to view this image or video.
It really doesnt matter how much of the back you sand off. Youre just trying to get off the orange crap off the back of the numbers and letters. Decided to wet sand mine so that I could rinse it off and look as I worked on it, to make sure it's clean. I painted the back of my gauges but you might not need to (I dunno, I didn't try to mount the gauges without the paint).
You must be logged in to view this image or video.
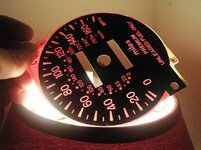
I just figured that since it lit up the needles pretty well, it might work pretty good for these also. At 1st I tried a blue sharpie. Ill say it wouldve looked pretty good had it not been for all the streaks you could see from the front. You can hold the face over a lamp to check and see how it looks before getting too in depth with your work.
You must be logged in to view this image or video.
Anyway, I sanded that off and tried painting it blue instead. Could see streaks with the blue paint as well so tried some clear wrapping paper stuff to put behind the faces and tried cutting it to shape with an exacto knife but it looked like a baby blue, even using multiple layers to try and darken the color. So I tried painting one red, one white, and one blue again so that I could compare all of them at the same time. The red turned out pink, the blue was still a baby blue and could see streaks, and the white was perfect and no streaks so I went with white. No matter how thick or how bad the streaks were on the back. Anyway, lets say youre done with painting all the faces. Throw the 2 side gauges back in but leave out the speedo and leave off the tach face. Put the cluster back in without the covers and fire it up to operating temp. Put the needles back on where they need to be. Turn it off, pull the cluster once again and put the tach face back on and bolt back in the speedo. You can throw the black cover back on now. Throw it back in the car and fire it back up again and put the tach needle back on. For the speedo needle, you can't just put it at 0. It'll be off. What I did was start the car and put the needle back on, maybe a centimeter or so below the stopper then pulled the tip of the needle over the stopper and let it rest at 0. Think it needs some slack taken out of it. Now it seems pretty close to the speed it should be. Might be right on, but haven't had anyone to drive beside me yet to compare my speed. After this, shut it off and pull the cluster again. Throw the clear cover back on after you're sure all the gauges are calibrated properly, throw the whole thing back in, and youre done. Enjoy. Hope this helps. And remember, its not my fault if you have no mechanical skills and fubar your gauges or your car.
The picture I took here is of the boost/oil, tach, and speedo gauges all done but with the fuel/water gauge left as stock. The needles on that gauge is untouched as well. Hope this helps for anyone that wants to improve the look of their gauges for cheap and not a lot of work involved.
You must be logged in to view this image or video.
Dunno why it posted the lamp one at the end, but sure ya'll can figure out the order of the pics.
Attachments
Last edited by a moderator:
