

VETDRMS
15+ Year Contributor
- 340
- 21
- Jun 1, 2006
-
Vancouver,
Washington
Well, it turned out to be a long road of waiting to get it all back together but it is finally running again!
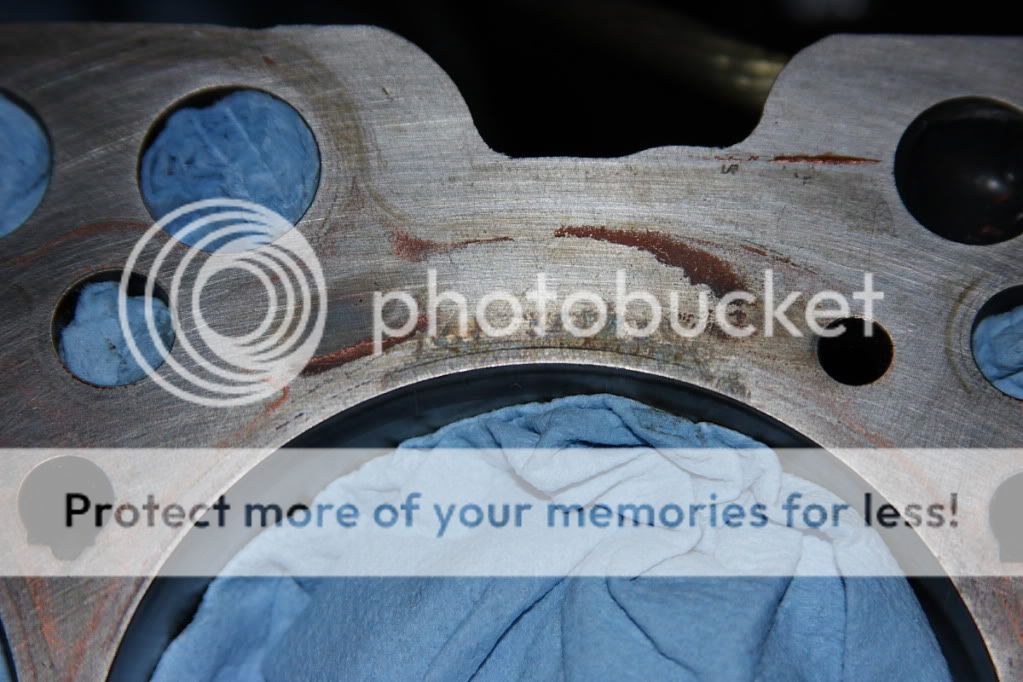
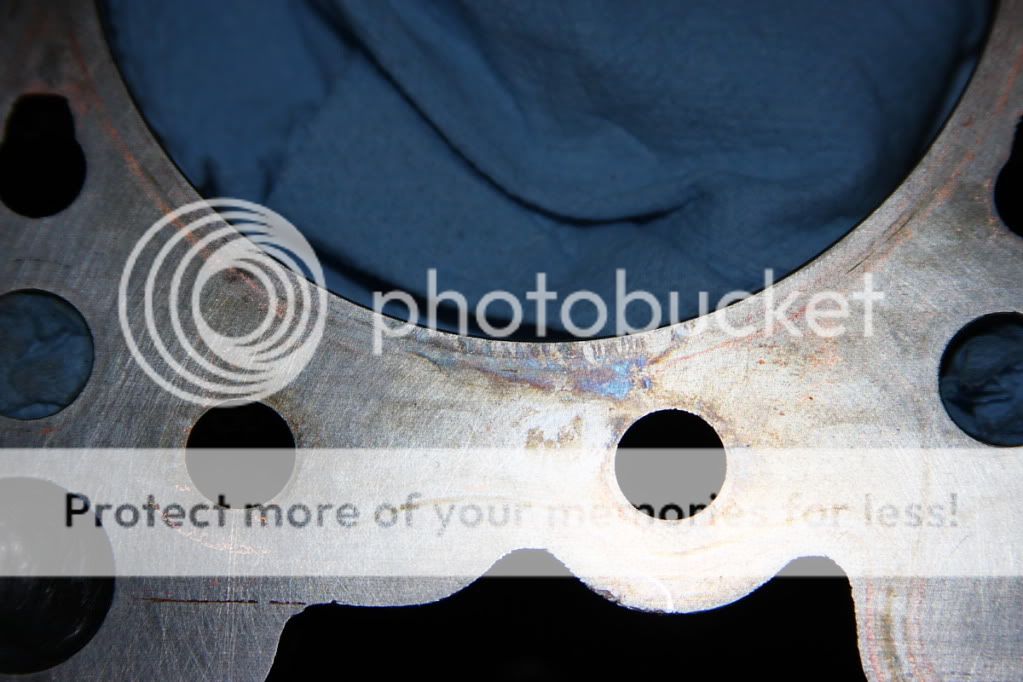
Once I got the deck cleaned up to start lapping I noticed that the gasket actually failed in 4 spots, the worst of them being on cylinder 2 at the front of the block. Both cylinders 2 and 3 failed directly in front and in back of the cylinder:
Cylinder 2 - Front

Cylinder 2 - Back
Cylinder 3 - Front
Cylinder 3 - Back
I then lapped the block with 800 grit until the scarring from the gasket failure was no longer visible and the deck surface was clean and mirror-like.
The cylinder head took some time to repair. It was welded at ETS to fill in the cuts from the unshrouding work where the gasket was hanging in to the chamber. The welding made the valve seats brittle as it had to be welded right next to the seats. This was confirmed on the cutter and the area around the weld was very brittle so it was time for new seats.
I had to ship the head to Montana to have the machine work done, and my buddy was backed up at the shop so it took some time to get to. The chambers were then re-shaped and approximately 0.0045" was removed from the deck surface.
The valve seats were replaced, blended into the ports, and a new valve job was done, resetting the valve installed height to the lower end of the stock specifications (1.921" I believe).
While it was apart we checked the GSC springs and they were spot on spec after the first 1800 miles.
Once that was done the head was sent back to me unassembled and then it was off to English Racing to be lapped and assembled.
I had ordered another 87mm 0.066" thick gasket from Cometic and it was finally time to assemble it. I put a couple light coats of the Hylomar spray on it, but I really didn't like how this stuff goes on. It sprays quite uneven, like a silicone spackle.
I bolted the head down and noticed a slight amount of the Hylomar pushed out along the gasket edge. I didn't like how it looked and wanted to make sure it didn't find its way into any of the coolant/oil ports so the head came back off. I probably put too much on but practically all of the Hylomar had moved away from the flat surfaces and into the coolant/oil feed ports. The flat parts of the gasket were solid black and nearly free of any Hylomar... If I were to use this stuff again I would only put a very light single-coat "spackle" on the gasket.
I also checked the imprint on the head to see if there was any overhang in the chamber and to see where the fire-ring sat. There is some core shift in the head and there was some very small overhang near the intake valves on a couple chambers.
After talking with Lucas @ ER we decided to order a custom 87.5mm 0.066" thick gasket from Cometic so that meant a couple more weeks of down time. Might as well get it right.
The new gasket showed up on Friday so it was time to put it all back together. I put two very light coats of Copper spray on the gasket and installed the head with the A1 H11 studs torqued to 95lbs in a 30-60-95 sequence.
I fought with the timing tensioner for a while trying to get the right amount of protrusion but torqueing that damn thing to 35ft/lbs and keeping it from moving (even with the special tool) is a pain. I am probably way too anal about it but I try to get the protrusion between 1.15" and 1.16" exactly instead of just making sure the pin is loose and calling it good. When the pin is actually loose in the hydraulic tensioner actual protrusion is usually under 1.15". I ended up at a protrusion of 1.142" and decided to stop messing with it.
I had a full tank of E98 in it when it was torn down 2 months ago so I was a little concerned about the fuel keeping, but I sealed off the lines when it came a part so no moisture should have gotten into the fuel.
The motor fired right up once it got fuel and did the usual clacking for the first 10 minutes. There is still some lifter clatter but I will drive it a bit before worrying about it. When checking the lifters on reassembly I noticed one of them was leaking and the valve wasn't sealing, which would explain some of the additional noise I heard before. I replaced this lifter. Even when the lifters are pumped up the the S2-R cams seem to produce more valvetrain noise than stock or more mild cams, which GSC has acknowledged and is probably due to the agressive ramp rates.
I let it get up to operating temperature and then shut it down to let it cool before re-torqueing the head studs. After it had cooled down all the studs took another 20* turn or so at 95ft/lbs. I also changed the oil to get rid of any crap from machining the head (switched from VR1 to Brad Penn), flushed the coolant to remove the WD-40 from lapping the deck, and tonight it will be ready to get back on the road!
Hopefully head gasket issues are over. Work had been crazy but I want to get it on the dyno at ER in the coming weeks and then off to the track. I will post results back here then!
Thanks Pete, ETS, and the guys at English Racing!
Once I got the deck cleaned up to start lapping I noticed that the gasket actually failed in 4 spots, the worst of them being on cylinder 2 at the front of the block. Both cylinders 2 and 3 failed directly in front and in back of the cylinder:
Cylinder 2 - Front

Cylinder 2 - Back
Cylinder 3 - Front
Cylinder 3 - Back

I then lapped the block with 800 grit until the scarring from the gasket failure was no longer visible and the deck surface was clean and mirror-like.

The cylinder head took some time to repair. It was welded at ETS to fill in the cuts from the unshrouding work where the gasket was hanging in to the chamber. The welding made the valve seats brittle as it had to be welded right next to the seats. This was confirmed on the cutter and the area around the weld was very brittle so it was time for new seats.
I had to ship the head to Montana to have the machine work done, and my buddy was backed up at the shop so it took some time to get to. The chambers were then re-shaped and approximately 0.0045" was removed from the deck surface.
The valve seats were replaced, blended into the ports, and a new valve job was done, resetting the valve installed height to the lower end of the stock specifications (1.921" I believe).
While it was apart we checked the GSC springs and they were spot on spec after the first 1800 miles.
Once that was done the head was sent back to me unassembled and then it was off to English Racing to be lapped and assembled.
I had ordered another 87mm 0.066" thick gasket from Cometic and it was finally time to assemble it. I put a couple light coats of the Hylomar spray on it, but I really didn't like how this stuff goes on. It sprays quite uneven, like a silicone spackle.
I bolted the head down and noticed a slight amount of the Hylomar pushed out along the gasket edge. I didn't like how it looked and wanted to make sure it didn't find its way into any of the coolant/oil ports so the head came back off. I probably put too much on but practically all of the Hylomar had moved away from the flat surfaces and into the coolant/oil feed ports. The flat parts of the gasket were solid black and nearly free of any Hylomar... If I were to use this stuff again I would only put a very light single-coat "spackle" on the gasket.
I also checked the imprint on the head to see if there was any overhang in the chamber and to see where the fire-ring sat. There is some core shift in the head and there was some very small overhang near the intake valves on a couple chambers.
After talking with Lucas @ ER we decided to order a custom 87.5mm 0.066" thick gasket from Cometic so that meant a couple more weeks of down time. Might as well get it right.
The new gasket showed up on Friday so it was time to put it all back together. I put two very light coats of Copper spray on the gasket and installed the head with the A1 H11 studs torqued to 95lbs in a 30-60-95 sequence.
I fought with the timing tensioner for a while trying to get the right amount of protrusion but torqueing that damn thing to 35ft/lbs and keeping it from moving (even with the special tool) is a pain. I am probably way too anal about it but I try to get the protrusion between 1.15" and 1.16" exactly instead of just making sure the pin is loose and calling it good. When the pin is actually loose in the hydraulic tensioner actual protrusion is usually under 1.15". I ended up at a protrusion of 1.142" and decided to stop messing with it.
I had a full tank of E98 in it when it was torn down 2 months ago so I was a little concerned about the fuel keeping, but I sealed off the lines when it came a part so no moisture should have gotten into the fuel.
The motor fired right up once it got fuel and did the usual clacking for the first 10 minutes. There is still some lifter clatter but I will drive it a bit before worrying about it. When checking the lifters on reassembly I noticed one of them was leaking and the valve wasn't sealing, which would explain some of the additional noise I heard before. I replaced this lifter. Even when the lifters are pumped up the the S2-R cams seem to produce more valvetrain noise than stock or more mild cams, which GSC has acknowledged and is probably due to the agressive ramp rates.
I let it get up to operating temperature and then shut it down to let it cool before re-torqueing the head studs. After it had cooled down all the studs took another 20* turn or so at 95ft/lbs. I also changed the oil to get rid of any crap from machining the head (switched from VR1 to Brad Penn), flushed the coolant to remove the WD-40 from lapping the deck, and tonight it will be ready to get back on the road!
Hopefully head gasket issues are over. Work had been crazy but I want to get it on the dyno at ER in the coming weeks and then off to the track. I will post results back here then!
Thanks Pete, ETS, and the guys at English Racing!
