Basically, just a better lip that cost's 20$ or less, and you can buy at any home improvement store and do with a few regular hand tools and a drill.
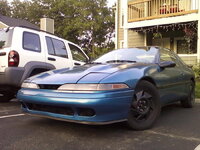
This is much cleaner and better looking DIY lip. (See attached images!)
NOTE: The car I used for this mod was a 1990 Plymouth Laser RS-Turbo so some things may be slightly different on your 1G DSM
Materials:
*Garage Door Seal (I bought a roll of 15 Feet so I had plenty left over!)
*10-25 Screws + Washer's. (I used 25 Screws and Washers, The more you use the better it will look and stay on. No particular Size)
*1G DSM Front Bumper
Tools:
*Drill or Dremel, Anything that can Drill Holes
*Drill Bit (You want a Drill Bit that is slightly smaller then the size of your screw so the Screw Stay's in tight and wont pull out!
*10 mm combination wrench
*10 mm socket
*3\8 drive socket wrench
*3\8 socket wrench extension
*Phillips Head Screwdriver.
*Jack (Optional)
*Jack Stands (Optional)
Instructions:
Removing your Front Bumper.
1:Start by removing the front head light lenses and center piece by removing the Phillips Screws under the hood. The lenses will slide right out after, but don't forget to remove the turn signal\driving light bulbs. Simply Twist and pull.
2: Remove the Corner Lenses by 2 Screws on each one of the lenses that you will see was behind the front lenses after removing them. once the screws are off the lenses should pop out by sliding them forward slightly and pulling them out. Don't forget to remove the turn signal\Driving Light bulbs also. Simply Twist and pull.
3: Next unbolt the the 10mm bolts holding the top bumper support on.
4: Behind the Lenses you will 1 10mm Bolt on each side of the car holding the corner of the bumper on. Simply remove it.
(Step 5 and Step 6 are easier if you raise the front of the car up on jack stand's and remove the wheels!)
5: Remove the Splash guard from in front of the SMIC on the Passenger's side, and the splash guard in front of the windshield washer fluid reservoir on the driver's side held on by 10mm bolts. (Be cautious! the 10mm bolts may brake dude to rust and corrosion build up!) Once removed look inside the wheel well where the corner of the bumper connects to the Fender you should see 1 10mm bolt there also holding the bumper up, Remove them and the bumper corners should fall free! Be cautious about that and don't let it hit you in the head or something!
6: Go back to the front of the car and behind the bumper along the bottom will be a metal support bar going horizontally across the back of the bumper connected to 2 Vertical metal bumper support bar's holding the bumper up connected to the Crash bar held on by 1 10mm Bolt each, Simply remove it, and the bumper will fall free! don't let it hit you on the head thought!
Installing the Lip
NOTE: If working on a rough service such as a driveway or something similar lay down a cloth to set the bumper on to prevent scratching it.
1: Flip the bumper upside down, and start removing the 10mm bolts holding the bottom metal support bar on. You will need to remove it to install the lip. Leaving this on will make it near impossible with out modifying the the Support! I left mine off because it was all bent out of shape and rusted up anyways; Chance's are your's will be some too!
2: With the bumper support bar removed, Start by drilling X amount of holes for X amount of screws that you bought in the center of the bottom of the bumper stretching from end to end.
3: Start on the Driver's side corner (or passenger if you prefer) and lay the lip on there and start screwing in your Screw\Washer combination. make sure it is pulled tight so you don't leave gaps which looks crappy and allows things to get caught in. Also leave a few inches slack on your starting end just to play things safe you can always come back later and cut it!. Tighten the screws but don't over tighten them because the screw and washer may pull through or even damage the lip!
4: Once the lip is in place and screwed down tight. simply trim the ends and your ready to install the bumper again with your new lip!
Installation of bumper is reverse of removal!
and your done!

DISCLAIMER: I am not responsible for any Injuries, Broken Bolts, Tools, or Damages to you or your property that may occur while attempting to install this mod!")
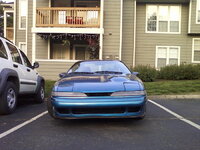
This is much cleaner and better looking DIY lip. (See attached images!)
NOTE: The car I used for this mod was a 1990 Plymouth Laser RS-Turbo so some things may be slightly different on your 1G DSM
Materials:
*Garage Door Seal (I bought a roll of 15 Feet so I had plenty left over!)
*10-25 Screws + Washer's. (I used 25 Screws and Washers, The more you use the better it will look and stay on. No particular Size)
*1G DSM Front Bumper
Tools:
*Drill or Dremel, Anything that can Drill Holes
*Drill Bit (You want a Drill Bit that is slightly smaller then the size of your screw so the Screw Stay's in tight and wont pull out!
*10 mm combination wrench
*10 mm socket
*3\8 drive socket wrench
*3\8 socket wrench extension
*Phillips Head Screwdriver.
*Jack (Optional)
*Jack Stands (Optional)
Instructions:
Removing your Front Bumper.
1:Start by removing the front head light lenses and center piece by removing the Phillips Screws under the hood. The lenses will slide right out after, but don't forget to remove the turn signal\driving light bulbs. Simply Twist and pull.
2: Remove the Corner Lenses by 2 Screws on each one of the lenses that you will see was behind the front lenses after removing them. once the screws are off the lenses should pop out by sliding them forward slightly and pulling them out. Don't forget to remove the turn signal\Driving Light bulbs also. Simply Twist and pull.
3: Next unbolt the the 10mm bolts holding the top bumper support on.
4: Behind the Lenses you will 1 10mm Bolt on each side of the car holding the corner of the bumper on. Simply remove it.
(Step 5 and Step 6 are easier if you raise the front of the car up on jack stand's and remove the wheels!)
5: Remove the Splash guard from in front of the SMIC on the Passenger's side, and the splash guard in front of the windshield washer fluid reservoir on the driver's side held on by 10mm bolts. (Be cautious! the 10mm bolts may brake dude to rust and corrosion build up!) Once removed look inside the wheel well where the corner of the bumper connects to the Fender you should see 1 10mm bolt there also holding the bumper up, Remove them and the bumper corners should fall free! Be cautious about that and don't let it hit you in the head or something!
6: Go back to the front of the car and behind the bumper along the bottom will be a metal support bar going horizontally across the back of the bumper connected to 2 Vertical metal bumper support bar's holding the bumper up connected to the Crash bar held on by 1 10mm Bolt each, Simply remove it, and the bumper will fall free! don't let it hit you on the head thought!
Installing the Lip
NOTE: If working on a rough service such as a driveway or something similar lay down a cloth to set the bumper on to prevent scratching it.
1: Flip the bumper upside down, and start removing the 10mm bolts holding the bottom metal support bar on. You will need to remove it to install the lip. Leaving this on will make it near impossible with out modifying the the Support! I left mine off because it was all bent out of shape and rusted up anyways; Chance's are your's will be some too!
2: With the bumper support bar removed, Start by drilling X amount of holes for X amount of screws that you bought in the center of the bottom of the bumper stretching from end to end.
3: Start on the Driver's side corner (or passenger if you prefer) and lay the lip on there and start screwing in your Screw\Washer combination. make sure it is pulled tight so you don't leave gaps which looks crappy and allows things to get caught in. Also leave a few inches slack on your starting end just to play things safe you can always come back later and cut it!. Tighten the screws but don't over tighten them because the screw and washer may pull through or even damage the lip!
4: Once the lip is in place and screwed down tight. simply trim the ends and your ready to install the bumper again with your new lip!
Installation of bumper is reverse of removal!
and your done!
DISCLAIMER: I am not responsible for any Injuries, Broken Bolts, Tools, or Damages to you or your property that may occur while attempting to install this mod!