Calan
DSM Wiseman
- 7,251
- 363
- Jan 16, 2007
-
OKC,
Oklahoma
I spent the last week or so finishing up the basic cleaning, building new brackets, and mocking up the new firewall layout. Extensive work was done on the wiring harness; several wires were shortened and others that were not needed were removed.
I also started testing various paints for the engine bay. The first paints I tested were standard rattle cans of Krylon and Rustoleum. Interestingly, they seemed to work ok except for where they were applied over the existing cork/rubber sealer crap that runs around the joints in the metal. After 24 hours, the quick-drying Krylon Satin Black was still freshly wet on the sealer; Rustoleum primer wasn't much better.
It's hard to see in the pic below, but the area where the paint wouldn't dry is the bead of sealer right under the clutch and brake hard lines. You can see another bead of it running up the joint at the bottom left of the strut tower. (It shows up much better in the last pic on this page).
View attachment 328
I ended up deciding on Duplicolor engine paint. It covers well, drys quick, stuck to the sealer, and appears to be a very hard durable finish. The two colors I'll be using are Low Gloss Black and Semi Gloss Black, although I'm not exactly sure yet where I'll use each one.")
Contrary to the engine paint, I wasn't very pleased with the Duplicolor bed liner paint that I tested in part #3. After a couple of days, it easily chipped off with just my fingernail...I can only imagine what rocks and bone fragments from small wayward animals would do. So I'm still looking for something to line the wheel wells with...suggestions welcome.
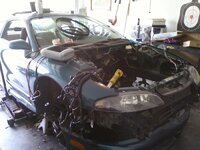
The next project was to start mocking up the firewall and fabricating new brackets. The pic below shows generally where everything will end up. The following pictures will show more detail. The re-worked components include:
View attachment 337
A. Power fuse for stereo amp
B. Noise filter
C. A/C evaporator block off plate
D. Golan fuel filter
E. DSMLink boost sensor
F. AFPR
G. WAI boost sensor
H. Injector resistor pack
For the fuel filter and DSMLink boost sensor, I made a loop clamp for the sensor, and a separate bracket that the stock Golan filter clip bolts to. The AFPR bracket is a simple "L" shape and sits just to the right.
View attachment 331 View attachment 338
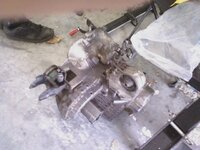
The injector resistor pack will be mounted under the battery, where the charcoal cannister used to mount. The holes on the resistor cover had to be opened up slightly, but other than that it fit nicely. In the pictures below you can see this area both before and after the pack is mounted.
View attachment 340 View attachment 333
The WAI sensor sits just below the AFPR, to the right of the fuel filter. This put it close to the other boost sensor, and made the wiring simpler to route. It bolts through a flat plate into the firewall, using an existing M8 threaded hole (cruise control mount maybe... I forget). A small area will be sanded to bare metal and coated with dielectric grease behind the bracket, since it will also serve as a main ground point.
View attachment 341 View attachment 342
The A/C evaporator cover is a piece of .090 aluminum. For the stereo amp power fuse, I drilled two holes and welded studs into the passenger-side strut tower. (Just below the fuse studs, you can see the non-paint friendly sealer I mentioned earlier. The paint just wiped off the sealer after waiting a full day).
View attachment 339 View attachment 343
I have detailed pictures of all the brackets if anyone wants them. They are all made from aluminum, and will be either powder coated or brushed/polished.
Once everything was relocated and fabbed up, I tore everything apart again and have started filling, sanding, and prepping for paint. In the next part, I'll cover some of this process as well as more details on the new wiring.
I also started testing various paints for the engine bay. The first paints I tested were standard rattle cans of Krylon and Rustoleum. Interestingly, they seemed to work ok except for where they were applied over the existing cork/rubber sealer crap that runs around the joints in the metal. After 24 hours, the quick-drying Krylon Satin Black was still freshly wet on the sealer; Rustoleum primer wasn't much better.
It's hard to see in the pic below, but the area where the paint wouldn't dry is the bead of sealer right under the clutch and brake hard lines. You can see another bead of it running up the joint at the bottom left of the strut tower. (It shows up much better in the last pic on this page).
View attachment 328
I ended up deciding on Duplicolor engine paint. It covers well, drys quick, stuck to the sealer, and appears to be a very hard durable finish. The two colors I'll be using are Low Gloss Black and Semi Gloss Black, although I'm not exactly sure yet where I'll use each one.
Contrary to the engine paint, I wasn't very pleased with the Duplicolor bed liner paint that I tested in part #3. After a couple of days, it easily chipped off with just my fingernail...I can only imagine what rocks and bone fragments from small wayward animals would do. So I'm still looking for something to line the wheel wells with...suggestions welcome.
The next project was to start mocking up the firewall and fabricating new brackets. The pic below shows generally where everything will end up. The following pictures will show more detail. The re-worked components include:
View attachment 337
A. Power fuse for stereo amp
B. Noise filter
C. A/C evaporator block off plate
D. Golan fuel filter
E. DSMLink boost sensor
F. AFPR
G. WAI boost sensor
H. Injector resistor pack
For the fuel filter and DSMLink boost sensor, I made a loop clamp for the sensor, and a separate bracket that the stock Golan filter clip bolts to. The AFPR bracket is a simple "L" shape and sits just to the right.
View attachment 331 View attachment 338
The injector resistor pack will be mounted under the battery, where the charcoal cannister used to mount. The holes on the resistor cover had to be opened up slightly, but other than that it fit nicely. In the pictures below you can see this area both before and after the pack is mounted.
View attachment 340 View attachment 333
The WAI sensor sits just below the AFPR, to the right of the fuel filter. This put it close to the other boost sensor, and made the wiring simpler to route. It bolts through a flat plate into the firewall, using an existing M8 threaded hole (cruise control mount maybe... I forget). A small area will be sanded to bare metal and coated with dielectric grease behind the bracket, since it will also serve as a main ground point.
View attachment 341 View attachment 342
The A/C evaporator cover is a piece of .090 aluminum. For the stereo amp power fuse, I drilled two holes and welded studs into the passenger-side strut tower. (Just below the fuse studs, you can see the non-paint friendly sealer I mentioned earlier. The paint just wiped off the sealer after waiting a full day).
View attachment 339 View attachment 343
I have detailed pictures of all the brackets if anyone wants them. They are all made from aluminum, and will be either powder coated or brushed/polished.
Once everything was relocated and fabbed up, I tore everything apart again and have started filling, sanding, and prepping for paint. In the next part, I'll cover some of this process as well as more details on the new wiring.