This is my very first Tech article, I still do not have much access to the site but I have been a member for a long time and have learned a lot from reading at this site. I am hoping this will clear things up for anyone doing the fuel pump rewire on a 2g car.
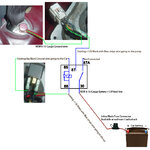
These numbers are on the relay right next to the terminals
* 30 - feed wire from battery
* 87A - Not used
* 87 - when cutting stock 12V pump wire, this is to the pump
* 86 - when cutting stock 12V pump wire, this is to the car
* 85 - when cutting stock ground wire, this is to the car
This is a Diagram that shows all the connections that are made for the fuel pump rewire.
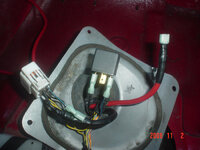
In this picture on the left is the white plug that plugs into the fuel pump, as you can see I have a large 8 guage ground wire for my new ground hooked up to the big black wire, You can also see that I have crimped on a connector for the relay to the black with blue stripe wire.
Then in the middle you see the actual relay, it has the already existing black wire ground, and black with blue stripe +12v wire hooked up.
Then on the right you will see the +12V 8 gauge +12v feed wire that comes from the battery.
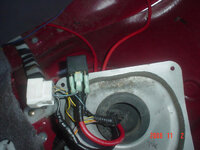
In this picture all that has changed from the previous picture is that I have plugged in the 8 gauge +12v feed wire and the black with blue stripe wire that goes to the fuel pump connector plug.
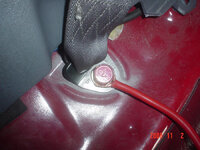
This is a closeup of my ground, notice I have cleaned the connection by taking the paint off, I did this to both sides of the seat belt bracket, I used a wire brush that I bought at walmart for $1.99. Also notice that I did not use a Ring terminal crimp adapter, This will actually work just as good as long as you make sure you got a good bite on the wire and that it is secure well, I did not have any ring terminal crimp adapters, If I feel the need I will go back and do that at another time.
Here is a picture of it all put back together with the new 8 gauge +12v and ground lines going through a slit I cut in the rubber.
These numbers are on the relay right next to the terminals
* 30 - feed wire from battery
* 87A - Not used
* 87 - when cutting stock 12V pump wire, this is to the pump
* 86 - when cutting stock 12V pump wire, this is to the car
* 85 - when cutting stock ground wire, this is to the car
This is a Diagram that shows all the connections that are made for the fuel pump rewire.
You must be logged in to view this image or video.
In this picture on the left is the white plug that plugs into the fuel pump, as you can see I have a large 8 guage ground wire for my new ground hooked up to the big black wire, You can also see that I have crimped on a connector for the relay to the black with blue stripe wire.
Then in the middle you see the actual relay, it has the already existing black wire ground, and black with blue stripe +12v wire hooked up.
Then on the right you will see the +12V 8 gauge +12v feed wire that comes from the battery.
You must be logged in to view this image or video.
In this picture all that has changed from the previous picture is that I have plugged in the 8 gauge +12v feed wire and the black with blue stripe wire that goes to the fuel pump connector plug.
You must be logged in to view this image or video.
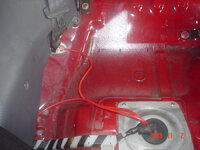
This is a closeup of my ground, notice I have cleaned the connection by taking the paint off, I did this to both sides of the seat belt bracket, I used a wire brush that I bought at walmart for $1.99. Also notice that I did not use a Ring terminal crimp adapter, This will actually work just as good as long as you make sure you got a good bite on the wire and that it is secure well, I did not have any ring terminal crimp adapters, If I feel the need I will go back and do that at another time.
You must be logged in to view this image or video.
Here is a picture of it all put back together with the new 8 gauge +12v and ground lines going through a slit I cut in the rubber.
You must be logged in to view this image or video.