Note: This is my first attempt at a tech article. So I apologize if I am confusing or it sucks. ALSO MAKE SURE YOU READ THROUGH THE ENTIRE TECH ARTICLE BEFORE YOU START!!!!!!
Car info: My wife drives a 1993 Eclipse GS (1990-4G63 turbo swap). Her Clutch was slipping all the way through 2nd gear (3rd-5th as well) so I took pictures of everything I did to swap the clutch out. This took me about 5 hours, but I stopped to exlplain to my racing club everything and took pictures along the way, so it took my longer than usual.
You will need quite a bit of tools for this job, so make sure you have a full Rachet Set (to inlcude 32mm Socket), Screw Drivers, Pry Bar, hammer, Wrench set, pliers, needle-nose pliers, Also get some friends to help you. Its always good because somtimes you miss something that they get.
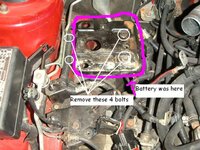
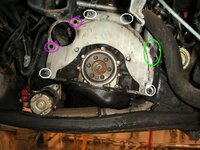
Lets start at the top of the car. You will need to clear out a lot of things, First you will need to remove the battery. Disconnect the Negative Terminal, next remove the postive terminal. Remove the Batter Tie down rod. Move all wires out of the way and remove the battery. Next remove the Battery Stand, it does not need to come out but it makes things SOO much easier. There are 4 bolts holding it down. I circled them in white, the two left ones are under that thick black wire and are moderately difficult to get to.


