

TTnelco
Probationary Member
- 22
- 10
- Aug 25, 2019
-
Key largo,
Florida
I haven’t found a really good thread on this, and it is obviously a big issue with these cars. I’ve seen multiple threads people saying to scrap cars and send them to the junk yard because of some rust. I would implore you to at least try to fix it before you send one of the poor DSM’s to the graveyard. First, prior to this I had zero welding experience and minimal body work experience. I do however have a good background in mechanical work and things of that nature so I’m not clueless. I also was certified in weld inspections for the USCG, so again I atleast knew what a fully penetrating weld is , blah blah. Let’s get to it.
This is what my car was looking like when I bought it from a guy in Wisconsin.
First thing is to measure your car and see how straight the frame is to start. This will also give you measurements to check as much as you can along the way to make sure the tower is not shifting to much. It will move, heat will cause some movement, but more then likely very minimal. You might not even be able to tell. Here is a what the measurement are from factory.
I’m not positive what years and models are exactly the same, so make sure you look up you specific cars measurements.
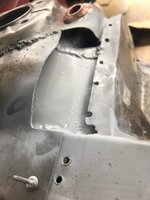
Once you have that out of the way take a angle grinder or some other destructive tool of your choice and grind off the paint in the area, the rust will be much worse than it looks unfortunately. Be care to just remove the paint, I suggest you use a less aggressive flap wheel so you don’t grind down any metal. Do this on both the top and bottom. Once the paint is removed and you can see rust areas better you can cut them out. I used a cutoff wheel on my angle grinder.
My car had two layers of rust. The top piece, and the piece you can see from the wheel well. Next is planning the easiest way to make a replacement piece. For me I decided it was best to cut out some
More metal and weld along the circular portion of the tower. It was a good place to tie into the existing structure as to not make a weak spot. I also removed some exhausting metal so I could tie into the area where the existing button welds were located. This way I could also button weld the two new pieces and tie them into an existing piece of the car.
After you got good straight cuts, get some sheet metal and shape it how you want. I used a hammer and my vice, which is shaped like an anvil. Take your time it’s frustrating as hell, but you want the pieces to fit as tight and flush as you can.
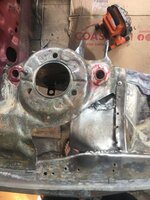
I started with the bottom piece, welded it in, then did the first top piece. I used ospho to make sure there was no more rust, then painted the metal that was going to end up enclosed with Rustoleum primer and black enamel. (I’m not going into how to weld, I bought a $99 flux core welder off eBay and went to town. Just do tack welds and move around to keep heat down. Other than watch videos and make sure your confident before you do this on the car.)
I did use some rivots to hold the repair pieces in place. It made things easier. Finally I welded in the final piece. My welds are not pretty, but the penetrated well, and will do. After you can grind the welds down carefully, make sure to go slow and not heat them up too much. You can see if any welds have small crack and redo them if needed.
Once that was done I used body filler to shape, and hit it with primer.
Here is were you check your measurements and make sure nothing moved around too much. You should probably be doing it as you go along, but I didn’t and it worked out thankfully. I will be using fender braces and a couple other braces on the towers. It’s a very important part of the car, and I’m taking no chances, especially as I’m going to be using in time attack. Daily drivers should also consider using at least fender braces and tower braces if you do this for added support.
This is what my car was looking like when I bought it from a guy in Wisconsin.
You must be logged in to view this image or video.
First thing is to measure your car and see how straight the frame is to start. This will also give you measurements to check as much as you can along the way to make sure the tower is not shifting to much. It will move, heat will cause some movement, but more then likely very minimal. You might not even be able to tell. Here is a what the measurement are from factory.
You must be logged in to view this image or video.
You must be logged in to view this image or video.
I’m not positive what years and models are exactly the same, so make sure you look up you specific cars measurements.
Once you have that out of the way take a angle grinder or some other destructive tool of your choice and grind off the paint in the area, the rust will be much worse than it looks unfortunately. Be care to just remove the paint, I suggest you use a less aggressive flap wheel so you don’t grind down any metal. Do this on both the top and bottom. Once the paint is removed and you can see rust areas better you can cut them out. I used a cutoff wheel on my angle grinder.
You must be logged in to view this image or video.
You must be logged in to view this image or video.
My car had two layers of rust. The top piece, and the piece you can see from the wheel well. Next is planning the easiest way to make a replacement piece. For me I decided it was best to cut out some
More metal and weld along the circular portion of the tower. It was a good place to tie into the existing structure as to not make a weak spot. I also removed some exhausting metal so I could tie into the area where the existing button welds were located. This way I could also button weld the two new pieces and tie them into an existing piece of the car.
You must be logged in to view this image or video.
After you got good straight cuts, get some sheet metal and shape it how you want. I used a hammer and my vice, which is shaped like an anvil. Take your time it’s frustrating as hell, but you want the pieces to fit as tight and flush as you can.
I started with the bottom piece, welded it in, then did the first top piece. I used ospho to make sure there was no more rust, then painted the metal that was going to end up enclosed with Rustoleum primer and black enamel. (I’m not going into how to weld, I bought a $99 flux core welder off eBay and went to town. Just do tack welds and move around to keep heat down. Other than watch videos and make sure your confident before you do this on the car.)
You must be logged in to view this image or video.
I did use some rivots to hold the repair pieces in place. It made things easier. Finally I welded in the final piece. My welds are not pretty, but the penetrated well, and will do. After you can grind the welds down carefully, make sure to go slow and not heat them up too much. You can see if any welds have small crack and redo them if needed.
You must be logged in to view this image or video.
You must be logged in to view this image or video.
Once that was done I used body filler to shape, and hit it with primer.
You must be logged in to view this image or video.
You must be logged in to view this image or video.
Here is were you check your measurements and make sure nothing moved around too much. You should probably be doing it as you go along, but I didn’t and it worked out thankfully. I will be using fender braces and a couple other braces on the towers. It’s a very important part of the car, and I’m taking no chances, especially as I’m going to be using in time attack. Daily drivers should also consider using at least fender braces and tower braces if you do this for added support.
Attachments
-
 3AFB7E95-4184-4F12-9ECC-A1A687991881.jpeg640.7 KB · Views: 127
 -
 81267AE9-9AC8-4B98-B0BF-BAEE197847DC.jpeg792.4 KB · Views: 102
 -
 45210052-419A-4780-9AD4-FD6163706180.jpeg495.9 KB · Views: 93
 -
 68DECC78-E966-418F-9C56-95456240A5CD.jpeg691.4 KB · Views: 106
 -
 9C440E95-0C25-4A80-BFA3-59140CDB975E.jpeg792.4 KB · Views: 121
Last edited:
