The Top DSM Community on the Web

For 1990-1999 Mitsubishi Eclipse, Eagle Talon, Plymouth Laser, and Galant VR-4 Owners. Log in to remove most ads.

Please Support STM Tuned
Please Support ExtremePSI

Daily Drive

This site may earn a commission from merchant
affiliate links, including eBay, Amazon, and others.

This site may earn a commission from merchant affiliate links, including eBay, Amazon, and others.

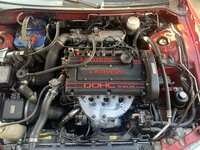
Now that I have the time to work on my DD, I replaced the transmission mount, which was shot. Here are some pics for you guys.


C5F2F6C7-2FB0-4884-9240-F699DC44DDC1.png


I hate the solid mounts Vibration for a DD, so I use a pease of hose to help the mount.

822C78CF-A1E9-442B-B986-8BFDDD241041.png
I replaced the transistor connector, the lock clip was broken and was no longer staying locked,
The car came with the worn out mounts, so the vibration the transmission transmits when flooring it, it backs out the transistor connector and stalls, so I replace it with a good one, It’s a used one though, I had to depin both of them in order to swap it without cutting the wires.

Here is the broken one.


D92EEBD1-FFA2-4F1D-A71C-58240B1632B9.jpeg


And here is the good one, used but in good conditions.

FF13E078-D302-43B1-A7F7-E59835C565BB.jpeg
 
Update,.

My AC Compressor gave up on me, I hate to drive without ac on the heat,, I ordered a remanufactured one ad should be here in this week.

I took off the dash and did a good clean up on the new black dash, It came nice, I will get it installed today and see how it looks.

I will post some pics later on from the dash swap..
 
Here are some pics of the process.
Inside the car was freaking dusty, I don’t know if it used to be in a dusty community before or some sore of.

I disassemble the dash and console in peaces and clean every single peace and assemble everything back together, I clean in and out even knowing I will never see the inside (underneath)LOLLOLLOL

I apply some plastic restorer (I love that product) and let it sweat for a couple of minutes and remove all off,

Here are the results.

9C8D3771-E0B4-44A9-9F38-31E1CAF4FAAE.jpeg
2E0F3C8A-B498-4622-828D-599512DB2CD8.jpeg
1F6BFFCC-DCF4-42A7-8FC6-FB7F37E9F4E6.jpeg
BB6E4414-99C7-42FB-86FD-6937194542AD.jpeg
EE8190B1-1995-442C-874E-8DCBC7B42616.jpeg
 
Update.
It’s in, all came out good, here is a pic.


B35AF712-C6A2-4805-86A1-F908B1480783.jpeg


Now it’s time to do a transmission oil change and filter., also now that I’m working in the engine bay, I will replace the AC compressor, it arrived today so tomorrow, I’ll puntito .

The driver side wheel bearing is starting to make sum noise, so I will replace it and once I’m there, I will remove the drive shaft to get the boot replaced, it starting to throw greas all over the place.

I’ll decrease everything once I’m down there

I have an EVO3 turbo to drop it in and I think it’s the time to do it so tomorrow,, I will start doing all that.


3A636E44-3A0C-49FF-AAA7-430D374E5070.jpeg


The valve cover gets wet on the center section, I know is not the top cap, I think is crack somewhere in the center section.,
I will replace it and send it to check and fix, IF it’s crack.

This is the first time using wrinkle paint and I love how it came out., I paint the letters but with no success, however I will put it like that,maybe the next time I make it better.
Here is a pic of it.


6330935F-EF64-4E8B-8506-4D6BF4A6DF17.jpeg
 
Update. Working on changing the AC compressor, I discover, the compressor has only 2 bolts holding it and they weren’t tight, so that makes me think be that cause of the intermittent clonk noise I had, I add two more bolts and bolt it down the way it should be, Im hope, the compressor didn’t twist which the bolts where holding it was, the left top and the right lower, so with the load of the belt., So I hope it works now.

I removed the driver side axle and the outer boot was barely open and just a few grease sprayed around the area, so I replaced both boots.

After removing the axle, it catch my attention a light shiny hair crack deep between the block and transmission, after inspection, I discover is a shiny spot where the block at the starter plate, YES, there is no bolt in there, so I add a bolt and will make sure the rest of the transmitting to block bolts are tight.

There is oil all over the oil pan and lower side of the transmission, even the Tcase was all covered of oil, so I removed the Tcase to trace the leak, all what I can see is, the transmission shaft seal or the Tcase seal should be the culprit.
I degrease the top of the engine and transmission when I did the head gasket job, but never the bottom side, so I don’t know it the leas is resent or the problem was fixed and. Ever took the time to clean the mess, so I’m just going to clean all parts and put them back together., The only thing I’ll do for now is, to replace the oil pan gasket.

While replacing driver side wheel bearing, I took the time and clean and paint the brake shield to kill the light rust build up it has.
Here are some pics as always.

I started cleaning part of the transmission when I run out of light, so I won’t finish it today, so I will update later.


00356BE2-734B-438C-9932-1CAEB8405A47.jpeg
82CD8715-D471-46F7-B40C-96D4978C02B1.jpeg
87A0F19D-1B8E-40DF-9AA1-24EBEFA27CE3.jpeg
7878D51C-4B01-4D28-B2B2-EBA3D80A3761.jpeg
B0BF0CA0-242A-4C93-B47B-FC837CE6323B.jpeg
 
Update. Looks like the more I dig the more bad things I find.

Cleaning the mess I found this.

64BE004C-FB7F-45F4-B6FE-FA1797C83E22.jpeg


looks like the shaft teeth are no good, it’s like the teeth are shorter/smaller.

I will have to source a good one to swap it out. But for the moment being, I will leave it as is.
 
Good job Miguel! I like the wrinkle paint also. Good scrub down and you should find what ever is leaking.

Yes, a good clean up will do the job.

What originally was a regular transmission oil/filter change, became a massive nest of problem, one fallowing another., but overall, I’m more satisfied the way it is coming along, which I know what it has had so I can take care of it. And like we all know what that means, It’s the beginning of a reliable DD:cool::cool::cool:
 
Update. I change the oil pan gasket, clean and dry everything very well, and like always, pics for the viewers.

15484479-43D9-4575-8F76-A79227CAD275.jpeg


New bolts were installed all around the oil pan. I also install new bolts on the transmission oil pan and even the flywheel inspect plate (or however it’s called) has new bolts, so we are all good down there.


FE359AB0-9E00-4983-AC1A-7319CB49E399.jpeg
933CAF5D-B3F8-4AA7-A742-C2D5BD182A6A.jpeg


New valve cover and gasket is going in.

BDBE8777-7975-42EF-9CE5-3719B21F69E3.jpeg


This is what came in today., Now with fresh transmission oil, it will handle the abuse if it ever gets it LOL
AA593CFD-8A4C-4A42-A4F4-11F56A3576C4.jpeg


Here is a before and after cleaning the Tcase.

CAEFC0D1-3E93-431E-988D-E090A85DF017.jpeg
E935315F-1E88-477D-B864-880C3636A8C6.jpeg
 
Here is how the rusty bolts/hardware looks like, but it feels good that is only the hardware whats rusted, and only the lower section of the complete car, the upper bolts and nuts from the underbody looks really clean. also the frame and complete structure is rust free which I love:D:D:D


A3722C09-CDED-48A2-B7A8-C23C4625FD68.jpeg


This are the spacers in front of the center crossmember, I rust clean one and still one more to go,

91A5649F-6071-4D88-AA59-57268ED59169.jpeg


Here is some new/used clean hardware replace into the rusted once, is impressive how the clean hardware makes everything more clean, more valuable.
I love how it is coming along.

1278FE14-E257-4710-98CF-A01AE6963EEB.jpeg
F8BE0DDC-E595-42E5-B159-9E664B300078.jpeg


Here is a closer pic of the washers, but it’s rusted only on one side, the other side is rust free, which tells the rust was just starting.

D1A9BA99-AE23-4A39-9E6A-4D2F90AB5753.jpeg


I port match the gasket to the turbo housing and transfer the gasket to the O2 housing.
For the moment being, I am using a 1g O2 housing which it has the O2 location o the upper side ( like the evo3 housing.
I have the evo housing but because it has a different angle for the down pipe, I’m not going to modify the down pipe which it will take me way longer to get the car back on the road, I will do that next time, that’s why I didn’t go crazy and didn’t detail the port job.

D368B499-8363-4407-8004-9195F9E088EB.jpeg
9DD8B4F9-5FBC-418F-8F05-AFC01CCC6910.jpeg
 
More updates.
I finally get to work in the front transmission mount, the center hole is to big for the bolt, so I went and add some sleeves to make it smaller to cut the play and make it a bit stif, you can see how wide is the hole compared to the bolt.

DC21D268-7B47-4562-A2ED-2540A9F0D165.jpeg
136D5355-3746-4254-8DE7-F68E8FDD9B9C.jpeg
AC62A29D-EF02-4133-8FAE-57BBD0F77DC0.jpeg


I love how new hardware stands out and makes everything to look way better.

E6C3C798-9B29-45F3-9E80-F5F606C6CD42.jpeg


Here is the sleeves inserted to the mount.
77ACC27C-A21F-46F0-AEB3-DEE56DF0BFDB.jpeg


This is what’s going in for the moment:cool:
55FAA2E0-CEAD-4BCE-BEC2-C4D25C524FA5.jpeg


And this is how it seats for the moment, hope you guys enjoy it:D

60D69467-014E-4A3C-90B7-035AF28BBE93.jpeg
 
Another update.
I paint the battery tray which was really rusted, I really love the way it came up..
I install the battery and add the tie down which it didn’t have before, I still have to fix the body ground terminal, It’s in its last times and a new one is required.


28AFDBDF-7A33-467B-BFF0-29789725D042.jpeg


The car came with a different TCU connector and now that I’m working in the area, I went ahead and solder a factory connector.
This is what was on it.
E68D3821-D96B-4B29-93D8-0F2D36BCF2C2.jpeg


Here is the factory one installed, soldered, heat shrink and will last for the life of the car.

11ACEB94-8023-47AA-8969-95A50F034919.jpeg


The transmission hard lines were rusted and looking nasty, I wire brash and paint it to keep the rust away.

193ABDAB-A918-4249-A5FB-601444A8D1B3.jpeg


Here is all free of rust and painted.

0D5C5650-726B-4525-93FA-7FC8D2DF8AFC.jpeg


At this point I have replaced 90% of the engine bay and underbody bolts, nuts and washers. With some clean and some new hardware.
This is one part of the hardware that were replaced on the car.

863C6EE0-52AF-4BBE-9621-BEA060AD7200.jpeg


Now it’s looking almost complete, just a few more things and should run.
The evo exhaust manifold was cracked from underneath, so I’m waiting for it to get welded, hope to have it tomorrow ready to install.
All what I have left is the manifold and turbo and it should run.

Here is how it is right now.

DC8892A5-6717-4A5E-BEA5-395AE93C0037.jpeg


I forgot to mention before, I found some stuff in the oil pan pick up screen, it was peaces of rtv, good thing there were no signs of metal anywhere, this engine is really healthy, hope it last for ever.
This is all for the moment I’ll update once the manifold gets ready to install.
136C1A27-8EB6-4A36-A383-E90C8535A030.jpeg
 
I’m cheap too, I just bought a J pipe for the tubo from EBAY, that them pipe is almost same diameter then my finger.LOLLOLLOL

It’s being along time that I stay away from EBay but some how, I ended up buying there again.:beatentodeath::beatentodeath::beatentodeath:

But well, live and learn right?. (What else I’m going to say) :(

Ho by the way the complete kit of bolts for the entire car cost me $2 ., Yes you read it right only $2 , Which is the $2 entrance they charge, just to get into the store., The store is called PICK & PULL :D:D:D
 
Last edited:
Updating.
Not much did yesterday. Which the manifold is not ready., I install the middle timing cover.
The car came without the middle section and I source one, it’s used and cracked at one corner, so I fixed the crack, clean it up and install it.


24583EC7-CE33-47B2-A37A-4D01E2D458F9.jpeg


When removing the motor mount, I found out it’s bad, after inspecting it, I discover this.

1A0D6CFF-BD0E-4CEA-B3F0-F905BACF0E24.jpeg

So it will be replaced in the future, at least is on the list to do.

So with no manifold, I just install the turbo and heat shield for now and bolted down to the downpipe to guide the oil feed line and get a better picture of how to rout it.


The J pipe ended up pointing to the transmission, I cut it And will shorter to make it work.

I will update once the manifold gets ready.

6BAD2D10-2F4A-4023-9951-CBD3C3E25256.jpeg
 
Update. Is running now.the only thing I did was to add the cranck sensor connector holder bracket or however you call it,( it holds the connector.)

01D4032F-6FE1-4B25-BBBB-A6ED1C1C1020.jpeg


I modify the EBay Jpipe to be able to rout it well and use the stock intercollegiate down hose. It all came nice.

C90D9460-300D-4989-9F7B-57D1EA2ADF9C.jpeg


I fixed the top timing cover, it was cracked, so I just weld it in and add a wire net to make it strong on that area.


C99C78DF-CE74-4046-A8AC-C153E7F65D51.jpeg


Curious if any one has the part number for the racket that holds the knock sensor connector, It is located a side of the cam sensor, in a 2ga and 2gb.
The 2ga has it right where the 2gb cam sensor is located, but the 2gb is located between the cam sensor and the inlet of the fuel rail.

I was going to start a new thread to keep this one clean but for some reason I can figure out how to start a new thread.
Is the site updated or changed the system?. I remember it was on the top right hand where says START NEW THREAD but I just can see it any more, so I can’t ask anything but only in this one.
 

Attachments

  • D4761F6D-5D2C-46A6-9AD9-971FB4863FF7.jpeg
    D4761F6D-5D2C-46A6-9AD9-971FB4863FF7.jpeg
    1 MB · Views: 90
Last edited:
Update. After driving the car, there was a strange noise feeling when braking, si went and replaced all 4 brake pads But the problem persist, I might remove the abs system and keep it simple.

Brakes were t to bad though. .


64D8B459-F7E6-4F1A-B056-6DF9FD41AA2A.jpeg

I clean and grease the guide pins and put all back together.

4E2C9D4E-32BC-4331-B536-4105EDB5D1FA.jpeg


I haven’t drive it to much and just notes the leak start to show up.
Well, is better then Qi was expecting, it end up being the Tcase seal, So I will order both seals for the Tcase and forget about the Tcase
BDA90341-1385-44A6-AEEF-111F6E1DB01F.jpeg


Here is the evidence. Lucky me it wasn’t the transmission seals.

9BBD6B40-AF8C-441B-8723-3E1223AD0492.jpeg


And here is with the heat shield installed, both the heat shield and O2 heat shield are ceramic coated so will being coating the manifold and turbine housing in the future.


7082E7EB-D03A-4A1B-A54B-E3326E7F2F16.jpeg


Hope you guys enjoy the view. :hellyeah:
 
Support Vendors who Support the DSM Community
Boosted Fabrication ECM Tuning ExtremePSI Fuel Injector Clinic Innovation Products Jacks Transmissions JNZ Tuning Kiggly Racing Morrison Fabrications MyMitsubishiStore.com RixRacing RockAuto RTM Racing STM Tuned

Latest posts

Build Thread Updates

Vendor Updates

Latest Classifieds

Back
Top