The Top DSM Community on the Web

For 1990-1999 Mitsubishi Eclipse, Eagle Talon, Plymouth Laser, and Galant VR-4 Owners. Log in to remove most ads.

Please Support ExtremePSI
Please Support Rix Racing

2G hesitates

This site may earn a commission from merchant
affiliate links, including eBay, Amazon, and others.

This site may earn a commission from merchant affiliate links, including eBay, Amazon, and others.

1dohc6

10+ Year Contributor
67
5
Sep 14, 2010
Greeley, Colorado
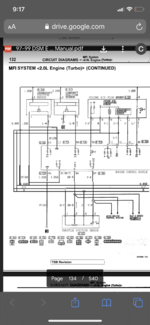
98 gst car sat for 2 years before I put the motor back in was previously running fine other than speedo not working. Car starts every time but only revs to 3 and super slow and hesitates and backfiring. Check engine lights on p1400 , p0120, p0105, p0300. Any thoughts on what could this? Thanks in advance Chris
 
Update : no spark at all for 2&3. I tried connecting another set of coil packs I have and still no spark. Swapped plug wires made sure they were in order no change. I tried a power transistor unit from a 96 and the car wouldn’t stay running any more. I’m not sure if it matters what year the ptu is? Or the spare 96 ptu I have could already be bad. Any input would be appreciated thanks
 
Tried a 3rd power transistor so that’s not the issue pulled the ecu out today no fishy smell but did notice a burnt area and it look like there was some leakage on the bottom I’ll post pictures soon.
You must be logged in to view this image or video.
 
Replaced ecu and I now have spark to all four cylinders but car is still hesitating under boost won’t even go past 5psi. check engine codes are p0120 p0105 p1400 p0443. I performed a boost leak test and had leaks so I replaced Intake manifold gasket, throttle body rebuild with new gaskets and seals, inyector o rings/seals egr delete ( it was stuck open) and now it will easily hold 20psi. Still need to adjust the BISS screw and tps just waiting on good weather.
 
P0105 checked the plug of the maf with multimeter

pin 1: blank
Pin 2: 0
Pin 3: 5.0
Pin 4: 0 (pink/bue wire) Is a reading of 0 acceptable and what is this wire for ?
Pin 5: 12
Pin 6: 5
Pin 7: -.2
Pin 8: 5

tested the maf for resistance between 5&6 with a heat gun at 180 degrees and did not match Hanes manual specifications im gonna try to source a new maf any input would be appreciated thanks.
 
I'm fairly certain that all of the codes you have are for sensors that get their 5V supply from pin 81 of the ECU. I would check voltage between that pin and ground with key on, engine off. I suspect that you have a short somewhere involving this supply voltage.

Check page 8-120 and 8-121 in the factory service manual.
 
Thank you Delta448 for the reply. I did check for voltage at pin 81 and did not get a reading when back probing with the key on engine off. We’re do I test from pin 81 thanks I can’t find anything in my manual or online about pin 81 other than it’s location and color.
I have a Haynes manual, what factory service manual is it that you mentioned?
I'm fairly certain that all of the codes you have are for sensors that get their 5V supply from pin 81 of the ECU. I would check voltage between that pin and ground with key on, engine off. I suspect that you have a short somewhere involving this supply voltage.

Check page 8-120 and 8-121 in the factory service manual.
 

Attachments

  • 63888D42-94FF-4178-88C7-78C4583A3CF1.png
    63888D42-94FF-4178-88C7-78C4583A3CF1.png
    141.5 KB · Views: 53
I’m trying to teach myself to read this diagram
Pages 74-79 have been helpful I don’t want to give up I feel like I’m so close to getting the car running again. I am grateful for you’re help I believe on the sensor in the diagram wire number 6 is the what I thought was pink/blue buts it’s labeled R-L red - blue is it supposed to read 5v?
 
ECU pin 81 is the +5v sensor power from the ECU. It's the green/yellow wire.
ECU pin 72 is the output from the MAF Intake Air Temp sensor from MAF pin 6 and it's the red/blue wire.

I'm not sure what it was that blew up that transistor on your old ECU but I'd be very careful until you do know so that you don't blow up the new one.

It doesn't look to me like your locating the right pins on the MAF Pin 8 is the one not connected and pin 1 is where the green/yellow wire connects for the +5 sensor voltage.

The wire colors should be:

1 Green/Yellow
2 Orange
3 Blue/Yellow
4 Red (1.25mm diameter wire)
5 Black
6 Red/Blue
7 Red/White
8 Not Connected

Fault codes:
P0105 - MAP Circuit Malfunction
P0120 - Throttle Position Sensor/Switch A Circuit Malfunction
P0443 - Evaporative Emission Control System Purge Control Valve Circuit
P1400 - Manifold Differential Pressure Sensor Circuit

ECMTuning has cleaner versions of the diagrams.
http://www.dsmlink.com/images/forums/2GECUPinout.pdf
http://www.dsmlink.com/images/forums/2GECUMFI.pdf

When you look at the connectors the diagrams are showing them from the perspective the wires coming out of them (facing you) not the pins facing you.

1 Green/Yellow. 5.0
2 Orange 0.00
3 Blue/Yellow. 5.0
4 Red (1.25mm diameter wire) 12.0
5 Black 0.00
6 Red/Blue 4.70
7 Red/White. 0.0
8 Not Connected

Ecu pin 81 0.00
Ecu pin 72 0.00
 
Yes, If you're not seeing the same voltages on MAF pin 1 as ECU pin 81, MAF pin 6 as ECU pin 72, MAF pin 7 as ECU pin 19, MAF pin 2 as ECU pin 85, and on MAF pin 3 as ECU pin 90 my first thought would be to make sure it's the right pin on the ECU connector and that the wire colors match.
 
I made sure to check the wire colors for pin 81 green/yellow and 72 red/blue no voltage at all with key on engine off. I can take a picture of the pins I’m checking on the ecu just in case I am in fact checking the wrong pins let me know what you think I should do next thanks.
Yes, If you're not seeing the same voltages on MAF pin 1 as ECU pin 81, MAF pin 6 as ECU pin 72, MAF pin 7 as ECU pin 19, MAF pin 2 as ECU pin 85, and on MAF pin 3 as ECU pin 90 my first thought would be to make sure it's the right pin on the ECU connector and that the wire colors match.
 
Those are the right locations but maybe your not reaching the connectors since you not measuring anything at the ECU pin but the other end of the wire has the right voltage.

What problem are you chasing now? Still the Fault Codes?
 
I had work today so it took a while to reply. I am trying to find a fix to the codes I’m throwing so I started with the p0105 that’s why I started at the maf checking for voltage. I still haven’t adjusted the tps / BISS screw I’m in the process of reading up on how to. The car drives fine in low rpm but once I try to get on it it jerks and backfires and doesn’t stop till I let off or change gears. I will try to make a better connection to the ecu pins to and see if I get a reading, if I still don’t get a reading at pin 81 and pin 72 would my next step be to test for continuity?
 
Thank you for confirming that the plug end of the wire has the correct voltage. I stopped at an auto parts store on the way home and bought some wire and alligator clamps so I can check for continuity. I made sure the paper clip was reaching the connector on pin 81 and rigged up an alligator clamp to the multimeter leads. I am now seeing the 5v that was there all along so since I’m already on pin 81 I check for continuity and it’s good. I then figured I’d check for continuity at pin 84 Brown red wire for the tps and it’s a no go. So I’m going to trace that wire and check for a short, am I supposed to have voltage at pin 84 with the key on?
Those are the right locations but maybe your not reaching the connectors since you not measuring anything at the ECU pin but the other end of the wire has the right voltage.

What problem are you chasing now? Still the Fault Codes?
 
The Brown/Red from TPS pin 2 to ECU pin 84 carries the output voltage of the TPS voltage divider back to the ECU. It should measure somewhere between 0.5v and 5v depending on the TPS position.

Pin 1 of the TPS gets the same +5v as pin 1 on the MAF and pin 4 on the TPS is grounded. (also goes to the MAP sensor on the intake manifold)

TPS pin 3 goes to ECU pin 87 and grounds it when the throttle butterfly is closed (assuming the TPS is adjusted correctly), once the throttle butterfly opens the voltage floats back up to about +5v due to the pull-up in the ECU on that pin.
 
Ok so I was trying to trace pin 1 Green/ yellow since I should have 5v there but don’t. I traced the green/yellow wire and couldn’t find any bad spots. I was checking for voltage and disconnect the maf plug while testing pin 1 on tps and I got 5v since I couldn’t find any thing wrong with the wire could it just be a bad maf? Sorry for for my ignorance when it comes to wiring issues thanks for being patient with me and helping me out. Another thing correct me if I’m Wrong but I don’t think I can adjust the tps until I address this problem of not getting 5v to tps pin 1 while maf is connected. I couldn’t open the page on VFAQ for tps adjustment but from searching the forums I found this procedure and you added step 7 to it

1. Loosen the 2 TPS screws.

2. Put a feeler gauge of .0177" under the stop screw

3. Turn the car to the ON position

4. Rotate the TPS until pins 3 & 4 lose continuity (open)

5. Verify that the voltage between pins 2 & 4 is .4-1 volt with the feeler still in.

6. Tighten TPS bolts and remove feeler gauge.

7. Verify that the pins 3 & 4 have continuity (shorted) when the throttle is closed and don't have continuity (open) when you open the throttle slightly

currently my stop screw isn’t even coming in contact is there a certain way to adjust this screw or is as simple as loosening the nut and screw in until it makes contact. Also I don’t have a feeler gauge but I read you can fold a piece of paper 4 times? I need to go to the store anyways I might just buy a feeler gauge is this tool something I could use in other situations working on the car? Thanks again.
 
Last edited:
Support Vendors who Support the DSM Community
Boosted Fabrication ECM Tuning ExtremePSI Fuel Injector Clinic Innovation Products Jacks Transmissions JNZ Tuning Kiggly Racing Morrison Fabrications MyMitsubishiStore.com RixRacing RockAuto RTM Racing STM Tuned

Latest posts

Build Thread Updates

Vendor Updates

Latest Classifieds

Back
Top