DogWhistle
Supporting VIP
- 1,033
- 588
- Sep 13, 2012
-
St. Paul,
Minnesota
We all work hard to make things work and look good on our cars, only to have the smallest things be the hardest to find a solution for. We're tired of burned out dash switch bulbs, with the only solution to be going to a boneyard scavenging for used bulbs from old cars, which may or may not even work when we get them home.
Fortunately for us, there is a bulb available which is an exact replacement, sold by Radio Shack. It does not come in the small base, so this write-up will show you how to solder the bulb in the base.
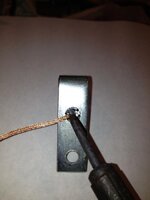
The first step is to remove the bulb from the switch. A thin, standard blade screwdriver works well. Give the bulb base a twist counterclockwise. Here is the bulb and base removed from the switch.
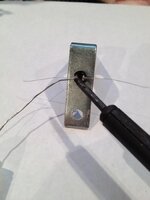
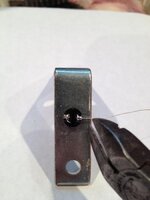
Next, flip the bulb and base upside down. We used a steel angle bracket with screw holes to hold the bulb securely. While you are at Radio Shack, pick up a roll of solder wick. Heat the two solder points, one at a time, with the soldering iron, pressing the solder wick into the soldered tab in the base. Pull the wick away while the solder is still liquid, and your old bulb wire lead will be free. repeat on the other tab.
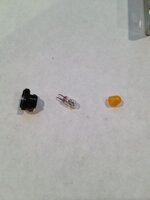
When the leads of the old bulb are free from the socket tabs, separate the base, bulb and bulb rubber.
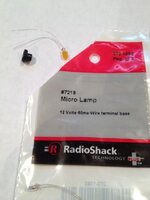
Open the new package of bulbs. These are Radio Shack #7219 Micro Lamp / Part #272-1092. Put the bulb rubber back on and slide the long electrical wire leads through the holes in the bulb base.
Fold the wire leads over each base tab, and solder them together. Do not heat for too long a time and melt the base.
When the solder is set, ship off the extra wire lead.
Reinstall the bulb base into the switch, using a flat blade screwdriver, with a twist clockwise.
Power up the dash lights and enjoy a complete looking dash again! Congratulations!
Fortunately for us, there is a bulb available which is an exact replacement, sold by Radio Shack. It does not come in the small base, so this write-up will show you how to solder the bulb in the base.
The first step is to remove the bulb from the switch. A thin, standard blade screwdriver works well. Give the bulb base a twist counterclockwise. Here is the bulb and base removed from the switch.
Next, flip the bulb and base upside down. We used a steel angle bracket with screw holes to hold the bulb securely. While you are at Radio Shack, pick up a roll of solder wick. Heat the two solder points, one at a time, with the soldering iron, pressing the solder wick into the soldered tab in the base. Pull the wick away while the solder is still liquid, and your old bulb wire lead will be free. repeat on the other tab.
When the leads of the old bulb are free from the socket tabs, separate the base, bulb and bulb rubber.
Open the new package of bulbs. These are Radio Shack #7219 Micro Lamp / Part #272-1092. Put the bulb rubber back on and slide the long electrical wire leads through the holes in the bulb base.
Fold the wire leads over each base tab, and solder them together. Do not heat for too long a time and melt the base.
When the solder is set, ship off the extra wire lead.
Reinstall the bulb base into the switch, using a flat blade screwdriver, with a twist clockwise.
Power up the dash lights and enjoy a complete looking dash again! Congratulations!