The Top DSM Community on the Web

For 1990-1999 Mitsubishi Eclipse, Eagle Talon, Plymouth Laser, and Galant VR-4 Owners. Log in to remove most ads.

Please Support RTM Racing
Please Support ExtremePSI

Wiring multiple SPAL fans using factory relay to power secondary relays

This site may earn a commission from merchant
affiliate links, including eBay, Amazon, and others.

This site may earn a commission from merchant affiliate links, including eBay, Amazon, and others.

twicks69

Supporting Vendor
4,203
1,662
Mar 12, 2004
Milwaukee, Wisconsin
After reading the following thread: http://www.dsmtuners.com/threads/using-stock-rad-fan-wiring-for-spal.176503/page-3

I am doing something a bit unique, and likely overkill, but I need to confirm wiring signal.

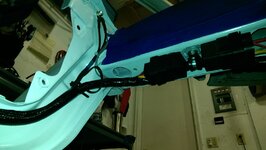
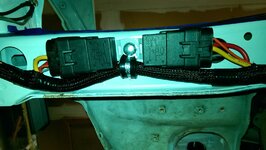
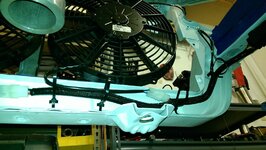
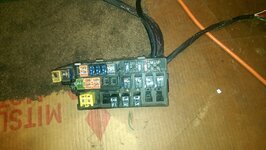
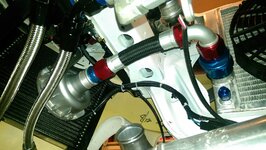
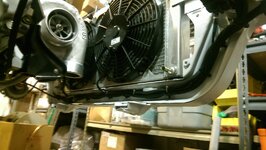
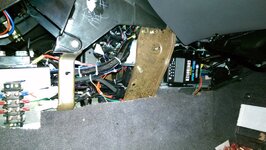
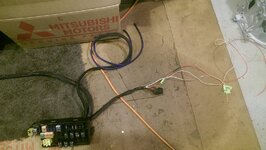
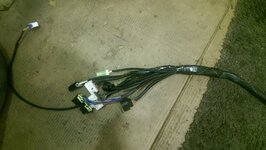
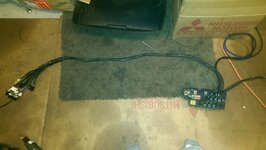
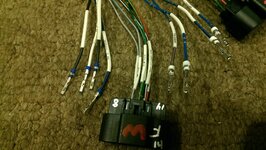
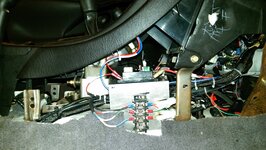
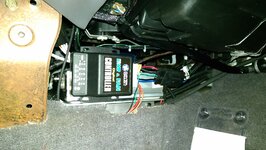
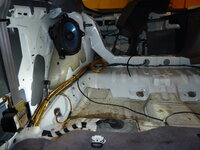
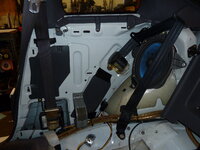
I am using the factory 2G DSM engine fuse/relay panel to send the signal for turn-on of 2x external SPAL fan relays.

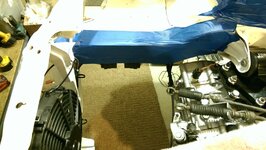
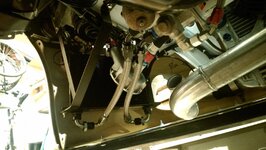
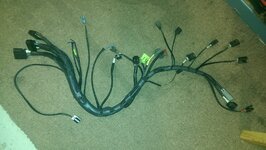
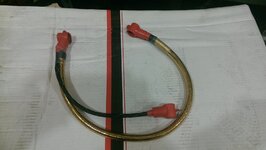
The setup is two SPAL fans each with their own relay; main 12V is straight from battery, chassis ground, and using the SPAL relays signal wires run to the combined Fan HI/LOW relays power wires. The factory fan HI/LOW relay GROUND wires (black and black/blue wires) are combined and grounded to the chassis. The factory fan HI/LOW relay POWER wires (white/black and white/blue wires) are combined and are wired to the SPAL signal wire. The factory wiring of the fan fuse is being retained and changed from a 30A fuse to a 50A fuse.

Essentially, I am using the 3x factory fan HI/LOW relays (and fuse wiring) to signal the combined SPAL relays to turn on in an ECU fan HI or LOW signal. The fans are only going to be 1 speed anyways.

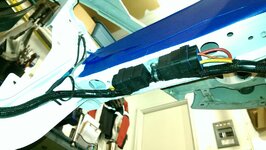
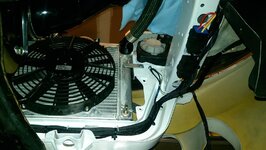
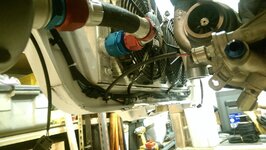
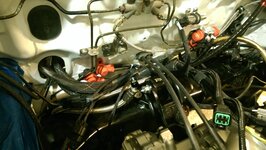
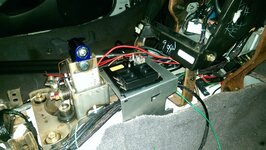
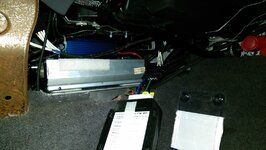
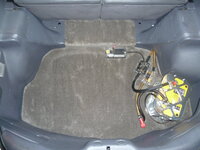
As well, I am using an electric water pump and pump controller (Davies Craig EWP115 8050 kit), so I will be using the ECU fan HI and LOW signal wires (Pin 20 and 21 on 2G ECU) cut and spliced to the electric pump controller instead. This way, the water pump controller will turn on/off the fans instead of the ECU. I have combined the green/orange and green/black wires at the fuse box to the pump controller fan signal wire.

I know I could have made it easier on the wiring side and deleted the fan LOW relay altogether in this circumstance considering that i am using the external pump controller, but I kept the wiring like this for reference if someone is still using the factory ECU to control LOW and HI signals from pin 20 and 21.

Just confirming that this would work properly. From looking at it, it should just fine but I wanted agreement from others.
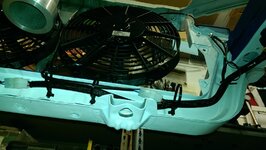
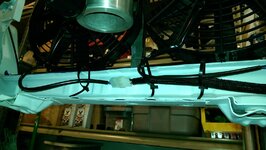
 
Last edited:
As an FYI, everything works just fine. With the water pump controller disconnected, the ECU powers the fans, and when the water pump controller is connected it has control and override. The fans turn on in HI and work very well.
 
Last edited:
I attached a few pictures of the build with the twin relay / twin fan setup on my custom C&R race radiator.
 

Attachments

  • IMAG0094.jpg
    IMAG0094.jpg
    203.7 KB · Views: 170
  • IMAG0096.jpg
    IMAG0096.jpg
    207.1 KB · Views: 163
  • IMAG0099.jpg
    IMAG0099.jpg
    149.4 KB · Views: 165
  • IMAG0105.jpg
    IMAG0105.jpg
    215.2 KB · Views: 159
  • IMAG0106.jpg
    IMAG0106.jpg
    203.6 KB · Views: 161
  • IMAG0111.jpg
    IMAG0111.jpg
    232 KB · Views: 164
  • IMAG0114.jpg
    IMAG0114.jpg
    244.7 KB · Views: 168
  • IMAG0389.jpg
    IMAG0389.jpg
    243.8 KB · Views: 178
  • IMAG0595.jpg
    IMAG0595.jpg
    208.3 KB · Views: 173
  • IMAG0371.jpg
    IMAG0371.jpg
    204 KB · Views: 164
  • IMAG0375.jpg
    IMAG0375.jpg
    210.9 KB · Views: 157
Here's a few more along the way at different points.
 

Attachments

  • 999.jpg
    999.jpg
    254.8 KB · Views: 130
  • 998.jpg
    998.jpg
    249 KB · Views: 134
  • 996.jpg
    996.jpg
    238.1 KB · Views: 144
  • 881.jpg
    881.jpg
    265 KB · Views: 141
  • 562.jpg
    562.jpg
    208.3 KB · Views: 150
  • 561.jpg
    561.jpg
    253.6 KB · Views: 140
  • 330.jpg
    330.jpg
    204 KB · Views: 146
It turned out pretty good; the car was a complete ground-up build. I would do some things differently, but it was a customer car, not my own. All in all, it was a lengthy job with a ton of time put into it. Take it as a learning experience.

Car also made nice power too for 91 octane and then we added like 3 gallons of e85 to a tank of crap gas and turned it up a little bit. If it was on race fuel or straight E85 it could have easily done mid/high 800's AWHP with about 15-18psi more boost.

It is a 2.3L steel rod 6-bolt with a BW S366 and plenty of goodies on it.
 

Attachments

  • 1012.jpg
    1012.jpg
    64.5 KB · Views: 99
I mounted it like this -- it is floating; also super quiet this way since there is no harmonic resonance through the frame. Plenty sturdy, not going anywhere.

Pump controller was installed inside the car when i did all the custom wiring and ecu and harness stuff.
 

Attachments

  • 561.jpg
    561.jpg
    253.6 KB · Views: 141
  • 550.jpg
    550.jpg
    255.9 KB · Views: 123
  • 548.jpg
    548.jpg
    201.2 KB · Views: 132
  • 547.jpg
    547.jpg
    205.7 KB · Views: 138
  • 514.jpg
    514.jpg
    277.3 KB · Views: 130
  • 333.jpg
    333.jpg
    215.8 KB · Views: 122
Awesome Tim!!!
 
That wiring harness you made looks great, nice work!!

Thanks, pretty much the entire wiring harness for the car was redone from scratch; body and engine harness. Here's more pictures. Only stuff I didn't touch were the door harnesses and tail light harness. I redid everything from the fuel pump forward and removed all the excess junk.
 

Attachments

  • 1037.jpg
    1037.jpg
    217.2 KB · Views: 104
  • 350.jpg
    350.jpg
    236.8 KB · Views: 130
  • 348.jpg
    348.jpg
    226.4 KB · Views: 112
  • 344.jpg
    344.jpg
    216.6 KB · Views: 129
  • 229.jpg
    229.jpg
    240.7 KB · Views: 117
  • 180.jpg
    180.jpg
    220.5 KB · Views: 101
  • 172.jpg
    172.jpg
    275.6 KB · Views: 127
  • 089.jpg
    089.jpg
    209.6 KB · Views: 124
  • 040.jpg
    040.jpg
    203.8 KB · Views: 132
  • 028.jpg
    028.jpg
    141.9 KB · Views: 125
  • IMAG0263.jpg
    IMAG0263.jpg
    289.5 KB · Views: 105
  • IMAG0265.jpg
    IMAG0265.jpg
    214 KB · Views: 103
  • IMAG0514.jpg
    IMAG0514.jpg
    275.2 KB · Views: 114
  • IMAG0536.jpg
    IMAG0536.jpg
    292.1 KB · Views: 102
  • IMAG0539.jpg
    IMAG0539.jpg
    274 KB · Views: 97
  • IMAG0540.jpg
    IMAG0540.jpg
    222.8 KB · Views: 109
  • P1050729.JPG
    P1050729.JPG
    62.4 KB · Views: 115
  • P1060054.JPG
    P1060054.JPG
    259.7 KB · Views: 115
  • P1060059.JPG
    P1060059.JPG
    233.9 KB · Views: 95
  • P1060073.JPG
    P1060073.JPG
    319.7 KB · Views: 99
Thanks, pretty much the entire wiring harness for the car was redone from scratch; body and engine harness. Here's more pictures. Only stuff I didn't touch were the door harnesses and tail light harness. I redid everything from the fuel pump forward and removed all the excess junk.

Those pictures, you're just showing off now, LOL!! I seriously wish I had the time and patience to do that with my 1G... Someday...
 
It was LOTS of time, and things got added on over and over. Build ended up taking over 3 years on my end alone.

Full teardown, rebuild / replaced nearly every fastener on the entire car, refinished the subframes, all new suspension, all electrical, all plumbing, body work, paint work, built everything in the engine bay and all the driveline, etc. Sooo much time....

Only things that were reused on the entire car was pretty much the brakes (which he replaced later on), the borg warner S366 turbo, and his ECU (just an AEM V1).
 
Meh, I'd be more impressed if it were all wireless/wifi. I mean, it is almost 2018 :)

Out of curiosity, what would you have done differently with the build?
 
Meh, I'd be more impressed if it were all wireless/wifi. I mean, it is almost 2018 :)

Out of curiosity, what would you have done differently with the build?

Well, aside from not taking the job? LOL, I would have done an aluminum rod instead of the steel rod motor, and a Garrett GTX4088R divided T4 0.95 housing instead of the open T3 0.91 housing Borg S366. Or I would have done an FP/Xona 82/67 or 95/67 with a Tial V-band housing. I would have done the exhaust manifold differently, and would have done a Haltech Elite 1500 with a digital dash and Haltech's M&W ignition box and their wideband O2 setup. Wiring wise, I would have changed a few things more up and spent more time on it (which is only a learning experience and a cost issue).

I'm happy with most of how it turned out. It was reliable, made killer power, and everything worked the way it should. I had a manual toggle electric power steering setup on it, the electric water pump, a saturn 200A alternator, and simply 1 accessory belt for the alternator. No BS, no issues, and the car drove great with the power steering off. With it on, with the crappy tires that were on it, and the crap brakes (Baer evo brakes), the car was scary at even wastegate spring boost in the 500's on the most conservative tune. It would instantly light the tires up and if you did a 3rd gear pull it would be a handful. I would have definitely changed the coilovers to different ones, definitely different brakes, and different wheels/tires. The wheel offset pushed the tires outside of the body lines and I didn't like how it drove like that. And the muffler, I didn't like the Tanabe muffler he wanted; just not my type of exhaust tone.

The owner has done some aesthetic stuff since i sent it to him, so this is what it looks like now in the attached photos. I shipped it to Netherlands in the spring of 2017, and it now resides in Turkey.

The car came to me with the gold wheels on it, then the customer wanted the silver wheels that were installed with the bad offset, and then he changed it up to white when the car was received.

Though it has a 95-96 wing on it with gold wheels, the car was a 40,000 mile 1997 GSX.

------------------------------------------------------------------

The big parts of the build include:

Block -
Magnus 6-bolt 2.3 components, 2.4L 100mm billet crank, Pauter rods, 85.5mm 8.5:1 Ross stroker coated pistons, ARP main studs, Mitsu oil pump, BSEK, ACL HX series main and rod bearings, Fluidampr crank pulley.

Head -
6 bolt cylinder head, Supertech STD size intake/exhaust valves, lo-rider seals, Supertech guides, Supertech high pressure dual springs and Ti retainers, Kelford TX288 cams, HKS cam gears, ARP 8740 head studs (we were not planning to go above 35psi so no need for L19's), OEM MLS head gasket, Kiggly HLA. Mild port work. Frontline Fabrication billet valve cover, billet CAS cover, billet COP cover, billet water pump blockoff inlet and outlet -16AN, Zaklee timing cover, Gates Kevlar timing belt. Custom Fathouse fab coolant expansion tank w/ Stant 32psi GM style double locking rad cap, coolant overflow tank and breather tank w/ K&N panel filter.

Intake -
Beyond Redline SMIM (last production one made; I have the prototype on my car), Custom Fathouse Fabrications 3" IC piping w/ Tial BOV and ETS large core intercooler. 4" intake pipe w/ K&N RE-0860 air filter, Vibrant wiggens style clamp at 70mm S90 throttle body.

Fuel -
RCI 2200cc injectors, Walbro 255HP in-tank pump, rewired w/ 1x Signalstat 192 2-signal relay, feeding a Walbro 255HP in-line pump, -6AN feed and return, Fuelab in-line filter, Fuelab AFPR, Aeromotive fuel rail.

Ignition / Electrical / Cooling -
2G TPS, NGK BR8ES plugs, 1990 CAS w/ modified trigger wheel, Kiggly 12-tooth crank sensor V2, AEM EMS V1, AEM 5 bar MAP sensor, GM IAT sensor, Dynatek ARC-2 ignition, ignitor installed, all custom electrical harnesses for 90% of body / power / engine, Defi Gauges, AEM WBO2. Saturn 200A alternator w/ modified Jay Racing rear mount bracket, Renault Clio Hydro / Electric power steering pump w/ custom -6AN high pressure lines / sleeved w/ Derale 13310 in-line -6AN cooler mounted on frame rail w/ in-line return side low pressure crack valve and Carlton Bates / Cole Hersee 24059 solenoid, Davies Craig EWP115 electric water pump and controller, 2x SPAL 30100364 puller 11" fans w/ SPAL FRH fan harnesses w/ relays, custom C&R race radiator -20AN in/out (same as my car). 300M coils w/ my wiring harness. XRP HS-79 -20AN upper rad hose, Aeroquip Startlite -16AN lower rad hose to water pump and to block. 1990 style oil filter housing with Setrab external oil cooler. Main fuse box rewired and located to glovebox, Tein EDFC controller to center console, custom relay and fuse panel behind / adjacent to shifter assembly for interior components.

Exhaust / Turbo -
Borg Warner S366 T3 0.82 housing, Defi titanium turbo blanket, Tial MVR 44mm wastegate, double blue springs, Fathouse Fabrications custom 3" stainless turbo back exhaust w/ Tanabe racing muffler, and wastegate dump tube, heat wrapped downpipe and wastegate dump, Dragonfly performance open T3 tubular manifold.

Wheels / Brakes -
Goodridge braided lines, Advan RG-II wheels, JDM spindles for Evo brake conversion, Baer crapass brakes front and rear with Evo calipers.

Frame / Suspension / -
Completely restored front and rear subframes, all brand new suspension components (all control arms, fasteners, all poly bushings, etc.), JDM spindles, near rear spindles, new wheel bearings all around, OEM driveshaft, Torque Solution billet engine and transmission mounts, Torque Solution shifter bushings, shifter cable bushings, driveshaft carrier bushings, RMDSM front sway bar, Billet rear diff bushings, billet subframe bushings front and rear. Tein Type Flex coilovers w/ thrust washer and Torrington bearing sets and TEIN EDFC controller, Ingalls rear camber kits.

Drivetrain -
TMZ Performance Stage 4 Transmission Rebuild (Evo 3 1st/ DSM 2nd/ Evo 3 3rd and 4th/ DSM 5th gearset) w/ 4-spider center diff, and detailed/deburred/shot peened / cryo treated gearset. Custom -6AN breather to external breather tank.
TMZ Performance Transfer Case Rebuild, shotpeened gearset.
TMZ Performance Quarter Master street twin disk clutch with street friction disks, OEM TOB, Competition Clutch fork
TMZ Performance Stage 3 Rear Differential Rebuild, shotpeened gearset DSM 5-speed ratio, Evo clutch type rear differential w/ TRE Ninja cover, flipped clutch pack, HD bearing, Frontline Fabrication 2g billet rear differential cover clearanced for TRE Ninja cover
DSS Stage 2 front axles, DSS stage 5 rear axles w/ Evo 300m pro series 6-ball inner CV's
B&M Shifter Assembly, ARP Wheel Studs

Interior / Exterior -
Bride Stradia II Reims seats w/ modified Bride RO brackets, MOMO steering wheel w/ NRG quick release and short hub, DEFI gauges, Tanin Auto Electronix modified gauge cluster, battery relocation with 0-gauge shielded / sleeved wiring (gold in pictures). Carbonetics carbon front lip spoiler, removed all dumb stickers and repaired bodywork.

On top of all this stuff, the car also got front half body work and paint work (engine bay / rad support / frame rails, etc.) by me, and a lot of other big details.

I am forgetting ALOT of things, if you had questions i could answer in further detail. I have 3 expandable folders of receipts from the job.
 

Attachments

  • 20139921_1971381766474941_4121460261877679384_n.jpg
    20139921_1971381766474941_4121460261877679384_n.jpg
    69.2 KB · Views: 96
  • 20155850_1971381769808274_2291943519629037388_n.jpg
    20155850_1971381769808274_2291943519629037388_n.jpg
    47.8 KB · Views: 81
  • 11928696_464114473768923_1460025967_n.jpg
    11928696_464114473768923_1460025967_n.jpg
    139.7 KB · Views: 89
  • 639.jpg
    639.jpg
    153.7 KB · Views: 95
  • 640.jpg
    640.jpg
    204.9 KB · Views: 89
  • 1733.jpg
    1733.jpg
    288.4 KB · Views: 91
Last edited:
I love the quality of work u did. To each their own but I prefer a stock body 97 gsx with rpf1 enkeis :dsm::D

I agree, I prefer a stock body 2GB with nice clean wheels. The car had Advan RG-D's on it when it came to me in gold, which looked nice, but were the wrong color. The RG-II's that the customer wanted instead were totally the wrong offset and were a poor choice. His money, his car.

I added build part details in post #16.
 
The goal was a "reliable" 700-800HP capable setup as a street car. On RON 94 (USA 91 octane). If he had E85 or race fuel available the tune could be redone or boost turned up. It made 630AWHP on a super safe timing (with a bunch of torque pulled out to keep the driveline happy) on several year old 93 octane, so easily below 87 octane LOL; I added like 4 gallons of fresh 93 octane to ancient gas to knock it up a little. 27psi.

We pumped out about 4 gallons of this crap/93 mixture and added 4 gallons E85 and had it at 32psi making 720AWHP with ALOT left on the table.

This setup was made to run on pump or e85 or race fuel. Everything was made to handle everything that the S366 could throw at it and 50+psi boost if necessary (other than head studs upgrade; I put them as a safety in case the customer was an idiot and wanted to throw allz the boosts at it LOL. I did make an E85 tune as well after dyno time and was fooling around with it at 42psi, and it was an absolute riot to drive doing easy rolling 3rd gear burnouts and squirrelly in 4th gear.

The customer didn't have e85 available in Netherlands or Turkey, i believe he has access to race fuel now and maybe e85 in the future.
 
Support Vendors who Support the DSM Community
Boosted Fabrication ECM Tuning ExtremePSI Fuel Injector Clinic Innovation Products Jacks Transmissions JNZ Tuning Kiggly Racing Morrison Fabrications MyMitsubishiStore.com RixRacing RockAuto RTM Racing STM Tuned

Latest posts

Build Thread Updates

Vendor Updates

Latest Classifieds

Back
Top