The Top DSM Community on the Web

For 1990-1999 Mitsubishi Eclipse, Eagle Talon, Plymouth Laser, and Galant VR-4 Owners. Log in to remove most ads.

Please Support Fuel Injector Clinic
Please Support ExtremePSI

Street Build The most reliable daily - 1G AWD N/A

This site may earn a commission from merchant
affiliate links, including eBay, Amazon, and others.

This site may earn a commission from merchant affiliate links, including eBay, Amazon, and others.

livedsm4g63

15+ Year Contributor
1,214
151
Mar 1, 2008
Auburn Hills, Michigan
Its time to build another 1G AWD N/A!!

As one knows, N/A's dont produce a lot of power..Itll prolly stay that way. This car is going to made with reliability in mind. For now we will start with the basics. Recently I bought a 1990 Plymouth Laser RS from an old guy in my area. Car has 82,000 miles on the clock. Yes 82,000 miles. It is also equipped with a 2.0 4G63 non turbo motor. Mind you, this beast has a 9:1 compression ratio. Little better then the turbo'd version, with a 7.8:1 ratio. Right now my goal is to fix up this fwd pos and drive it around. Im currently looking for a 1g AWD shell I can place this motor into. In time, Im sure I will find one.

Here is the fwd pos in my garage the night I bought her.
IMG_1184.JPG


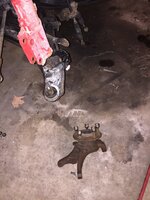
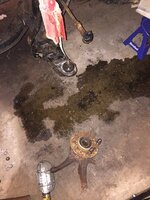
First day I thought it would be great to replace the valve cover gasket.
IMG_1206.JPG


This reminds you, we are working with old warn out cars... Haha, spark plug wire were dry rotted.
IMG_1207.JPG


This is how the front end looked before I started. Check out the driver side bumper support frame.
IMG_1222.JPG


Chain meet dsm.
IMG_1205.JPG


After that I heated up the frame and was able to pull down the support. This is what I came up with.
IMG_1223.JPG


I did run into an issue though. The frame wouldnt budge after this. Didnt matter how much heat I gave it, it was almost stuck in place. So I gave up for the night. Before I left I decided to mock up the bumper and realized that the driver side bumper shock will have to be removed. This is due to the fact that, now there is no room for it to fit in the so called "frame". My plan is to drill the shock to release pressure, then cut the bumper shock off. Once this is done, the bumper should fit on without a problem. If this happens to fail, my mig welder should be up and running tonight too. :)
 
Last edited:
Well tonight I received my new lead for the welder. The old one was so clogged that it wouldn't feed wire.
5.jpg


Here she is all done up and ready to weld on a bumper!
index1.jpg


As I said I had to cut off part of a bumper shock. I first drilled through it allowing the gas to escape. Heres a pic of it cut off. Dont mind baby number 1 in the back ground :)
index.jpg


After that I wanted to see how it would fit on the car.
2.jpg


Not bad but the drivers side is sticking out. I guess it happens. Some screw can fix that though.
3.jpg


Over all not to bad. As a $600 car at least it has a bumper somewhat on. Next thing to do is to use the mig welder to mount it to what is left of the mounts. It doesn't fit all the way onto the passenger side studs but that's OK. My plan is to weld it directly to the mounts from the top, that way if it ever needs to come off I can just use a cutter. No reason why it would ever have to come off anyways. Again, this shell will only be around until I find my awd shell. Once that time hits, this car will be either put up for sale or sent to a junk yard. Haven't made up my mind yet. I hate doing that because Chuck Norris sheds a tear every time a dsm is sent to its grave.
 
Well its time for an update.

Over the last weekend I decided it was time to fully mount the bumper, aka weld that B on. The passenger side bumper support was able to start on the studs of the crash frame. From there I was able to gently kick the bumper onto the studs. I was then able to get a few nuts started and Bam, passenger side attached. The major problem was that drivers side support. From all the hammering and bending on that support, I had a stud fall out from the vehicle side. In my opnion this helped me. I was then able to use a nut/bolt combo that would allow the bumper to bolt to the frame. However, after I had it started, the bolt would only tighten down to a gap of about 1 inch. But it was attached. From there I took the welder and went to town. Here is what ended my weekend.

IMG_1240.JPG


IMG_1239.JPG


Not bad over all. I placed the new light assembly on however now the hood does not want to shut. The accident bowed the hood. It also damaged the latch itself. That is next on the list of replacements.

Following the install of the bumper I figure I would celebrate with a short ride. I took the vehicle out and what do you know.....it starts to sputter under load. I pulled the plugs and they were gapped to about 60-70 thou. Spec is 44 thou. Pretty sure they were the original plugs from 1990.

After replacing the plugs, the thing runs great minus one thing. The charging system. Before start up my battery was at a healthy 12.4volts. After I started the vehicle my volts shot to 11.2v and stayed there. Another problem was that I had the break light, coolant light, and battery light all on at once. When this happens it means you have a major charging system failure. I traced the wires, all check out good, so I moved to take off the alternator. Ripped it out last night and took her to autozone. The bench test showed the alternator was only putting out 11.2 volts, matching what I saw in vehicle. Long story short, I ordered a 90 amp replacement. I figure the extra juice will help during the michigan winters. My plan is to place the alternator on tonight and I will be able to start daily driving this beast.
 
A little update on the charging issue.

With some help from the forum, I was able to trace the alternator relay wires to this location... As you see the white wire has a larger then normal resistance. :) It only took ripping out half of the engine bay harness.

IMG_1254.JPG


After I repaired that I threw everything back together and to my surprise, the car still did not want to charge. Knowing that there was a chance the voltage regulator was bad on a new alternator, I ordered a replacement a few days back. Luckily enough, the replacement came in yesterday allowing me to swap alternators after I found the one I had was bad. After placing the new alternator on the vehicle, I get 14.3v at the battery! The beast can now be driven. All the lights off!

IMG_1256.JPG
 
Interesting to say the least. This could be done with a turbo car too correct? Just delete the turbo, up the compression, maybe make it a stroker for extra displacement? Or am I way over simplifying it?
 
You are correct, if you have ECMlink and do an engine build with higher compression. If you dont want to spend a lot of money on it, you buy a donor that has low miles and all the parts youll need for the swap. IE N/A motor, harness, injectors, fuel rail, ecu, maf, intake and you find an awd shell.
 
Well.. sadly to say my plans have been brought ahead. A guy coming the opposite way lost control and swerved into my lane. Just happy to walk away. Still have pain in my chest so Ive been unable to do any physical work. (even though I found out the hard way.) For now, here is how she sat after the dude hit me.

IMG_1611[1].JPG


IMG_1612[1].JPG


The good news! The front bumper support didnt move!

Anyways I was able to get it to my house after paying the costs of getting it out of impound... (I paid 100 more for the car then the cost of the impound cost..but I gota get that engine!)

Here she is in the garage.

IMG_1620[1].JPG

IMG_1638[1].JPG


And this was the heart breaker. Chances are all the valves are trashed.
IMG_1637[1].JPG


After being in the crash I figured I would pull the engine and finally buy a awd shell. Well...I did it. A week after the accident I went up to Traverse City to buy a panda. For the amount of miles the thing has, Im very surprised of the condition it was in. Sadly to say, this trip made made me aware that my chest was still hurting. After further xrays, I was told that I more then likely had fractures, etc. So I went on an ordering spree the last week. (You'll see more in the coming days.) For now, lay your eyes on the shell.

IMG_1633[1].JPG
IMG_1634[1].JPG
IMG_1635[1].JPG
IMG_1621[1].JPG
 
Last edited:
Thanks guys. All I could do was file a mini tort and I was able to recover 1k. (MI no fault insurance, dumb) They told me it would cost 3200 to fix, LOL, if they could fix it for 3200.....right... Anyways, I know sometimes things happen and I took it as that. Im just happy it wasnt the evo! If it was the evo I would have been going ham.
As for the driveshaft, its said to be in good condition with a few cracks in the carrier bearings. U-joints are decent however I have a jnz rebuild kit coming in to rebuild it. Figure its better then being somewhere and having a u-joint come loose... haha. Also, the lobro boost/rebuild kit came in from amazon. Glad to see they still had that in stock! From what you have said, its a harder to find part.
 
Since it was such of a nice weekend out I figured I better start doing some work. As you can see, the transmission is out! Yes I was lazy and didnt feel like disconnecting the torque converter from the driveplate. I figure Ill mess with that once its out of the vehicle.

IMG_1668.JPG


IMG_1669.JPG


And due to the nice weather, I figured it was time to take my baby to the Spa.

IMG_1666.JPG


I should have more parts arriving today. More pictures to come. Next on the list, rip out the engine, TCU, ECU along with a bunch of random parts you can no longer buy. Then to the yard to recoup some money.
 
A few updates.
I received some more parts!
Fresh off the truck from New Mexico. Just crossing my fingers that it shifts ok. Manual Trans from a 1g.
IMG_1671.JPG


And my order from JNZ arrived!
Here you'll see the driveshaft rebuild kit, new nuts and bolts for the driveshaft, a few shifter clips and a/c delete bolt kit.
I also received the oem flywheel I bought from a fellow member on here. @black92_tsi_awd Thing looks good, no cracks or severe heating spots. My plan is to send this to the machine shop and have them give me a fresh surface. Ill wait to do this before I'm ready to drop in the engine and transmission. Limit the amount of corrosion before it gets installed.

IMG_1675.JPG


Next I thought it would be best to start working on the car. Ive been wanting to get the wrecked car out of my garage so I can park the evo on the side of the garage that has a functional garage door opener. Well, after only an hour this is what I came up with.

IMG_1674.JPG

IMG_1673.JPG


Its really amazing how fast things go when you don't care about the body of the vehicle. Made it a million times easier to just rip and cut everything I wouldn't need. Next on the list is to pull the ECU, TCU, a few hoses, clips and connectors. After that she will be going to the scrap yard.
 
Well its been a few days since I last updated this, thought today would be as good as any.
More parts have arrived!
Heater hoses, clutch line from the master to slave, trans dust shield, transfer case bolts, oem flywheel bolts, oem pressure plate bolts, TOB spring, new seals for the front wheel bearings, intermediate axle shaft with bearings and seals.

IMG_1703.JPG


IMG_1705.JPG


I didnt take any pictures of doing the intermediate axle because I didnt like the way it turned out. After install of the new parts, the shaft isnt as free as I would like it. I believe something is binding. The parts I used were from the "make the kit yourself" and I think Ill just order the JNZ kit that has all oem parts.

My little helper decided to join me for a day of fun! :)
She had bought me a creeper for my birthday and she wanted to put it together. (Because it isnt a present if I have to put it together, so I hear.)

IMG_1708.JPG


Next I moved on to the engine. Tearing most of the stuff off, this is what I ended up with.

IMG_1706.JPG

IMG_1707.JPG


Im a little unsure on what to do at this point. I see no visible signs of the pistons hitting the valves. Id hate to put it all back together to find out one of the valves have been tweaked. Granted it only takes a few hours to rip off the head. Still debating if I want to run it or run my buddies. Time will tell.

After I got off the head I wanted to finally unwrap the transmission I received. Well...this is how I found it after the unwrap. After talking with the person I bought it off of fleabay from, he is going to contact the shipping company and see if they cover it as it was not shipped from his location like this. Time will tell. Jacks has new end cases for 80 bucks. I may just bite the bullet and buy it for now. Maybe someone will eventually refun

IMG_1709.JPG


Next it was time to pull the knuckles. Job done. I tried to use my press to press the hubs out however, no luck. I may drop them off somewhere so they can press them out. Putting them in is a breeze. Dont pay att to the dirty floors :p

IMG_1713.JPG


IMG_1713.JPG

IMG_1715.JPG


Next on the list....No idea, Ive started too many things, haha.
 

Attachments

  • IMG_1713.JPG
    IMG_1713.JPG
    340.6 KB · Views: 46
  • IMG_1715.JPG
    IMG_1715.JPG
    356.1 KB · Views: 52
Last edited:
Well, Ive decided to start working on my talon again. Ive had all the parts to complete it however Ive been rather lazy to be honest. Being that the nice weather was coming out I figured it was time to spend some time in the garage.

I started with bandaging up the front end. I placed new ball joint, tie rod ends, wheel bearings, rotors, calipers and pads. I had to stop here because the old bolts were too stripped. I ended up ordering more from JNZ and they fit like a glove. I just need to mount the calipers, etc.
IMG_1834.JPG


Next up was taking care of the engine. First I swapped over the manifold and CAS from the old engine.

IMG_1833.JPG


Next I had to install the machined flywheel and an oem exedy clutch. Also placed a new TOB and retaining clip in the transmission. From what you saw earlier in the thread, the trans was damaged in shipment. The shipper was kind enough to refind me enough money to buy a new end cover from Jacks transmission. With all of that together, this was were I ended yesterday...Shes ready to drop in.

IMG_1839.JPG


Hopefully tonight I can rip off the hood and set her in. Fingers crossed the head I got from my buddy is still good. When turning over the engine by hand it does seem a little weak, but time will tell. Worst case I have to have my old head rebuilt with evo valves.

Once the engine is in I believe my next task is to get the tank mounted and feeding fuel to the rail. I would like to get everything hooked up so I can start it up to verify compression. Time will tell.
 
Last edited:
Well I decided to rewind a little. After placing the engine in the car I didnt feel comforable with the mounts I had so I pulled the engine back out. Since it was back out I said ef it, and pulled the head to ensure the valves were good. I had a local shop deck the head, install new valve stem seals and do a valve grind. (I had two heads dropped off, why not. Im sure me or one of my friends will ruin a head at some point.)
IMG_1891.JPG


Beyond that I also ordered some Avid motor mounts. Only pic I could find but I will be using all of the mounts.

IMG_1869.JPG


Here she is ready to go back in.

IMG_1903.JPG


Next step, install the engine and get the engine bay situated. Install front axles, re rebuild front half shaft, new brakes and new tires.
 
Also, the lobro boot/rebuild kit came in from amazon. Glad to see they still had that in stock! From what you have said, its a harder to find part.

When I rebuilt my driveshaft last year the OEM Lobro Boot was on galactic backorder, it might still be, I'm glad that I'm not the only DSM'er who uses the Febest parts.

Btw, did the machine shop say if the valves were bent at all from being in the accident?
 
You should clean the engine bay first ;)
BAH.. This isnt a galant restore :p
I do need to remove the firewall padding. Im afraid that if a spark ever flies the whole engine bay would go up in smoke.


When I rebuilt my driveshaft last year the OEM Lobro Boot was on galactic backorder, it might still be, I'm glad that I'm not the only DSM'er who uses the Febest parts.

Btw, did the machine shop say if the valves were bent at all from being in the accident?

When I ordered the lobro it wasnt on backorder however there was limited quantities. That was back a few months though so I cannot speak to if the company still has them.

And crazy thing...even though I broke the cam...the machine shop said the valves were not bent. Meaning I could have used it the way it was. I guess you can never be too sure. Now, I dont have to worry about it. :)
 
Well I was able to get the engine installed.
IMG_1910.JPG


Let me just saw wow on the avid motor mounts. I found it easier to first install the rear, get the front in but loosen up the mount to block so the engine can slide. Next I installed the trans mount while leaving it as loose as possible. Finally, I already had the timing belt side motor mount installed on the engine, the hard part was making it fit in the hole.. See below.

My little trick to get it aligned.
IMG_1909.JPG


IMG_1912.JPG


AND ITS IN!
IMG_1917.JPG


After this I tightened up all of the mounts and ITS READY TO START.....not.

After further research I remembered that this engine was from a 1990. Meaning, the coil pack and igniter are different then what the 93 had for connectors. Ive since sourced a 91-94 coil and ptu through a member. This should be in today.

To put the final touches on things, I couldnt find a under the hood wiring harness so I did what ever AWD NA needs... I found ECMlink V3 for sale..This should be shipping out today.
 
A little update.

I was able to get the passenger side new axle installed however when I started to put everything back together I realized that I didnt have an axle nut washer for either side..and the break pads I bought were not for the dual calipers...LOL. So Ill be needing to source these sometime.

IMG_1929.JPG


IMG_1930.JPG


I went ahead and put on the coolant neck as well. New gasket and some rtv does the body good. One thing to note in this picture, the linkage for the top most cable is kinked a little, as you can see. After further inspection I couldnt move the shifter left or right. So I took the linkage apart and re lubed everything. Upon taking the linkage off at the transmission I found that the plastic shoe was cracked in a few place. This may have been causing the offset in angles. So my plan is to order one of these shoes from JNZ. They've been the only ones to carry them in the past. Part number MD712919.

IMG_1928.JPG


Once that was done I decided it was time to throw in the header and radiator for mock up. Everything seems to fit. I was worried about the 02 sensor but that doesnt seem to be an issue.

IMG_1931.JPG


So the new purchases was ECMLINK because who wouldnt want to run your base NA at peak HP? :p I also picked up a set of 450cc injectors and a turbo throttle body. Mainly all of these had to be purchased because I couldnt find a 89-90 engine bay wiring harness. Oh well, I get to tune an NA at least :p
 
Support Vendors who Support the DSM Community
Boosted Fabrication ECM Tuning ExtremePSI Fuel Injector Clinic Innovation Products Jacks Transmissions JNZ Tuning Kiggly Racing Morrison Fabrications MyMitsubishiStore.com RixRacing RockAuto RTM Racing STM Tuned

Latest posts

Build Thread Updates

Vendor Updates

Latest Classifieds

Back
Top