The Top DSM Community on the Web

For 1990-1999 Mitsubishi Eclipse, Eagle Talon, Plymouth Laser, and Galant VR-4 Owners. Log in to remove most ads.

Please Support Rix Racing
Please Support Fuel Injector Clinic

2G Rear seat delete

This site may earn a commission from merchant
affiliate links, including eBay, Amazon, and others.

This site may earn a commission from merchant affiliate links, including eBay, Amazon, and others.

RidleyNoah

Proven Member
241
33
Jul 3, 2014
Redondo Beach, California
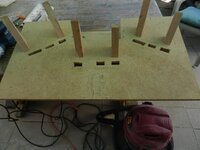
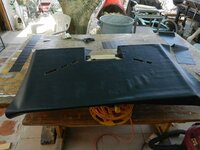
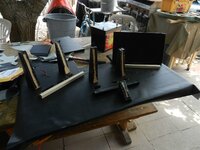
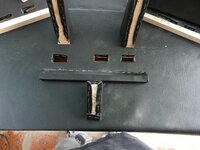
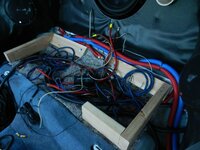
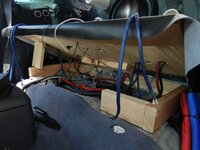
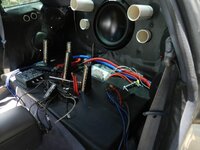
Started working on my rear seat delete. I got the deck section in yesterday. 5/8" MDF hinged in the back for ease of access underneath. Also had to hinge the side wing sections in order for it to hinge (tight fit). I now need to do the front panel. I'm doing that out of a 2" x 10" (cut down to about 8"H). When I get that cut and ready to install I'll show you how I'm attaching it. I'll finish everything with charcoal gray speaker box carpet and then install a mono amp behind the driver, a four channel amp behind the passenger and a 12" sub woofer in the center.
You must be logged in to view this image or video.
 
Last edited:
5/8" MDF? Sounds very heavy. Have you considered a nice thin poplar plywood? Its very stable and often used in boat interiors to save weight. I am watching closely to see what you come up with, keep up the creativity
 
Actually, I'm using 1/2", not 5/8". I was going to use 5/8" plywood but decided on 1/2" mdf instead. It's not too heavy yet.
I'm hoping to get the front section cut out, carpeted and installed this week.
I'm waiting for my mono amp and sub enclosure (be here this week).
Hopefully have everything completed next week.
I was originally going to mount the amps on the top side of the deck but now I think I'm going mount them on the underside. I'm also going to recess the sub enclosure as much as I can. The enclosure is 13" deep and I have about 8" of space underneath so the will be approximately 5" of enclosure above the deck. No exposed wiring, should look pretty clean.
 
Oops LOL didn't make the connection there! well here u go good sir! now I built this like 3 years ago now. I plan on redoing it eventually along with relocating both batteries to the spare wheel well under the box but ill save that for a future date when im done with my racecar LOL
 

Attachments

  • Amp Rack 1.jpg
    Amp Rack 1.jpg
    245.3 KB · Views: 204
  • Amp Rack 2.jpg
    Amp Rack 2.jpg
    269.4 KB · Views: 186
  • Amp Rack 3.jpg
    Amp Rack 3.jpg
    257.1 KB · Views: 177
  • Amp Rack 4.jpg
    Amp Rack 4.jpg
    336.6 KB · Views: 237
  • Amp Rack 5.jpg
    Amp Rack 5.jpg
    273.7 KB · Views: 203
  • Amp Rack 6.jpg
    Amp Rack 6.jpg
    270 KB · Views: 379
  • Amp Rack 7.jpg
    Amp Rack 7.jpg
    195.3 KB · Views: 192
Nice job on what I've seen so far! That looks like a lot of work.
 
I got my front panel cut and shaped today. Cut out of a 2" x 10".
You must be logged in to view this image or video.

I countersunk 3/4" holes in the top for the bolts I'll be installing and then drilled all the way through with a 5/16" bit, drilled holes in the front for wiring and got it carpeted.
You must be logged in to view this image or video.

I removed the back seat latches to expose the existing holes. I'm going to install 6" long bolts down through the top of the front panel and use toggle bolts to attach down through the seat latch holes. The panel spans from side panel to side panel and sits right where the front of the back seat was. I'll have it attached tomorrow and will post more pics.
You must be logged in to view this image or video.
 
A few things I got done today. I got the front panel mounted, ran my power wire to a distribution block.
You must be logged in to view this image or video.

I also got the deck carpeted, the amps mounted and the power and ground wires run to the amps. I should have everything completed tomorrow.
You must be logged in to view this image or video.
 
Here's a pic of my rear seat delete project completed.
You must be logged in to view this image or video.
 
Support Vendors who Support the DSM Community
Boosted Fabrication ECM Tuning ExtremePSI Fuel Injector Clinic Innovation Products Jacks Transmissions JNZ Tuning Kiggly Racing Morrison Fabrications MyMitsubishiStore.com RixRacing RockAuto RTM Racing STM Tuned

Latest posts

Build Thread Updates

Vendor Updates

Latest Classifieds

Back
Top