The Top DSM Community on the Web

For 1990-1999 Mitsubishi Eclipse, Eagle Talon, Plymouth Laser, and Galant VR-4 Owners. Log in to remove most ads.

Please Support Kiggly Racing
Please Support ExtremePSI

2G please help timing belt.

This site may earn a commission from merchant
affiliate links, including eBay, Amazon, and others.

This site may earn a commission from merchant affiliate links, including eBay, Amazon, and others.

mustracetsi

10+ Year Contributor
214
17
Apr 14, 2012
bergen county, New_Jersey
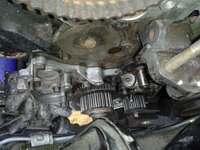
On my last post I posted that my water pump crapped out on me. Note motor still in car. Get everything out. When it came to loosen the timing belt via tension, I notice the cam gear closest to the headlight moved slightly counter clockwise. I put new water pump put the tensioner back on all in proper position from what I read on several treads and pic I saw. I put timing belt from bottom up.
When I got to the cams I moved the cam gear that slightly moved counter clockwise to its position and slipped the belt on. Then released the pin on auto tension made sure belt is tight. Rotated motor to see if it lines back up and that same cam still looks the same rotated the motor couple more times cause read it helps adjust the auto tension but still don't line up.

Need help I linking pic so you can see. Only cam I had move was the one that had moved.

1. Do I have to remove the tensioner pulley and the auto one or just the auto one and compress it again and put pin in?
2. Do I move the same cam to line up and retry it or the other one closest to fire wall.

I don't want to go wrong, I can't afford motor or new head atm and it is my dd. I didn't have any type of problem rotating motor.
If I did I would of not even try turning it as I could damage a valve or worse.

Thanks in advance and a lot of credit goes out to you guys that do this all time weather is hobby or living. I can see why now shop price is so much. Tight space and time consuming.
 

Attachments

  • 20140906_162522.jpg
    20140906_162522.jpg
    634.6 KB · Views: 91
Last edited by a moderator:
First off, if you are doing it right than you will not remove the pin in the tensioner until you have installed the belt and rotated the engine to make sure it is in time. You need to leave the pin in the tensioner and use the tensioner pulley to apply tension to the belt after installing the belt. Than rotate the engine and check to make sure it is in time. If everything is lined up than you pull the pin and measure tensioner clearance or make sure that you can re install the pin. If you don't set it properly than you will likely jump time or break the tensioner shaft.[DOUBLEPOST=1410046853][/DOUBLEPOST]
You must be logged in to view this image or video.
Judging by this pic you need to rotate the exhaust cam one tooth clockwise.
 
You must be logged in to view this image or video.
[DOUBLEPOST=1410047358][/DOUBLEPOST]Thank you now question is do I line up again or go a tooth earlier because first time I lined up I came with this results. Thank you for replying so quick a really appreciate it.
 
It's best to redo the timing from scratch. Rotate the engine until the crank timing mark lines up and the dowel pins are up on the cams.

Use the threaded rod to completely compress the hyd tensioner. You don't need to worry about installing the pin.

Remove the belt and set the timing mark for your rear balance shaft.

Put the belt over the exhaust cam and tie it in place.
If you have 2 17mm wrenches, put one on each cam bolt positioned so you can squeeze them together with one hand.

Squeeze until the marks are lined up on the inside, hold them in place and put the timing belt over the intake cam, tie it in place. You can now release the wrenches, the marks should still be perfectly even.

Now feed the belt from the intake cam around the idler pulley, pull the slack out and feed it around the oil pump sprocket. Check to see that the slack is out of the belt and that the timing mark is correct for the balance shaft.

I then jam a spring type clothes pin between the belt and the bottom of the cover to keep the belt in place.

Feed the belt around the crank sprocket, again making sure there isn't any slack in the belt, and feed it around the tensioner pulley.

Tighten the tensioner pulley to 2 1/2 inch lbs then tighten the center bolt. Loosen the threaded rod. If you mark the rod, count the turns while you're loosing the rod. Correct tension will be between 3 1/2 to 4 complete turns of the rod when there is no longer any pressure on the rod.

Check the clearance with a feeler gauge. Correct tension will be between 3.8 and 4.2mm.

Rotate the engine clockwise 6 complete turns and check all timing marks. Let the engine set for about 30 minutes and again check the clearance. If the marks and clearance checks out, button it up and run it.
 
Thank you guys, this my first time tackling timing belt and water pump. Good thing I found,well didn't find was balance is gone. Last owner did a bs delete so one less belt to worry about.
 
You do cams first with getting all marks aligned, lay the belt over the sprockets and clip the belt down on the sprockets-why the need of the two 17mm wrenches to keep the two sprockets locked down with the marks facing each other with dowel pins straight up before laying the belt over the sprockets and clipping the belt down.

Then you lace the oil pump sprocket, then crank sprocket and finish with the adjuster pulleys.

Easy as eating apple pie.

Good luck - dSM
 
Last edited:
Buy this and have no problems! http://www.jayracing.com/timing-belt-tools-c-17_229/jay-racing-timing-belt-tools-kit-p-214.html
And please before you put a new belt on clean that motor up and change the leaky seals! If your doing it without the tools the exhaust cam will always try and move a tooth off. So to fix that just start a tooth more forward that way when it moves back its dead on. If you had the timing tools the cams would be locked in place and also the auto tensioner held with tension until your absolutely ready! Its worth the $50 to have no headache and perfect timing everytime! ;)
 
Last edited:
Support Vendors who Support the DSM Community
Boosted Fabrication ECM Tuning ExtremePSI Fuel Injector Clinic Innovation Products Jacks Transmissions JNZ Tuning Kiggly Racing Morrison Fabrications MyMitsubishiStore.com RixRacing RockAuto RTM Racing STM Tuned

Latest posts

Build Thread Updates

Vendor Updates

Latest Classifieds

Back
Top