

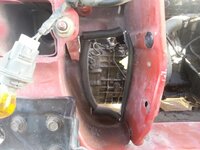
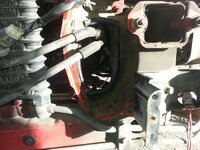
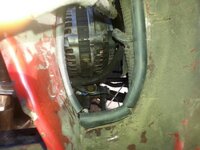
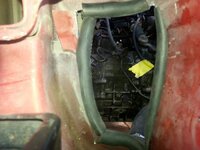
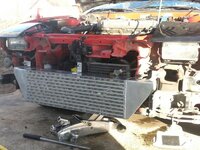
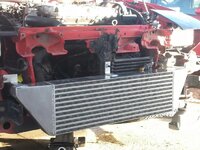
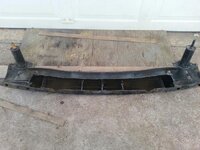
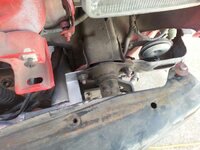
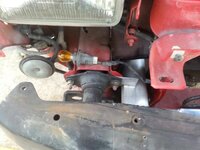
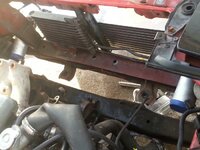
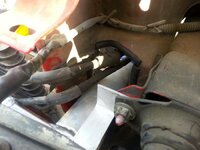
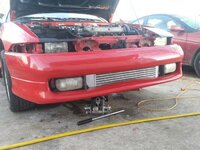
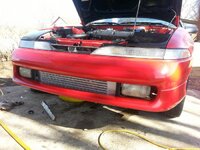
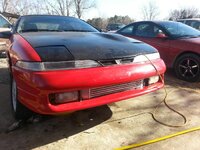
Hi all. I know there are other tech articles about how to do this install but this one retains the stock PS cooler and oil cooler in the front of the car and is very simple, even simpler with pictures so I thought I would share what I did with the rest of the DSMer's. The first pic is of the car with the bumper cover and crash beam already removed. It is a pretty simple process of removing alot of screws from the top and bottom of the crash beam once you are able to see them. To get there you will remove the center emblem, front and side marker lights so you can get to the bolt heads. Use some PB Blaster or WD-40 because these bolts have been in there along time. If you twist any of the BOTTOM screws off, don't worry, you won't be reusing them anyway but be careful on the top ones as they hold your bumper cover on so let them soak for a while with some penetrant. There are 2 bolts holding the bumper cover to the front fenders on each side as well, once you get the other bolts out it will be plain as day as what is still holding the darn thing on. They came out very easy but PB Blast or WD-40 them also. The second pic is after I have moved the PS cooler lines BEHIND the hood latch support. Be careful here and bend the lines slowly as to not crimp them closed. I almost did that but grabbed some vise grips and pinched it back open....just go slow and watch as you bend them, see pic #3. In picture #4 you will see the old overflow coolant tank bracket, instead of removing it which seemed to be way too much trouble, I just flattened it out and it works just fine and saved time and knuckle busting. Pictures 5,6,7 and 8 show the radiator support side openings that I opened up with a hacksaw blade on a battery powered sawsall. After cutting the holes open, I had to smack the verticle support that was left with a hammer to dent it in towards the middle of the front of the car. This allows ample room for the intercooler tubes to run through. If you don't dent them inwards, you will find it a much snugger fit that is why I bent them in a tad bit. It only took one smack (maybe 2) of a regular hammer as it is very thin metal. I decided to retain the PS cooler on my DD so I opened up the drivers side hole a little taller to make room for those lines and also lined the openings with vacuum tubing that I slit and cut to fit the openings to keep down metal on metal rubbing and irritating squeaks. Pictures 9 and 10 show the VRSF FMIC mounted in place and notice the PS lines on the drivers side, they will fit between the intercooler and the factory oil cooler without rubbing except where you run them by the oil cooler, they will touch the tank of the oil cooler. This is a good time to put some split vacuum line where they touch to avoid rubbing a hole in an important component, the oil cooler. Don't want a hole in that!!! Picture 11 shows the amount of material to remove from the crash beam to allow plenty of room for the FMIC. You will remove material from the inside of the inside bottom bolt of the crash beam absorber location AND on the absorber pad itself (shock looking part that has 4 bolts, now 3, holding it to the crash beam) to the same place on the other side. You will also notch the bottom of the crash beam a couple inches. I just cut the bottom even with the big round holes that were already in the crash beam and had plenty of clearance, but cut and check to be sure. There are 5 (I believe) inner supports that also need to be cut out of the inside of the crash beam. Look at the picture close and you can tell where to cut, grind or in my place plasma cut the crash beam for proper clearance. Pictues 12 and 13 show where I placed the mounting tabs of the intercooler to the inside bolts of the crash beam absorbers. You will have to drill these holes in the tabs but it is aluminum and will be easy, make sure you have the locations marked first. I did it by rubbing the tab up and down at the bolts then drilling them, it was simple. The same thing is done with the middle support, line it up and drill a hole accordingly to mate up with the threaded nut on the hood latch support. Pictures 14 and 15 are shots of the crash beam installed from the outside view and inside the engine bay view for references. Picture 16 is a close up of the drivers side radiator support opening with the intercooler pipe AND those PS cooler lines, notice plenty of room. Now I wanted to retain a stock appearance and keep my fog lights. There is room for the intercooler but you should grind the top inside fog light upper tab round so that it won't poke a hole in your nice shiny new intercooler. I also padded my intercooler in that area with some flat rubber gasket material and some spray glue that I applied directly onto the side of the intercooler for safety sake. Don't want no stinkin holes rubbed through my new pretty part!!! The last three pictures, 17, 18 and 19 show the bumper cover back on and the marker lights back in place and finally the hood closed! Viola, you are done and look you kept your fogs and your PS cooler. For a REALLY stock appearance I would paint that nice new shiny intercooler Semi-Flat Black that makes it look like just another plastic radiator if you don't know what you are looking at. Well that's it guys and gals. It was much easier than I thought it would be and I took the pictures just for you all in the case that you had questions that you just didn't know how to ask and sometimes a picture is worth a thousand words. Hope this helps someone out, it really isn't that hard at all. I removed the radiator so I wouldn't accidentally cut into it and I had the turbo off of the car anyway so it just gives you more room to work. This also gave me enough room to mount my slim 10" fans as PUSHERS as there was still plenty of room for them. That sure cleans up the engine bay for working around your turbo. If you have any other questions you can PM me and I can explain anything about it to you and would be glad to. Thanks! Enjoy!
Attachments
-
 1 front end off.jpg60.5 KB · Views: 1,173
 -
 2 front end off.jpg54.5 KB · Views: 1,063
 -
 3 PS cooler rerun.jpg44.9 KB · Views: 1,131
 -
 4 flatten bracket.jpg54.2 KB · Views: 1,014
 -
 5 Pass side rad support hole.jpg50.1 KB · Views: 1,056
 -
 6 Drivers side rad support hole w cooler.jpg55.8 KB · Views: 1,044
 -
 7 DS hole w tubing.jpg46 KB · Views: 1,052
 -
 8 Pass side hole w tubing.jpg38.9 KB · Views: 1,018
 -
 9 front side pic.jpg71.1 KB · Views: 1,110
 -
 10 front pic.jpg68.6 KB · Views: 1,065
 -
 11 crash beam cutout.jpg50 KB · Views: 1,088
 -
 12 Drivers mounting tab.jpg49.9 KB · Views: 1,025
 -
 13 Pass mounting tab.jpg47.3 KB · Views: 1,070
 -
 14 top of crash beam.jpg54.9 KB · Views: 1,029
 -
 15 top pic.jpg53.3 KB · Views: 1,062
 -
 16 PS cooler lines.jpg42.7 KB · Views: 1,058
 -
 17 bumper cover on.jpg58 KB · Views: 1,018
 -
 18 front back together.jpg62.2 KB · Views: 980
 -
 19 done.jpg65 KB · Views: 1,013
